

jevans
-
Posts
679 -
Joined
-
Last visited
Posts posted by jevans
-
-
Thanks David. That does the trick
-
I have a 10 sec section of video which I wish to add to an image, together with some other still images. At the moment, the video plays immediately the slide starts. Is it possible to delay the start of the video until part way through the slide time. I can acheive this effect by using duplicate slides, but wondered whether the start of the video can be delayed.
-
Hi Jeff,
Read this for an explanation of your other question:
Best regards,
Lin
Hi Lin,
Thanks. Got it.
Regards
Jeff
-
Hi Jeff,
Yes, I neglected to mention that the "Time Point" needs to be checked, however, I think that's the default.
I can't make Jt's method work on my system. It only moves the thumbnail over the immediate slide to the left but no further. For example, if I try to move slide four into the position formerly occupied by slide three, it simply covers slide three and slide three becomes invisible on the timeline. Perhaps there is a problem with my system or possibly a bug for XP, but I can't make it work without moving the "Time Point" indicator which allows me to move the slide to any position on the timeline.
Best regards,
Lin
Hi Lin,
In the timeline view, if you click on the number above a slide and drag it, you can position a slide in any position on the timeline. It just fits in wherever you stop dragging the point to. However if you use jt's method of hovering the mouse over the starting line of a slide until you get a double arrow then right click and drag, you cannot move a slide past the boundaries formed by the preceeding and subsequent slides (I am using Windows 7). I have just finished a show in which there was an incorrect break in the commentary and I wanted to move an associated slide to another position within the boundaries of the preceding and subsequent slides. So both methods work. I think if I wanted to exchange slide positions, I would do this in the slide list view.
Do you know the answer to my supplementary question of the function of the "hold time points after changes in the slide list" function?
Regards
Jeff
-
In order to follow Lin's way, you have to tick "Time Points". An alternative: Move the mouse until you see the double-sided arrow. The click left and drag.
jt
Thanks jt. That is a slightly better way as the whole slide moves rather than just the timed point followed by the thumbnail.
-
Hi Jeff,
Yes,
Click on the little square slide number, drag and drop. Don't click on the thumbnail or you will drag everything to the right with it.
Best regards,
Lin
Hi Lin,
Thanks as always. These little tips/aspects of operation do not appear to be documented anywhere (shades of our original decision to write the early guide!). So another related question : what is the function of the preference setting "hold time points after changes in the slide list"? Is that to keep the original position of a slide if it is replaced with an alternative image. I have done some tests on replaacing slides with and without the box ticked and cannot see any different sldie behaviour.
Regards
Jeff
-
When working in the timeline view, is there an option to move a slide to the left (together with its attached sound file) while keeping all the subsequent slides at the same position. I notice that there is a function in "Preferences" to hold key points, but I do not think that this is applicable.
-
I think Eric has a good point. If you want to change the opacity of an object, the drop-down box appears opposite the "Blur" adjustment button. Obviously the user knows that they are trying to change the opacity, but at a quick look, it appears that you are adjusting the blur. However there is a limited amount of space for the toolbar and you would not want to reduce the area for adding additional images/objects
-
Please pay attention to the attached demo project.
Try to change slide duration. Set 15 seconds, or 30 seconds.
You can see that all animation on a slide was proportionally scaled with a new time.
New option 'Scale key frames in objects' gives great possibilities.
Igor,
Works just as it should. This is a useful facility.
regards
Jeff
-
Firstly I apologise if the following actions are already well known to forum members : maybe they were all existing features which I had not spotted. Also I am aware that some of the hotkey actions are given in the User Guide. However last Saturday I attended a local AV day, and during the day, we looked at the new Version 8.0(with a Forum contributor fh185) and a number of functions in the timeline were demonstrated of which I was not aware. It seems to me that these might be of general interest to forum members, so I list them below :
1. To zoom the timeline view horizontally use :CTRL + mousewheel
2. To zoom the timeline vertically use :CTRL + SHIFT + mousewheel
3. To delete a keypoint on a sound file use :Right click
4. To hear an audio file, click on the file in the folder window then single click on the icon in the preview window.
5. To add an audio file to a specific point in the timeline and on a specific track, click on the file in the folder window and drag to the required location.
6. Audio files can be dragged between tracks.
7. Click on the top right of an audio track and drag to the left. This will fade out the track.
8. Drag one audio track onto another. This will produce an automatic cross fade.
The new timeline is fantastic. If you have not tried it then you should do say ASAP. I hope I am not "teaching my gradmother to suck eggs"!
-
I purchased and used often some of the wonderful styles TheDom for my presentations.
Let me know if you can import these styles in the new PTE 8.0, which has the function of management styles.
In this way would be much easier to apply these styles in new projects.
If so how?
Thanks
Carmelo
1. Open a new PTE project using Version 8.0.
2. Put any image on the slide line (this is just so that the "slide styles" button is not grayed out)
3. Click on the "Slide styles" button to open the styles dialog box.
4. Click on the "Tools" button and select "Import Style".
5. In the files dialog box, naviagte to the folder where you have downloaded Dom's styles and select a style.
6. click "open" and the style will be loaded into PTE for future use.
Please Note : The original style file will remain in the folder you downloaded it to. The imported style will be created in PTE readable form in the directory specified in "Settings/Preferences/templates".
Hope this helps
-
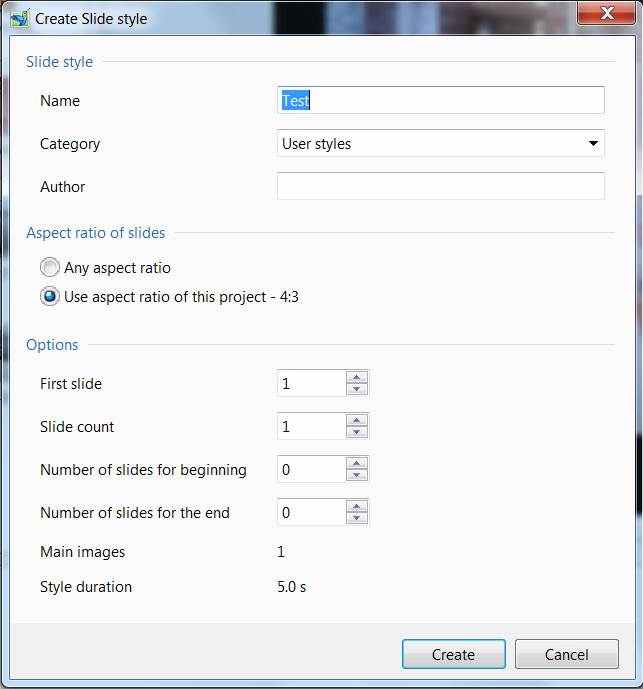
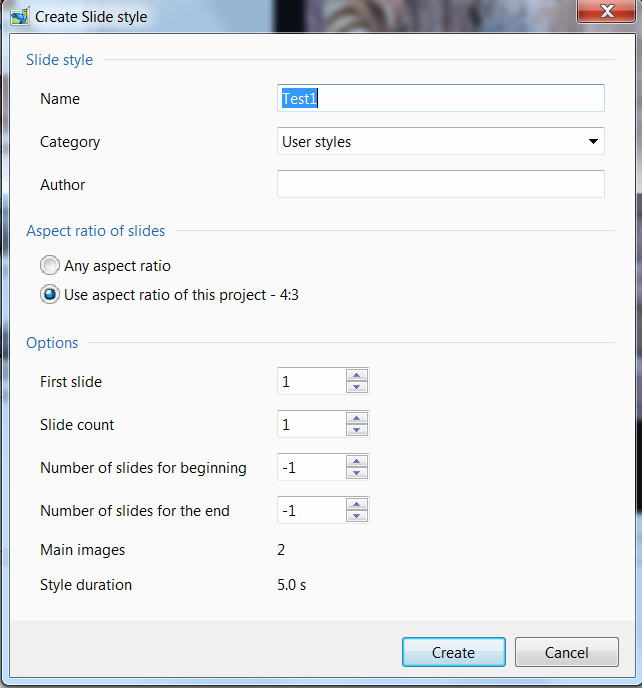
I downloaded the crystal ball style and imported it. When I try to apply it to 2 slides it says that it needs 2 images and that I used 2 images. Then it creates 4 slides using one of the images twice (at the beginning) and creates a blank slide as the 4th slide. When I try to apply it to 4 slides it says that it needs 4 images and that I used 4 images. This time it creates 6 slides and, again, uses one of the images twice (at the beginning) and creates a blank slide as the 6th slide. In both cases the first slide does not actually include the image that appears as the name of the slide in the timeline.
This could be:
My total failure to understand the new "Slide Style" feature;
a bug in PTE (I'm using beta 4);
a bug in the style itself (which I doubt as thedom is one of the best PTE experts in the world).
So I posted this here instead of reporting it as a bug. Either way it is very confusing to try to apply a style in one case and see that it needs 2 images and in another case and see that it needs 4 images and in both cases to see it create neither 2 nor 4 images.
Is anyone else finding all of this confusing?
potwnc,
I don't want to confuse things, but here is my contribution as I have struggled with this initially.
If you use two or more images on a single slide to make a style, then you must ensure that the box "Main Image" is ticked for ALL the added images. If you add two images but just have "Master Image" ticked for one image, then when you apply the style to two images which you have added to the slide track, the result will be two slides each formatted with the style. If both the images you originally added to make the style are both selected as " Main Image", then when you add two slides to the slide track, you will get a single slide formatted in the required style. attached are two version of the style dialog box. The first is what you get when you add two images to a slide but only one is selected as "Main Image". The second is what you get when both images are selected as "Main Image".
Hope this helps and does not confuse.

-
Gary,
Regarding your first point. Assume you have just created a style. The creation process includes an automatic save and coded stlye files will be saved in the specified default "style folder". In PTE the style will be visible to you under the name you used to create it, e.g. "My style" (although I assume in pratice you would give it a more descriptive name). Where the style is actually stored is only relevant for backup purposes and the fact that the folder has no obvious reference to the actual name is not important.
Now say you import one of Dave's styles. It will have a style name, say "Octogon" and when you import it, the actual name will appear in the style dialog box and the import process will result in the creation of another coded folder in the default styles location where details of the style "Octagon" are stored.
Now I agree with you that it might have been useful when creating the folders for storing styles, to use the name that the creator allocated. But in practice I do not see that it is too important. Once you understand the process, it becomes obvious. It fooled me at first until I looked at what was happening more closely.
Of slightly more concern is understannding the setting parameters of a style. That took me a little longer to figure out and needed a little play with various alternatives to see what the various settings were for.
Hope this helps
Jeff
-
Greetings,
I am trying to understand the Slide Styles/Tools menus. But I don't.
1- I open Slide Styles. I choose Tools/Create/Create. Where is it saved to? It was saved as ‘My style’ but I cannot locate it anywhere on my PC.
2- I open Slide Styles. I choose Tools/Export. What happens? Where was it exported to?
3- I open Slide Styles. I choose Tools/Import. It goes to 'Libraries/Documents'. There is a 'PicturesToExe' folder with a subfolder 'Slide Styles'. It has a subfolder with a long string of unknown number. I have no idea what this is. It is not the name of the Style that I Created or Exported.
4- So then I go into Settings/Preferences/Templates. I see that there is a 'Custom Slide Styles' folder that can be set. The default shows 'C:\Users\myname\Documents\PicturesToExe\Slide Styles'. This path does not exist on my PC, nor does it relate to the path indicated when I try to Import a Style.
What is going on here? Can someone explain?
Also, I think the setting of the Custom Slide Styles that I find in the Templates should be located in the Slide Styles menu where you are going to actually Create, Import or Export the Style.
Gary
Hi Gary,
Hopefully here are some answers.
1.Styles you create are saved in a user directory. On my Windows 7 computer this is :
C:\Users\Jeff\Documents\PicturesToExe\Slide Styles
The styles seem to be saved in a coded form. So looking in this directory you just see a series of numbered folders, each one containing a style that you have created. The only way to see the actual style name is from within PTE. Also see the menu item in PTE (settings/preferences/templates, and you will see the default location for tempates and styles and you can change these to suit yourself.
2.If you create a style and export it, then you get the standard "save as" dialog box which allows you to choose where to save the style to.
3. If you export a style, it saves the file as a *.ptestyle type file. Then someone else can import that file into their PTE project. The location of the style file is up to the user. For example if you download one of DG's excellent styles from the forum and save it to your "downloads" folder, you can then import it into PTE from that folder. Or you could move the style file to some other folder of your choice and then import it. When you import it, it will be saved into your default styles folder.
4. I got caught out by this one initially. On a Windows 7 computer, if you look in Windows Explorer for the deafult directory, you will see that the folder can be found here :
c:/users/Jeff/My Documents/PicturesToExe/Slide Styles, instead of just "Documents".
re your last point, I agree that would make it a bit easier to find.
Regards
Jeff
-
I have just finished a 6 minute show with 3 music tracks and associated commentary and I cannot speak too highly of the improvements provided in Version 8.0 compared to previous versions : I used Version 6.5 for my last show.
The improvement in the usability of the timeline is fantastic. No longer do I need to assemble composite tracks in my sound editor but can insert the required tracks directly. Individual comments for slides can be prepared and, most importantly, attached to their associated slide. This provides a huge benefit when doing final edits. Tthe timeline can be expanded upwards to reveal all the tracks and the "rubber banding" of each track works like a treat. Also the ability to create slide styles is a huge time saver. I am very impressed. Well done Igor and his team.
Jeff
-
Hi Jeff,
Thanks for checking it out!!
Glad to see you back on the forums!!
The text effect is done by adjusting the 3D parameter "Pan Z." In this particular example, a setting of -17 produces the distance from the rotating cube. If you put in two images as "objects" in the objects list and position them very close to each other, then set the 3D horizontal axis for each to about 45 degrees and play with the Pan Z value for one of them you will get a feel for how it works.
Best regards,
Lin
Hi Lin,
Thanks for that explanation. Somehow in your demo on my machine the text still seems to have a 3D appearance even when the cube is face on (obviously not true!). But after experimentation I see now that it is just the distance between the objects on the Y axis that gives the illusion. Whilst most of my shows are just straightforward and I tend to rely on the quality of the images and perhaps also the story for the main impact, I must lok at some of your tutorials again as the example shows you are posting have some very attractive effects which I am sure can be used to enhance the overall presentation. Thanks again.
Best regards
Jeff
-
Been working on a little project and thought it might be interesting to demo some of the amazing possibilities with PTE. Not that it's anything really useful for most slideshows, but just shows a little of what's possible with this unique software.
I don't believe this can be done with any other presentation slideshow software. This was done "entirely" with PicturesToExe.
One thousand seven hundred twenty eight independent displays running videos simultaneously on the six faces of this rotating cube. It's part of something else I'm doing, but I thought it might be interesting for some.....
Link to zipped Windows Exe - about 50 meg
Lin
Hi Lin,
Glad to see you are still keeping up your very high standard of PTE function demonstrations. This is very impressive and it runs as smooth as butter on my machine. I am just getting to grips with all of the additional features of Version 8.0. How did you make the text stand out from the cube background. I assume it is a function of the 3D parametes but, experimenting with them did not produce the result that you achieved.
regards
Jeff
-
Jeff,
Having designated your Styles Folder and Created your style it is no more than a set of instructions which are applied to a main image which you APPLY it to.
If the Style contains Non-Main Image elements such as a Background then that BG is just a reference to an Image location on your PC.
In order to send that Style to someone or post it here you need to EXPORT the Style to a location on your PC. It then contains the BG Image and its size reflects the size of that BG Image.
You can then send the .ptef file to another computer and/or post it here and the BG will be the same for anyone who uses the Style.
I hope that also helps?
DG
P.S. When you open the Slide Styles dialogue and choose a potential style the mini-player will tell you immediately if you have an error or are trying to do something which will not work.
Thanks David and Peter for your quick replies. All is now clear
Regards
Jeff
-
Firstly just to say what a great improvement version 8 is. Generally I have not updated to quickly to the most recent version as the facilities in Version 6 have met my needs. However Version 8 is a huge improvement, particularly (for me) the "slide styles" which will save hours of repetative work. Congratulations to Igor and his excellent team.
I have a basic question about the location of the slide style files. With The Dom's excellent templates for text shadows, his template file replaces apr_shadows.ini in the directory C:\Users\Jeff\AppData\Local\PicturesToExe\Versions\7.0 (at least on my Windows 7 machine). So far I have not created any styles of my own yet, but downloaded Dave's sample style to try and just put it in a temporary directory and was able to locate it and load it into a Project file to try it out. Presumably templates that you creat yourself will be saved in a related PTE directory (e.g. as above) and thus perhaps that is where you should store any imported styles obtained from others. I see also that, once imported, the styles remain in the basic PTE program so that they are available to all future projects. So the program must store the style locations.
Jeff
-
Hey Jeff,
Welcome back!! Where have you been hiding???
Best regards,
Lin
Hi Lin,
Part of the answer is that we had a major house move in 2010 which had a significant impact on the time available for photography. Also I have been concentrating on prints and print competitions and have not done any significant av work for some time. Any av work has been done with older versions of PTE which I have felt very comfortable with and have not needed to use the forum much. However as you see I have just upgraded to the latest versioin and and finding my way around. I see that the forum is just as good as ever and replies to questions received with lightning speed. Hope you are keeping well and enjoying your av work.
Best regards
Jeff
-
Hi Jeff,
It just shows an animation when you move slides in the Slide List View.
Tick it & then move some slides around & you will see what happens.
If it is not ticked then when you move a slide it appears as it always has done.
Jill
Hi Jill,
Thanks for your quick reply. I thought it referred to animations within a particular slide. however all is now clear
Jeff
-
It comes under Video for Mobile Devices?
DG
Thanks Dave. sorry I should have spotted that. Thanks for your rapid reply.
-
Just upgraded to Version 7.5.10 and have a question regarding the "Preferences2 menu "system". There is an option to "show animation in slide list". Maybe I am missing something but this does not seem to change the appearance of the slides in the list whether it is ticked or not. What is the function of this option?
-
Apologies if this question has been answered before. Just upgraded to Version 7.5.10 and note that the "Publish" menu has changed and there is no longer an option to produce video output for ipad devices. I have a Samsung 10" tablet running android Version 4.1.1. Is it possible to produce a version of a PTE show that will run on this device?
Time Line
in PicturesToExe 8 Beta
Posted
Barry,
I do not know if thisis relevant but So far I have had no problems controlling the timeline play until I chnaged the scroll mode to "autoscoll 2". In this mode it is difficult to stop the player.
regards
Jeff