

cjdnzl
-
Posts
588 -
Joined
-
Last visited
Posts posted by cjdnzl
-
-
===========================
I am in the same boat. I just have not found a use for LR. I tend to stick with Photoshop CS5 (for Levels and UnsharpMask) and a few other programs to rename/resize images. I like the Viveza plug-in, too, but only for its 'Structure' tool. But I went through a bunch of the tutorials that have been posted here and it made me learn a few things, so I might be getting into LR a bit more. I finally figured out how to "save" an image in LR....I mean 'Export' an image and Rename it. It is not a very intuitive program but it looks like I have to work a bit with it with much patience. So thanks to all the postings for the kick in the pants that I needed.
Gary
Likewise here. I have had several attempts at getting to grips with LR, but I just don't like it. It's fussy about the source files, doesn't like me taking them straight off the card, wants to put them into some sort of index, etc. and the controls are all sliders which I don't like all that much.
My usual modus operandi is to process raw files through DxOptics which identifies the camera and lens from the exif data, and applies the appropriate linear, sharpness, tonal, noise reduction and exposure corrections automatically. With, I might add, excellent results.
After that, tweaking and cropping in Photoshop completes the image work. Finally, if I am printing for exhibition, I use Qimage for superior printing.
Nowhere in that chain of processing can I find a slot for what LR does, so basically I bought LR on reputation which hasn't lived up to my personal way of working.
-
Colin,
I'm afraid you are giving out of date advice there! For new purchasers of PTE, there is only the one product: PicturesToExe Deluxe. There is only one key and it unlocks the entire product (or should do). As from v7.0 the licensing arrangements changed. Those who first purchased PTE at v7.0 or later have a licence that is valid for all future releases of v7.x.x. When v8 of PTE is released they will need to pay an upgrade fee (less than a full purchase price) if they want to upgrade to v8.
Cancaya,
Go to the Wnsoft website and raise this problem through the Support option: www.wnsoft.com/support/. You will probably be sent a replacement key.
regards,
Peter
Hello Peter,
Oops, I hadn't realised the changes there, as I haven't the need to make DVDs, and just upgrade as improvements come along.
I shall do a bit of catching up, just to remain au fait with the program.
Apologies,
Colin
-
Hello, today I bought the delux PictureToexe vesion 7.5.4 and mailed me the key. I copy the key and active.
I got a message: Thanks your password has been correctly loaded, please click OK, exit and restart the program again.
But, doing that, the system asked me the key again and did not activate the deluxe version.
The de luxe version requires a separate key to activate that part of the program. The key you received was to activate PTE for making slide shows in executable format (.exe files) which will run on any PC, but if you want to make DVDs you need the key to activate the de luxe facilities.
The basic key to activate PTE is a one-time purchase and will activate all future PTE versions, but the de luxe key needs to be purchased anew whenever a new version of PTE is released.
-
I made a mistake and did not save my final version before converting to a .exe file so is it possible to go back the other way ie reverse this process please?
If you still have the Project.pte file, you can with a bit of work, recover all the information you need to rebuild the show.
It's fairly simple to recover the filenames of the images in the order that they appear in the show, and with a calculator you can recover the duration times for each slide.
Things like fades, zooms etc. may be more difficult, but if you have the images in order and duration times the you will probably remember those.
Good luck,
Colin
-
Fantastic show, Deepak, and your photography is first class. Hugely interesting images, putting the viewer right into the scene. I felt I was actually there, could almost hear and feel the ambiance, the atmosphere. Nothing short of dramatic photography!
I know exotic places lend themselves to exotic photography, and I have been to a few exotic places as well - but I have never imagined or gotten anywhere near your expertise with a camera.
I agree with the comments about zooming, but that is simply a matter of technique with PTE that you will pick up easily, I should think.
My overall impression? BRAVO!!!
-
Do not be concerned that you feel disadvantaged here. Most of your posts will be understood by the majority of members.
I’m sure that nobody will think you a dumpkopf.
Please do consider what you are trying to convey though, as jumping in with ‘Jack Boots’is not always recommended.
This will be appreciated by all and no doubt, things will read much better for you in future.
Regards,
Davy
Davy,
I have to support Xaver here, as his reply to your first post was implying that Audacity would be sufficient for the kind and quality of the sound tracks on shows of yours that he has seen. He may or may not have been 'taking the mickey', but in any case he wasn't referring the the video part of your shows.
For the record, Xaver's English is very good indeed. I wonder whether he may have spent time living in an English-speaking country.
I have a German friend here in New Zealand who has lived here for more than 30 years, and his English, while good, is not as good as Xaver's.
-
Why would I want to use anything off YouTube? I refuse to use copyrighted material without proper copyright clearance. Everything posted on YouTube is copyright of the author (and maybe even of a third party if the author has illegally copied something into their video). Neither will I use material of a technical quality that is inferior to that which I can produce using my own equipment. Most of what I have seen used from YouTube is of a very poor technical quality (i.e. low resolution).
YouTube is not my scene. In many respects I'm a Luddite. I do not use YouTube, Facebook, Twitter, LinkedIn, Flickr or any other so-called social media web services. As far as I am concerend they are the greatest timewasters ever devised.
regards,
Peter
Not to mention downright dangerous to your internet health!
-
Barry
IMO anyone who posts their shows on public sites is obviously giving people permission to download them. <snip>
Yachtsman1
There is a big difference between downloading a show for personal viewing and downloading a show for subsequent club or even public use.
I think permission for personal viewing is implicit with the posting of a show, but permission to show somebody else's show is not necessarily implicit, and permission should be sought, along with the circumstances under which you intend to use the show.
Although not usually mentioned, copyright exists for every show, and public showing of someone else's work could be said to be infringing their copyright.
In every case where I have used another's show at club level I have sought permission along with how I wish to use their show. I've never been refused, and the authors have been very pleased that I did so. And I always tell the audience that the show is the work of the author and not mine, so I don't get embarrassing questions about where the shots were taken or how I did such and such an effect.
-
Hi Colin,
Have you been able to get them to work and such? Forbes says it's not correct here - that it is a misunderstanding....
http://www.forbes.co...tions-for-free/
Best regards,
Lin
Hello Lin,
Forbes may well be correct, but if so it's an incredibly stupid move by Adobe, I should think.
Yes I have downloaded CS2 and others with no problems.
Adobe do not ask for any ID whatsoever, just click and download. Surely, if Adobe wanted to restrict it to legit owners of the program(s) they would have asked for ID or registration details. They must realise what will happen with absolutely no checks, so maybe they don't mind. Maybe they hope that by allowing people to experience the software they might generate sales of the current versions?
Regards,
Colin
-
Adobe are offering free legitimate downloads of their older software here:
http://www.adobe.com/cfusion/entitlement/index.cfm?loc=en&e=cs2_downloads
You might have to try a couple of times as the website is getting heavy use.
I have downloaded CS2 and Creative Suite CS2, and will get some others as well.
Regards to all,
Colin
-
It can be done now if you use PTE's ability to create layers in the Objects and animation screen
Image 1 would be added in the usual way, but image 2 would be added via the Objects and Animation screen. Using keypoints you could then determine that slide 2 fades up to (lets say 50%) and holds there for a second or two. (Mid fade hold) Then fades up to full intensity. It would require 4 keypoints at least.
From the first keypoint to the second you use the opacity in Objects and Animation to reduce opacitiy of the second image. Between Keypoint 2 and 3 you hold and do nothing for the time you want both images to be seen together. From Keypoint 3 to 4 you use the opacity control and bring the second image up to 100%
The better news is we can do this far beter now with our image editors and actually create a third image, a derivitive of the the original two. The reason it can be much better is that in the old days we had no control over what part of the two images in mid fade showed up well. Now we do by creating a real third image. In addition we have all those blend modes in Photoshop and Elements that allow us creative control of our third image and if that wasn't enough we have masks too.
way of creating a third image was a bit clumsy compared to what we have now. In fact t opens up a whole new slide show technique.
This is another argument against the call for Igor to improve/expand/add features to image editing within PTE as a recent thread was about.
I believe that advanced editing of images - and sound, for that matter - is best done in image and sound editing programs rather than trying to do it all in PTE, as Barry has said above.
-
Desaturate image - keystrokes anyone?
Best regards,
Lin
Geez, Lin, that's gotta be the broadest question I've seen yet! What program are you wanting the keystrokes for?
I'll hazard a guess at Photoshop - in which case there is a fantastic plug-in that allows you to individually control the conversion of all six primary and secondary colors, or alternatively you can select from a range of black/white film emulations. I use this whenever I do a 'desaturation' - but it's far better than just a simple desaturate.
Have a look at http://www.photo-plugins.com/Plugins/Plugins/B-W-Conversion.html
Download is available at the bottom of the page.
Regards,
Colin
PS: Duh! I didn't think about PTE having a desat function.
But, true to my beliefs, I think all manipulation of images (and sound) should be done in the best program for the job, instead of Igor having to reinvent the wheel in PTE. Just my $0.02 worth

-
Well, I vote "no" for this idea.
Basically, I am opposed to adding virtually endless 'features' to a piece of software where the add-on is not part of the fundamental program design.
In particular, there have been calls for PTE to handle complicated audio functions which are already handled by more comprehensive software like Audacity or GoldWave, both of which are ahead of anything that may be built into PTE, and the same goes for handling images as well.
Photoshop and Lightroom, along with freebies like Gimp and Irfanview can do far more with images - including auto-resizing - than could be done with any reasonable addition to PTE. I think we should not ask Igor to spend time on peripheral issues which will take him away from continuing development of PTE.
In my own case, I assemble the sound track in GoldWave, with fades and changes, and accommodating voice-over where needed, all into one composite sound track, and import that track into PTE.
I process my images out of the camera through DxOptics Pro, then titivate any images that require individual treatment in Photoshop or Irfanview, then batch resize, converting to DNG images at the same time before importing them onto PTE.
I keep a folder for each show holding all processed full-size images. Then I resize to fit the chosen screen ratio, and proceed to assemble the show itself.
If I decide to alter the screen ratio, all I need to do is to resize the original images to the new size, drop them into PTE, change PTE's ratio, job done.
-
PTE should take into account MONITOR PROFILES , which have been generated for the monitor by products like Datacolor Spyder , Xrite I1 Display Pro etc.
This is required to view the pictures in exactly the way they were overworked in products like Adobe PS CS5 etc.
EXE-Files should behave in the same manner - if there are issues with feasibility or performance , a workaround could be to incorporate the Monitor profile during EXE-generation .
I am convinced that PTE would benfit a lot from the proposed extensions .
Thanks - Paul
I'm not sure what you're getting at here, but realise that a calibrated monitor has its profile stored on/in the graphics card. The purpose of the calibration is to make an image on the monitor show the correct colors for the chosen color space, in PTE's case sRGB. This is because the bare unprofiled monitor may/will show inaccurate colors due to spectral characteristics.
When PTE - or any other program that is not color-aware delivers an image to the computer, the monitor always uses the profile to correct the monitor deficiencies, so all images shown should be correct.
If your images use a less common, e.g. AdobeRGB profile, or way-out like prophoto, then your sRGB-tuned monitor will show you relative garbage.
Stick with sRGB unless you really know what you are doing. sRGB is the standard for good reason, and it was not designed by dummies. And, for what it's worth, even if you are erudite enough for that, your audience most probably isn't, negating all your work.
When all is said and done, the aim is for pleasing color and not necessarily accurate color which may not be so pleasing.
-
I just downloaded the image from your second post and looked at in PTE 7.07. Image was normal in preview, and normal when running the resultant exe file. Running XP here.
Photoshop said the image is in AdobeRGB, but that should make little difference for this purpose.
-
The Attachment of the image without the color cast did not work, I have put it also in Dropbox, see: https://dl.dropbox.com/u/12297675/Bert_110803_0013_0_1_2.jpg
Bert
It seems the colours are inverted, i.e. the orange colours of rust are turned blue, and the blue writing on the back wall has turned orange. These colours are spectral opposites, so I think your problem is the colour space the images are in.
You need to load the images into Photoshop or similar and ensure that the colour space is sRGB, which PTE is set up for. If you are shooting for slide shows you should be taking the shots in sRGB, not AdobeRGB
To help you further, could you tell us how the shots were taken, and what afterwork was done to the images?
-
The De Luxe product key unlocks another part of PTE to allow the making of DVDs for showing on TV sets. The Standard program contains the full program to make slide shows for showing on a computer and through a digital data projector.
The Standard program is a one-time purchase with free upgrades for life, the Deluxe needs re-purchasing whenever an upgrade happens the the Standard program.
-
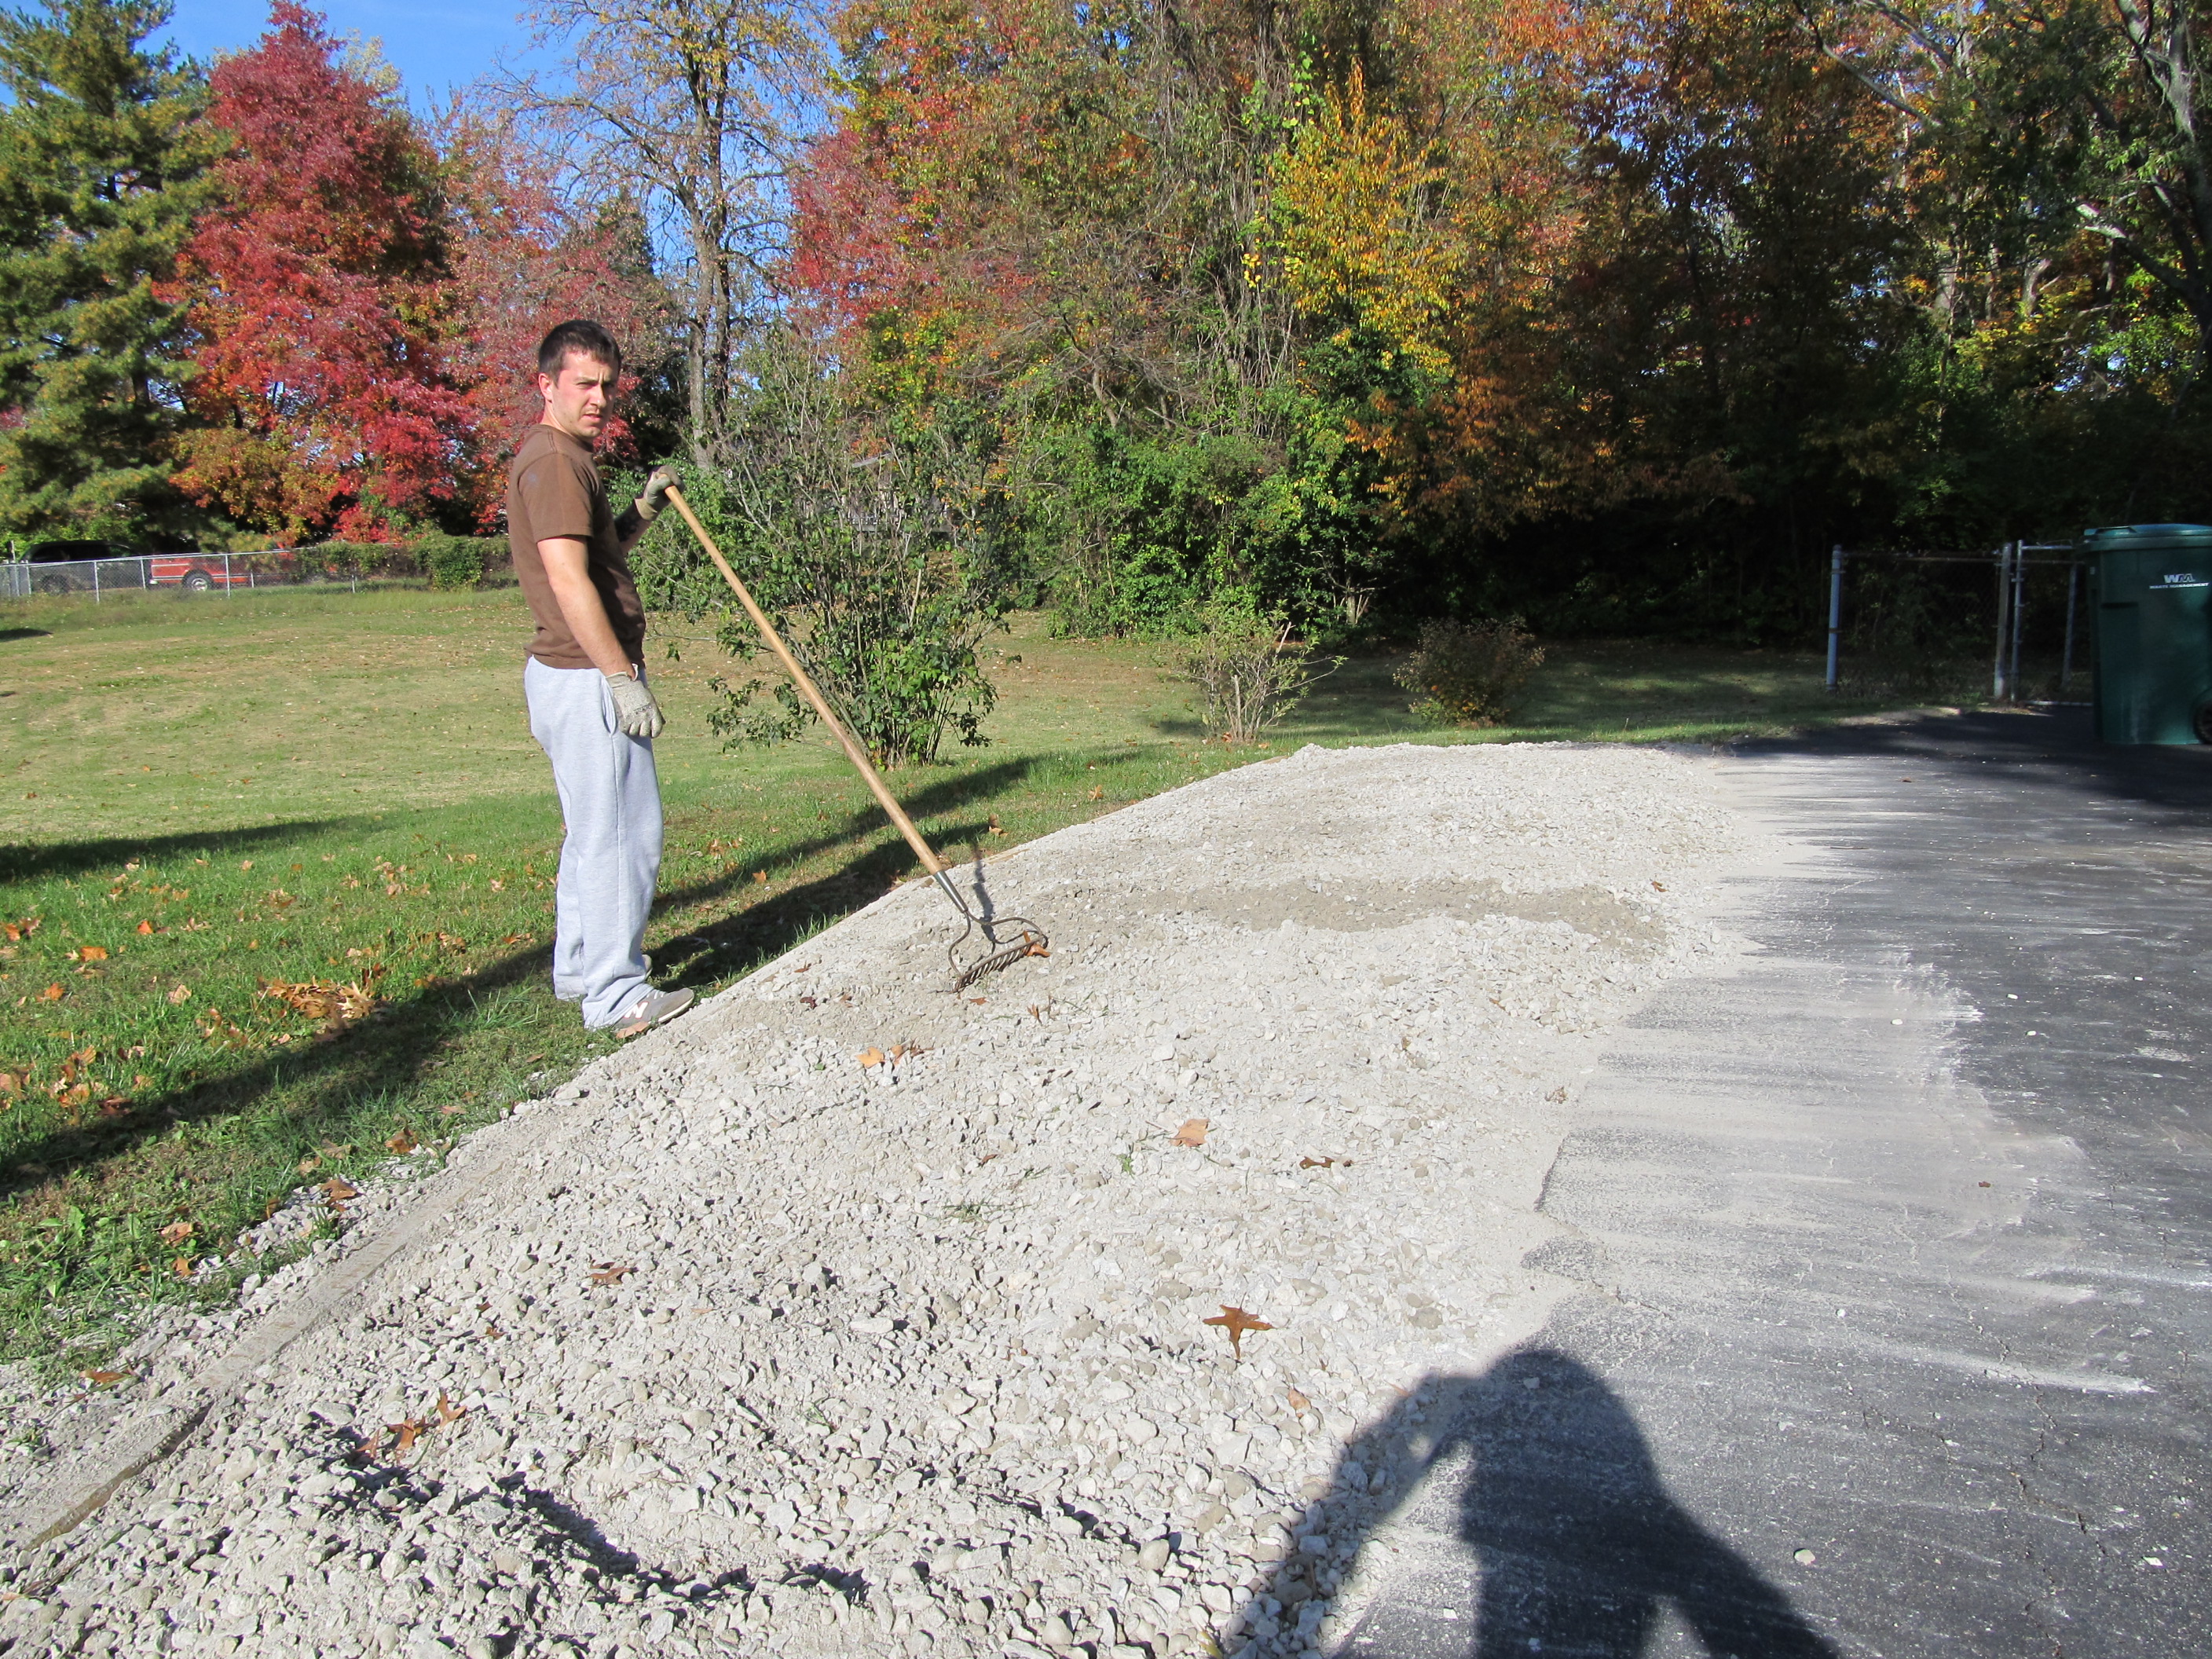
FYI- I meticulously cleaned the lens and took some more shots today.
Here is one with plenty of contrast and bright light with deep shadows.
Lots of fall color.
We were adding a new parking spot at my son's house.
It is not back lighted as my original complaint but it is very bright sun.
I think much of my problem was a dirty lens.
Other suggestions by many of you here will also be implemented by me
as I learn to use this camera.
I think you've cracked it. That garden shot is much sharper, and the detail right under the bushes is very good. I'm reminded of an old adage I learned 50 years ago - "Always keep your lens clean. This does not mean always keep cleaning your lens."
Good work,
Regards,
Colin (New Zealand)
-
The Fed Ex driver delivered my (gently used) camera just as we were preparing to bug out for a nice camping weekend.
I had already charged 2 pair of brand new Ansmann hi capacity NiMh AA batteries and had a new 16Gig memory card so
I was ready to try the camera.
We spent 3 days trailer camping at Mammoth Cave National Park in south central Kentucky, USA.
This park would be a great park even if it didn't have the largest cave in the US under it.
The park is also 56,000 acres of mostly un-touched natural forest.
It has miles and miles of hiking trails.
Now I have questions about this camera --
I know that any photo that is back lighted is a bad thing but sometimes you don't have a choice.
Either take the back-lighted shot or take no shot.
I have an example with a question.
Here is a tree with a huge gall on the side of it.
We thought we could imagine the gall as a bear cub holding on and looking at us.
In the first shot I am shooting with the camera on automatic mode and the lens is not
zoomed at all. I guess it's a wide angle shot.
Even tho there is a bright overcast sky behind the tree this photo looks pretty good.
In the second photo, I have zoomed all the way in at 12x to show a close up of the
tree gall that we thought looked like a bear cub.
In this shot taken from exactly the same spot, there is a lot of milky fog around the
photo.
I don't think my fuji camera would have done this. At least not this bad.
I have a couple of other examples I can post but this one is typical.
Is this milkyness normal?? Could I have used some other camera setting
and avoided some of this effect??
As always, I appreciate your comments!
I copied your tree image into Photoshop and had a good look at it. The first thing was that the shadows were too bright, but restoring the tonal range to put the dark tones where they should be was not entirely successful in terms of the image. There might have been an element of overexposure due to the dark trunk fooling the camera into overexposing, but that's not the whole story. There is an overlay of flare, or uniform light over the entire image. Flare is usually caused by shooting into the light, but in this shot there really isn't enough back light to cause much flare.
I have concluded that there was something wrong when you took the photo. Perhaps the atmospheric conditions caused some condensation on the lens - was the camera cold, did it come out of a cold trunk in the car? in which case it could be condensation. Or, is the lens clean? It doesn't take much grease on a lens to produce rampant flare.
Lastly, the images appear none too sharp. Perhaps you have reduced the image quality a bit too much with jpg compression. I'm hoping so, otherwise you could have sharpness problems.
Perhaps you could set up some controlled shots, frontal lighting, side lighting, and back lighting, checking the lens to be sure it's clean, and make a judgment about the camera after that.
-
Hi Leo
You need to crop your original images to 1920x1080 or an aspect ratio of 16-9. My Panasonic FZ150 can be set to take pictures of various aspect ratios which is one of the reasons I bought it. So I start off with an image of that aspect ratio 16-9. I don't know if you can do this with yours, you mention 4-3 aspect ratio which most domestic DSLR's use. With bridge cameras & high end DSLR's the aspect ratio can be changed in camera. If yours can't be set in camera, you will need to crop your images to 16-9 aspect ratio. When I used DSLR's I had to change my photography technique to compensate for my images being 4-3 & allow for cropping in processing. The other alternative is to re-size your original image but you will see a black box or black bands when viewing on a widescreen TV. Hope that is clearer.
Yachtsman1.
Just a small correction, Eric. Compacts are generally 4:3, as are the odd-ball Olympus Four Thirds system cameras. Regular DSLRs - Canon, Nikon, Sony, Pentax, etc., specially the high end versions, are all 3:2 ratio, and I don't know any that has variable ratios. A 3:2 ratio image is 16:10.6, so a crop to 16:9 isn't all that drastic, much better than cropping a 4:3 image.
Regards,
Colin.
-
Hi Igor
As I said in my first post, the clip is under 6MB, see my attached screen shot.
Regards Eric
Yachtsman1.
When you upload a file the data is sent in packets of typically 1500 bytes, with header, numbering, and address information added. These additions have probably taken your file to >6MB. A 9% increase will take you over 6MB, and some transmission protocols can add up to 30% to a file.
Colin
-
Hi Dave,
Will do as you suggest, but don't know where to find colour settings. Edit file opens the image in Photoshop where it looks fine. Help appreciated.
Ian
Check the metadata for the image and ensure it is set for sRGB. There is another thread in this forum with a similar problem and they found their images were unspecified.
Colin
-
For PC and Mac top of the page
Beautiful black&white images, Barry. You say you spent some effort on the BW conversions, It looks like a lot of work was done there.
There is a free plugin for Photoshop from Photo Plugins that does BW conversion, emulating various different BW films like FP4 and others. If you're interested, look here: http://www.photo-plugins.com/Plugins/Plugins/B-W-Conversion.html
Colin
-
My camera club recently bought a new projector, a Dell 4320 DLP machine, was lucky to get a $700 discount, about a third of the price! Native resolution is 1280 x 800, brightness 3,600 lumens - it's BRIGHT! I think it can handle 720p images, and will handle 1080p with good quality.
The colors are miles ahead of our earlier Epson LCD machine, and one can select from several colour options, including sRGB which is standard in this country for New Zealand Photographic Society functions.
No-one in the club can see any fringing reputed to happen with DLP machines, so I don't think that would be a problem.
We are very happy with it.
DVD Compilation Time
in General Discussion
Posted
I have just bought the De Luxe DVD option for 7.5.4, and compiled my first DVD show. I normally only compile exe's so this is a first for me!
But, it took around three hours or more to produce the DVD, which surprised me somewhat, considering the speed at which exe's compile, a few seconds in this instance.
Ok, the computer is older, but is a 3.3GHz P4 Pentium cpu, still pretty fast even today; memory is 4 GB, and when I checked the cpu usage it was around 50 - 60%, so not bottlenecked there. GPU is an nVidia Geforce 6600GT, again older, but not too slow, it will run everything I throw at it.
So, is this 3-hour compile normal, or is there something I have overlooked? I changed nothing in the setup options, just altered the title on the menu page.
The show is comprised of 99 images, all sized to 1080 x 1920 or narrower depending on the image, no zoom/pan/rotate, slide duration 9 seconds, 3 seconds dissolve, and the exe file size was about 61 MB.
Any comments gratefully received.
Colin