

isabel95
-
Posts
238 -
Joined
-
Last visited
Posts posted by isabel95
-
-
You didn't mention what application you use to record voice. I haven't figured out how to do that with Audacity, and Windows Vist Sound Recorder only saves as a wma, which Audacity won't read.
Isabel
I realise that this isn't strictly a PTE subject. But adding voice-over to music and images takes AV work to a new level of complexity. In the attached document I've tried to pass on some of the things I've learned along the way (sometimes learned the hard way - by trial and error!)
-
I totally agree with you about zooming being overused...in fact, when someone directs me to a presentation that has a lot of zooming and panning, I stop it before I get totally annoyed. The effects have to be used judiciously, just as one should not have every transition available used within a program. Up to this point I have been using only fades, but with 17 month old twin grandchildren that I see very infrequently, I like to make a presentation from the images I shoot when I see them and want to make some memorable more polished programs.
Yes...less is really more when it comes to creating a mood!
Quick question - I've been watching your tutorial information on your Australia program and tried to add a voice track in Audacity but find that Windows Vista Sound Recorder only saves in WMA format. Didn't XP save as a wav? What can I use as a sound record for that voice track (I noted that your commentary was pre-recorded and brought into Audacity, and not recorded from within Audacity (haven't figured out if that is even possible).
Isabel
Isabel
I am glad the tutorials are meeting your needs and you already have been given the answer to zooming in on an image, but here is something to consider. There are those who feel movement such as a zoom adds interest to an image and those who feel it doesn't. It probably depends on the style of show you are putting together. If your aiming to capture a mood or an emotion in your show, then animation and effects can have a detremental effect. (in my view of course, others will feel differently about this)
If your looking to create a slide show that may be described more as a presentation, then animation and zooms are great. We see them every day on TV
If you are aiming to capture a mood or an emotion in your show, I would say be careful when zooming into or out of an image as many of the examples I have seen are way over the top. (in my view of course, others feel differently about this too) Zooms that go on too long can be boring, we have already seen the image on screen, so to slowly zoom way into one part is often unecessary. Keep your zooms/animation delicate for these types of slide shows and you may find you can have your cake and eat it. In other words retain charm, appeal and avoid the pitfalls.
For a slide show that could be described more as a presentaion, then it is an entirely different thing.
The white line inclusion within PTE is a great addition, but of course you have to visit every image in your slide show to apply it and if you change your mind later it is rather a pain to visit every image in the show again to change it. As you have discovered, a Png frame/line is quick to apply and it is changed easily in one go no matter how many images your show contains. I hope in time we can choose a line or animation from within PTE and apply that to every image in our show in one operation.
-
Ahah! Thanks. That's higher math for me - not one of my strengths!
I found Lin's video tutorial tremendously helpful in understanding what's going on.
Isabel
Isabel,
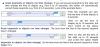
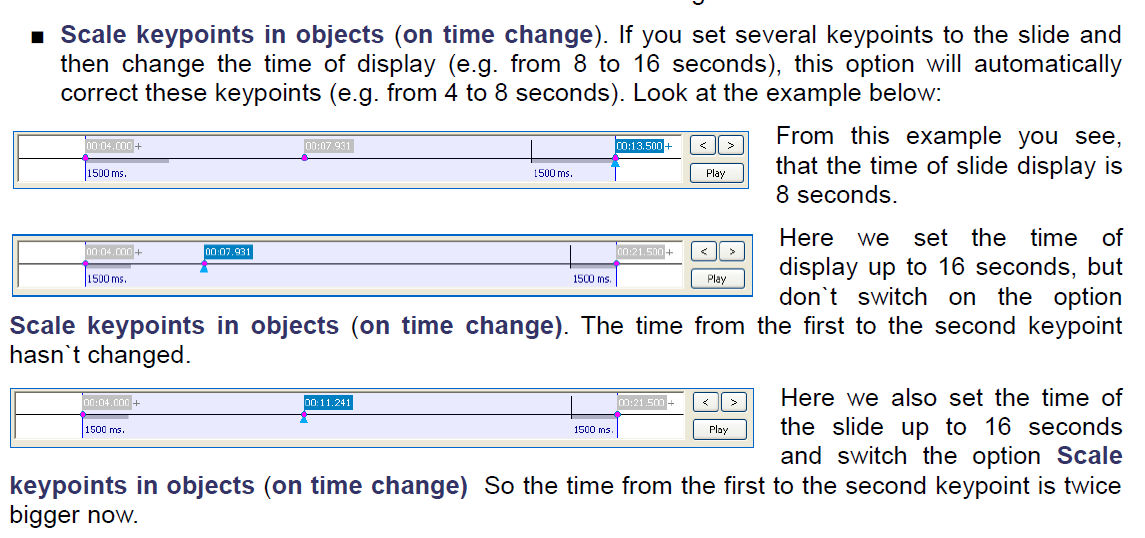
To understand the diagram you must study the time values encoded in the "flags" above the timeline. If you look at the times associated with the origin and end of the slide, subtract one from the other and then subtract the time allocated for the outward transition (1500ms = 1.5 seconds), you get 8 seconds in the first case and 16 seconds in the other two cases.
regards,
Peter
-
After I posted that illustration I did find your tutorial on panzoomrotate and it was tremendously helpful.
Thank you!
Isabel
Hi Isabel,
You're making this too difficult on yourself. Did you read my last message to you?? Go to the tutorials section of the forum. Download and play my AVI tutorial on PZR in the PTE Made Easy - (PTE For Smarties) section here:
http://www.picturest...?showtopic=7901
Some of the menu features I discuss at the beginning of the tutorial have changed over the past year or more, but the essential timeline process of Pan, Zoom and Rotate are identical in function. If you play this AVI you absolutely "will" understand the essentials of PZR.
Best regards,
Lin
-
Well...obviously I DIDN'T insert the link properly...It's the video on panzoomrotate:
http://www.lin-evans...nzoomrotate.avi (about 64 meg)
Thanks!
Isabel
Thank you, THANK YOU....for putting these together.
I've been struggling with animation all day and made next to no progress.
Just started watching this one and I was able to see some animation.
It's nice to know I can go to bed with another mystery cleared up!
Isabel
P.S. Not sure I inserted the link properly, but you know what I mean!
-
I'm trying my darnedest to learn the program features by reading the manual, but often the illustrations don't match up with their descriptions.
Attached is an example of what can be confusing.
I don't see the 8 seconds and 16 seconds described in the text. I do see something that comes close to 8 seconds, but I don't see anything like 16 seconds.
If someone could set me straight I would appreciate it.
Isabel
-
Neat-o. Nice feature!
I'm still aggravating myself about animation and keypoints. I don't quite have the steps in memory and I have to fiddle around till I get it to work! I wish the manual made the steps clearer. (Trying to zoom in to part of an image - I keep winding up with only the zoomed-in part of the image, rather than the animation starting from the beginning. Barry has an illustration in one of his videos but goes through it too fast for me to pick up on what he's doing.
Isabel
Hi Isabel,
You are really going to enjoy PTE Version 6.
One of the new features allows you to put a border around your image right in PTE without creating anything in Photoshop or other software. You can simply decide how wide and which color you want for your border. Just go to Objects and Animations, select your image in the Objects List, click on the Properties Tab then on the Adjust Image and Border and you can decide how wide and what color you want. You can also adjust the "canvas" which means you can decide all or any part of the image to be surrounded by the border. Essentially, this feature allows you to "crop" the image and place a border around it without actually affecting the real image. It's really a fantastic feature!
Best regards,
Lin
-
Saving mp3s as wav is what I've been doing.
Thanks for the confirmation (I hope!) about quality being retained!
Isabel
This has been covered MANY times and different opinions exist.
My method is to start with the original WAV (if you have downloaded an MP3 save it as WAV immediately for storage).
After doing your edits, fades etc save as an mp3 and try it in PTE. If you have to edit again go back to the original WAV.
For complicated edits saving intermediate WAV files is a good idea - that way you don't always have to start again from the beginning.
You are correct that there is a quality loss if you open an mp3, edit it and save again. Some will say that the loss is not enough to worry about.
If, like me, you care about quality you don't take that chance.
-
MP3 is a compressed file.
If one takes an mp3 file into Audacity to edit it, let's say to add some more silence to the beginning of the file, when it is resaved it is going to be compressed again when the altered file is resaved as mp3, resulting in loss of sound quality.
Am I incorrect?
Would there be any merit in saving the editing mp3 file in wav format and then resaving to mp3 hoping to retain the best sound quality?
Isabel
-
thanks, Dave and Ken.
It's really going to be fun making presentations using more of PTE's capabilities than I ever used before.
Isabel
-
Have just started watching the tutorials and love the ability to make a white border saved as a png and add to all the images at once (as long as they're the same size!). I realized that that was how additional elements are added to images within PTE rather than making additional images in Photoshop!
Figuring out how to do animation (I always wanted to learn how to do that) was a bit more complicated but I finally got it to work.
What puzzles me, however, is how do you deal with the inevitable image degradation when you zoom in (asking a smaller part of the image to fill the same space as the original image).
Thanks, Barry for putting this together for us.
Isabel
-
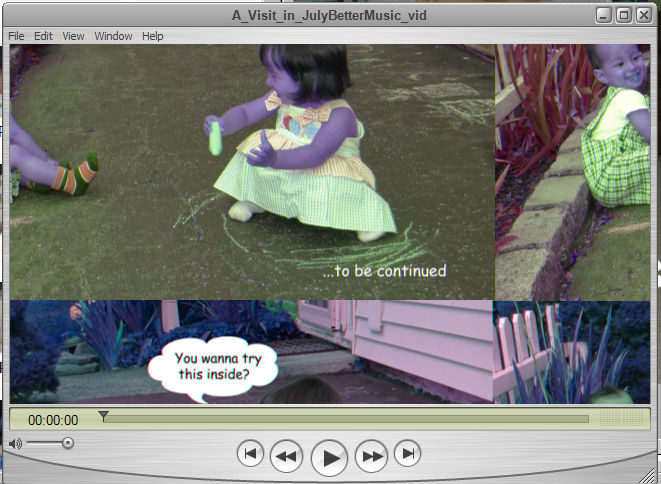
Thanks, Lin. That worked great, until I ran the file!
I had chosen to resize my original 1280 pte file to 640 x 360.
Attached is what I saw in QuickTime.
Isabel
Hi Isabel,
Actually, it's pretty easy once you remember that you have to click in the "Create Custom AVI Video File" circle.
Next you must choose from your available video codecs, so you click on the Video Codec Tab and choose something fairly generic. If you have a Microsoft Mpeg II or Mpeg 4 that would be good. Next click in the Audio Codec tab and see if you have a 44,100 16 bit stereo choice which would be nice.
Since you have done this before, you obviously have at least one Video Codec and at least one Audio Codec which will work. You can always download free Codec Packs such as the K-Lite (free) pack, etc., but probably won't need to.
Finally, you just choose an appropriate size such as 720x480 and an FPS rate such as (59.94) which indicates the "frames per second" and finally click on "Create" and choose the folder where you want it to go.
If you are creating a wide show then choose the appropriate dimensions instead of the 720x480 which is actually correct for an NTSC DVD.
That's all there is to it! The program will create a stand-alone AVI file for you this way.....
Best regards,
Lin
-
I'm totally baffled.
I want to take a pte slideshow and convert it to avi so that I can bring the avi file into a flash conversion program (Moyea FlashVideo MX Standard). I know I did this once before, but don't remember how I did it.
The instructions within the program (Deluxe 6) are very unclear. They state to click on finish after you've burnt the avi file to a disk...and also to open a burning program..I chose 1280 output and when saved the file was only 55kb????
Please straighten me out here.
TIA.
Isabel
-
Tthanks for the good feedback. Interesting that it runs faster on Firefox. That's my browser of choice, but I do have the IE tab for it for use when a website doesn't seem to be working right.
I used Moyea FlashVideo MX Standard.
It is extremely easy to use and does a great job.
Processing gives you four files (flv, swf, jpg, and html) which you upload to your website space (I have a Yahoo Small Business website for which I pay about $35 every three months).
Here's a link to their site, where you can download a trial: http://www.moyea.com/video-to-flv
Isabel
Hello Isabele,
Your flash ran without a hitch on my system.
Very sharp images and no sign of any glitches.
It ran smoother on Firefox than on Internet Explorer though.
I am very interested to learn what software you used to produce
the flash, perhaps you can give some more details please.
Ron West
-
Thanks for the feedback - I agree about the length. The original show was shorter and then I got a request from Shebang's owner to add a whole new bunch of shots. She was incredibly bonded with Shebang, who had been featured on the TV show "Pet Star" performing some of her amazing tricks. She died at only 8, leaving her owner completely devastated. This slideshow was played at a memorial for her. If you had a chance to meet her and see her perform you would understand why her loss was so tragic for her owner.
By the way, I just tried for the second time to upload the AVI to youtube, because Tammy has a lot of Shebang's videos over there. As happened the first time the uploading has just hung.
FlashVideo MX converted that 158mb file to the flash file you saw in just a few minutes. It's very fast. Fortunately I have my own storage space on the web, so I don't need to use YouTube, which can be a royal pain!
Isabel
-
No problems here Isabel - I watched it in HD and it loaded fast with no lags, all transitions worked with no lags either (connected via 10Mbit cable)
That's wonderful, Carol! You must have a faster machine than mine - or better wireless service!
Isabel
-
Was happy to learn that I qualified for a free upgrade and immediately used it to put together a fast slideshow, accepting the default transitions that the program chose (normally I just use fades...I am truly going to have to sit down and force myself to read the manual!)
I was THRILLED when I learned that through Deluxe 5.6 I could automatically upload to Vimeo...and upon testing found out that it was extremely to do so.
I'm concerned with the pacing of the slideshow and the starting and stopping of the video as it loads. I have a 3G dsl connection and wasn't playing the slideshow in HD.
Another concern is the fact that the opening slide on the Vimeo screen is a frozen image where two of the slides are evidently in transition, so it's a bit messy looking.
These are not PTE problems, but probably something to do with Vimeo's processing.
I am extremely pleased with this new capability.
Here's the show: http://vimeo.com/6489985 Password: PTE (black bars are the result of my noticing white
lines from cropping on the individual slides in Photoshop and recropping to smaller than they had to be.)
Isabel
-
Thanks!
Isabel
Hi Isabel
No the upgrades for the standard version are free, the de-lux version has a time limit on the video builder, I think it's 2 years. then if you want the de-lux version upgrade you just pay for the video builder side, that's my understanding.
Regards Yachtsman1
-
Haven't used it in a while and was happy to read that I can now upload slideshows to Vimeo...but wondering about the price for someone who owns version 5.5.
Isabel
-
Dragging didn't work for me but exporting the Amazon mp3 opened in Audacity to wav and the to mp3 worked. The truncated waveform that showed before the end of slide indication was moved further out remained truncated until I resaved the file.
Isabel
IsabelIt still looks to me like the problem I first mentioned. Look at my first screen grab called "end" The green line is within the transition of my last slide and any music playing at that point would come to an abrupt stop.
By clicking and dragging that line to the end of the fade and music "End 2" all is resolved
Thank you for recommending my tutorials, but perhaos I have a bit of work to do on ending a show

-
BRILLIANT....from your post I deduced that I should try the following:
I opened the mp3 from Amazon in Audacity.
I exported it as a wav file with a new name.
I opened up the new wav file in Audacity and exported as an mp3 file.
it worked!!! No more abrupt end.
Thank you!!!!
Isabel
P.S. I tried exporting an altered mp3 to mp3 format and it was degraded. If I export first to wav and THEN to mp3 the sound quality seems to be retained.
Interesting.I had the same occurence with PTE 5.7.5!
Music stopped 1 second before the end of the clip!
Opened Audacity, checked the file and it played perfect! I noticed my windows 7 system indicated it was 3 min 24 seconds long. After much trial and error, I decided to re export the mp3 from Audacity, and be darned if the length of the clip changed to 3 min 25 sec! Now the clip plays correctly in my slideshow!
Original clip was bought via iTunes, and converted to mp3 in iTunes... Wonder if there is a difference between iTune's mp3 codec and the Lame codec used in Audacity?
-
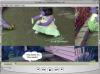
Tried that..for some reason that particular mp3 file is getting corrupted along the way, because it hasn't happened with another file. I moved the end of slide indication and got this:
Isabel,Please look at the green vertical line with the indication "End of the last slide". This seems to be the point of time where the show stops, and it will cut the music. Add 1 or 2 seconds to the time of the last slide.
Regards,
Xaver
-
Thanks for the input...this didn't work.
Please read my explanation in my response to Barry.
Isabel
Isabel,An alternative approach to Barry's suggestion:
If the end of the last slide comes before the end of the music:
- select the last slide
- go into the Timeline view
- click on the Timed Points button
- select "Set End of Last Slide at End of Music"
regards,
Peter
Learning from Barry's PTE 5.6 VideoTut
in General Discussion
Posted
Regarding my question about software to use for voice-overs - RED FACE HERE...
After using Audacity for years to prepare music and sound clips for stills posted on pbase and for slideshows I simply never noticed that RECORD BUTTON!
I'm using my Logitech webcam mike for voice and the quality is "all right" but I'll have to remove the bird clock from the wall. Wish I had carpet instead of a tiled floor in this laundry room!!!
Isabel