fh1805
-
Posts
3,880 -
Joined
-
Last visited
Everything posted by fh1805
-
Did you spot the difference? I don't know whether or not it is significant! Peter
-
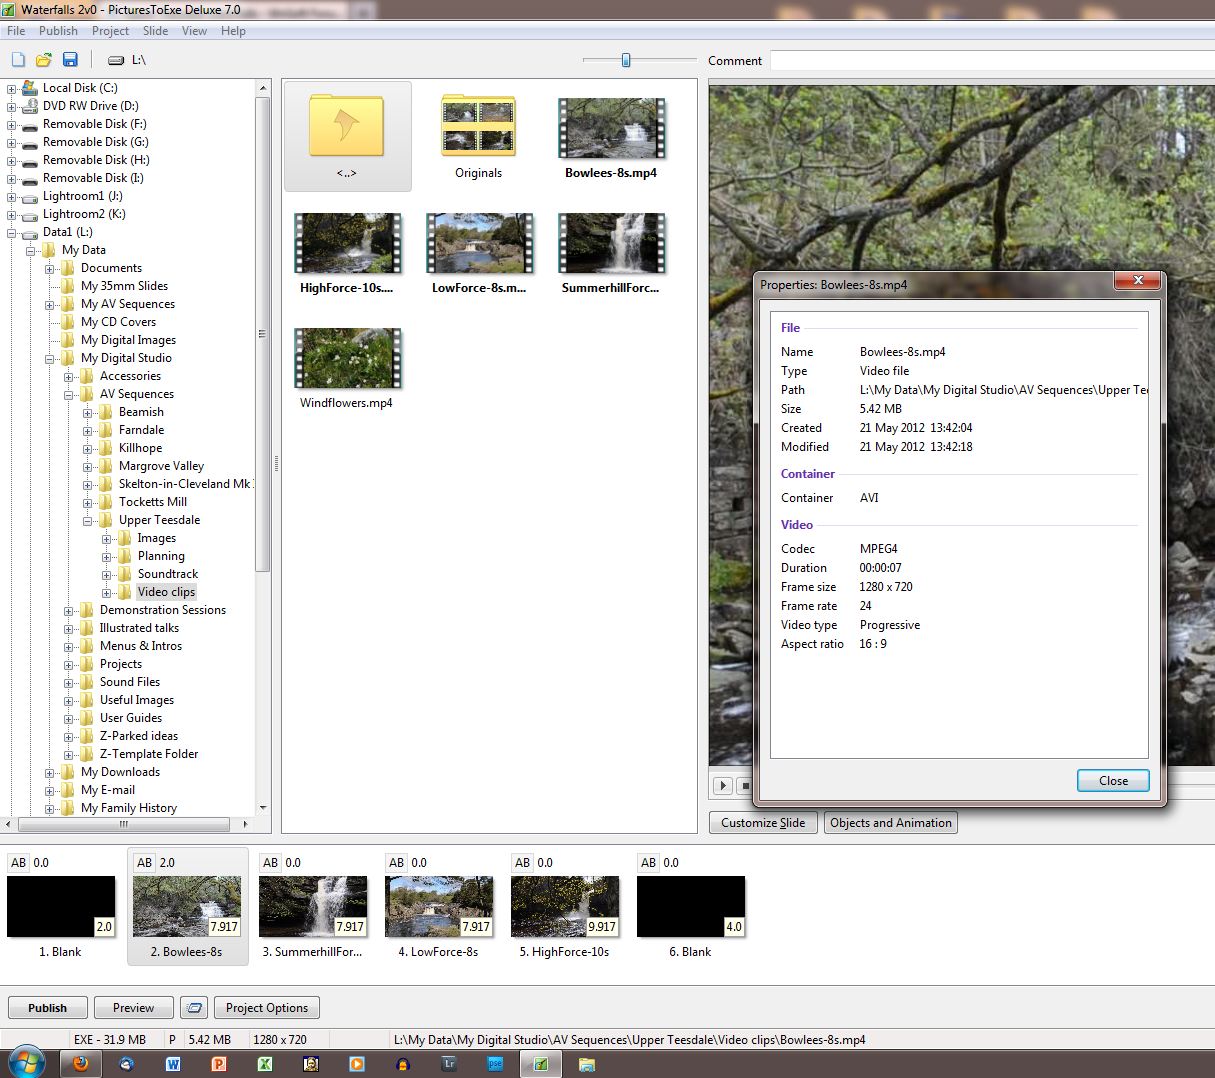
Eric, All three screen grabs were generated using Win 7's Snipping Tool. But I don't think that's what you meant. I think you meant: How did I get that pop-up window of information in the third screen shot? I right clicked on the video clip file and selected "File Info". As I understand it: AVI is the container type; MPEG4 is the codec used to encode the video frames within that container type. The D300s captures video in an AVI container and uses MJPEG codec to do so. PTE's Video Converter (at default settings) takes that data and writes it out into another AVI container using MPEG4 codec. No, I didn't set the AR via that pop-up window. I very rarely start a new project. I almost always open an existing project that has the right or nearly right attributes, then delete all its contents, adjust any options and drop in the images and the sound. That's what I did for this sequence. I took a 16:9 existing project, emptied it, set the Slide size to 1280x720 to match the video clips and went from there. Peter
-
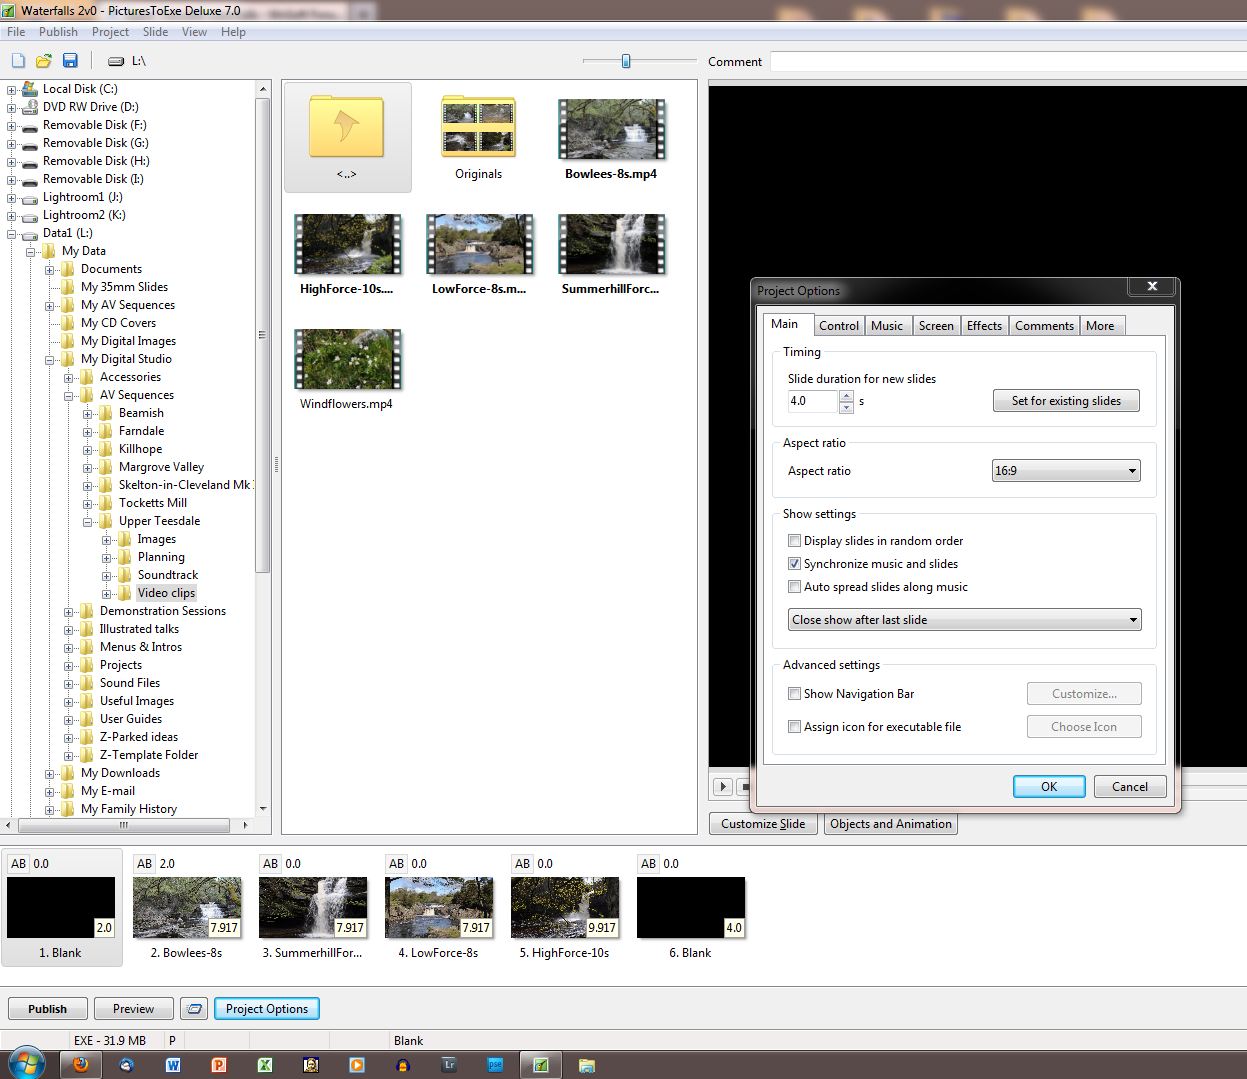
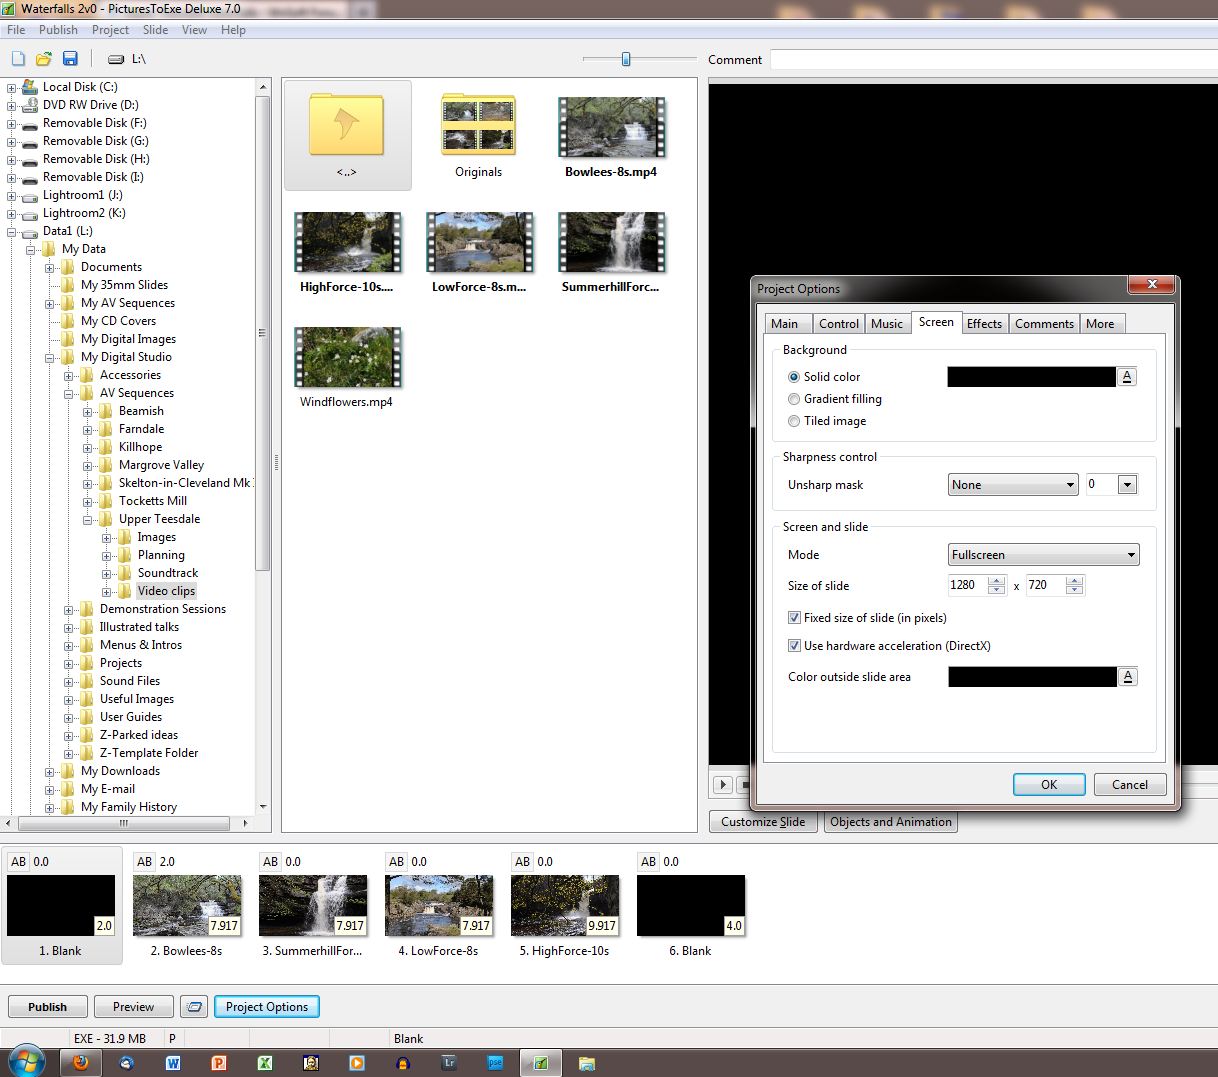
Eric, I do not know why your system behaves differently to mine. For info I have attached three screen grabs showing the Project Options and the File Info for the first video clip. Could the fact that I have no orthodox "slides" be relevant? All I have are two PTE-generated blanks and four video slides - no stills at all. Peter
-
Eric, In your post #33 above: you show Project Options...Screen as having "Size of slide" set to 1920x1080. I have "Size of slide" set to 1280x720. What happens if you change your value to 1280x720? Peter
-
Eric, Thank you for your continued apparent concern over the black frame. I know it is there. I want it to be there. It is what happens when I tick the "Fixed size of slide (in pixels)" and my images are smaller than the resolution of my monitor. It prevents the images being degraded by interpolation (prevents "up-sizing"). If I had left that box unticked, the video would have filled the entire monitor area (1920x1080) and would have had over 55% of the pixels generated by the software, rather than being the original pixels that I captured. That would have produced an image which was severely degraded in quality. As far as I am concerned, interpolation is something to be avoided at all costs. Peter
-
Yes (16:9) and No (1280x720).
-
That's because the camera takes 1280x720 maximum and I didn't want the images "upsizing" to full HD. I gave all that info in my very first post. But, of course, nobody bothers to read the important bits, do they? Peter
-
Dave, I'm uploading the originls of those two videos to Dropbox so that you can check what the original looks like on your monitors. I'll send you the links via PM once Dropbox has got them. Peter
-
Dave, Sorry, I completely overlooked that reply of yours. In mitigation, I would say only that this was such a busy topic yesterday that I was struggling to do the work and keep up with the dialogues. I have had another look at both versions of the sequence (cut mode and fade mode) and I do not see any obvious pixellation in either of them on my system. Peter
-
What do you mean by "they do not seem to be recognised"? Where are they stored compared to the ones that you can see and select? How did you add them? What exactly happened when you added them? etc. We cannot see your computer screen. You will have to give us much more precise detail if we are to help you. If you know how to get screen grabs, those would be very useful. Peter
-
Here's an attempt to describe the steps I followed to trim video files via Convert Video Clip: Navigate in PTE so that the File List panel is showing the contents of the folder where your original video clips have been stored Right click on one of the video clips and select "Convert Video Clip" The Video Converter window opens Note that you can convert several clips in one pass by using the "Add Task" button to select more clips Clips awaiting conversion show as "Paused" Select one of the clips to be converted Leaving all other settings unmodified, tick the "Crop Video" box Set the Start and End points of the trim by keying directly into the two fields or by dragging the sliders under the thumbnail Set the name and folder for the output file by clicking on the "three dots" button alongside Destination File and then using the dialogue box just as you would for a "File Save As" operation When you have completed steps 6 through 9 for all your clips, use the "Convert All" button to run the conversions. Finally navigate in PTE to the folder you nominated as your destination folder and drag the converted clips into your Slide List. N.B. step 7 works for me but that might be because the video files out of my Nikon D300s are already in AVI format. I am not converting my videos, only trimming them. Hope this helps. Peter
-
Mick, Thank you for sharing your thoughts. As I think you have realised, the waterfalls sequence is very much a "suck it and see" project. I'm willing to try anything in order to learn what works for me and what doesn't. Having built a "cut" version and a "dissolve" version, I can see that sometimes a dissolve between two videos will work. The transition between waterfall 1 and waterfall 2 is not too bad, and the one between 3 and 4 is a dissolve that I really like. But the transition between 2 and 3 is just so messy. I think what I'm saying is that video is just like stills - you can get a nice third image or you can get total rubbish. One of the learning curve steps will be to try some of the fancier transitions to see if any of them have prospects to get past a messy dissolve. Peter
-
Eric, I don't know. I haven't used that feature. I've done all my trimming by using "Convert video clip" which is available when you right-click on a video clip in the File List panel of the main window. Peter
-
It is a mix done in Audacity using four recordings, each made from the same position where I stood to take the associated video. And no, they're not all the same. I was surprised at just how different they are. All my previous experience of ambience recordings of rivers and waterfalls had taught me that white water makes white noise. But there are subtle differences in the ambience sounds (e.g. reverbs from the rocks around) that give each its own character. It shouldn't be getting upscaled! The Project Options...Screen tab was set to "Fullscreen", "Size of slide" = 1280x720, "Fixed size of slide (in pixels)" = On, "Unsharp mask" = None Which of the falls was pixellated, and whereabouts on the screen? Peter
-
Eric, Drop a video clip into a project as a slide and then take that slide into O&A. The Properties tab has some "Trim" fields for the video. Peter
-
Xaver, Indeed we can have such a discussion. Detailed and constructive observations such as yours are always very welcome. They force me to challenge my own thinking. Peter
-
@Xaver, Thanks for your comments. I don't think I can do much about the motion. There is not enough lighting to do any video capture. I have tried to use some gentle zooms to convey the impression of moving along the tunnels. Perhaps some more? Peter
-
Ken, Killhope museum has to abide by the rulings of the Mines Inspectorate in the UK, as does the Cleveland Ironstone Mining Museum where I'm a volunteer guide - so I'm reasonably familiar with the Health and Safety aspects of going underground in a vistor mine (as distinct from a working, extractive mine). Peter
-
Following the discussion with Dave (davegee), here's a re-worked version that has the videos fading into one another. The original version is available via my original post. Peter Waterfalls 2v1-KFSD.zip
-
Possibly the photographers fault . I wasn't shooting video clips with a pre-planned idea of what I was going to do with them. As I had zero experience with video, I didn't know how the transitions would look between two moving images. Like, I said - it's a learning curve. Yes it is. If I wait until the clips are loaded into the Slide List before I trim, I'll be loading the entire video clip, say, 30-40 seconds, when all I want is 8-10 seconds. That will add unnecessary "weight" to the final EXE sequence. Are you suggesting I should do two "trim" passes, one with Video Converter to chop off the major excess (leaving, say one second extra at each end), and then a second, more precise trim with O&A Properties? That is precisely the question I am trying to answer by all this messing around: "what should be the new approach?" Yes, once I've re-built the soundtrack to match the new timings that KFSD has given me. Grrr!!!! Peter
-
Dave, OK, I'm partially convinced . Some of the fades between the video clips work well; but some of them do not. However, as was discussed at great length last year, KFSD (Keep Full Slide Duration) adds some new complications. For example: Because the duration of my initial blank slide (Quick transition into the blank) was the same as the default transition time, the blank slide effectively didn't exist during playback. The show went straight into the transition into the first video slide. PTE wouldn't let me select the blank in order to delete it or change its duration . I had to reduce the transition into the first video slide in order to be able to select the blank and change its duration. But during my messing around I've found an even bigger worry. Using PTE's Video Converter, I trimmed all my video clips to either 8 seconds or 10 seconds in duration. But when I drop these into PTE as Video slides they show up as having durations of either 7.917s or 9.917 seconds (those values are with KFSD not ticked by the way!). This means I cannot apply my standard approach to sequence building and assemble the soundtrack first and then edit the images to match. If I use video clips as slides, I cannot guarantee that the slide durations are going to be as I expected them to be. Solve one problem but find two others - what a learning curve! At least I now understand why Igor gave us KFSD option. regards, Peter
-
Eric, When I shot the video, I took a still image immediately after each video clip. I just haven't got around to trying to transition from video to still as yet. Peter
-
Dave, With my limited experience to date I have found that the video stops playing at the start of the next transition. That results in, to my eyes and mind, an unnatural, jerky playback. By adopting "Quick" transitions, I am following the traditional film editor's approach of "cutting" from shot to shot. Peter
-
Thanks to Bill, Dave, Rick, Bert and Tom for your comments. @Dave, The museum are happy for me to use this sequence as I wish for my own purposes; so it will be seen by audiences local to my home. Also, I'm seriously thinking of entering it for the RPS International Festival later this year - not that I expect it to gain any awards. @Bert, The ambient lighting in the mine was almost zero after about the first 100 yards in. The only "ambient" lighting from that point on was provided by the helmet lamps (dim at best), with primary subject lighting coming from the flashgun. Even with all Nikon's clever gadgetry, the auto-focus frequently struggled to find enough contrast to get a good "lock on". Composition was mostly "shoot and hope" as I could see nothing through the viewfinder and not a great deal more on the LCD screen on the camera's back! @Tom, Unfortunately, I have no control over the location of the playback equipment; that is at the discretion of the museum manager, and he is handicapped by the existing design and features of the museum building. It is currently located just before exiting the museum building to go to the assembly point for the public tours of the mine. That's about as good as I could have hoped for. regards, Peter
-
I've been promising to upload this for a while now. I took the DVD version up to Killhope last week and Mike, the museum manager, was delighted with it. Killhope Lead Mining Museum is located at Park Level Mine in the upper reaches of Weardale, in County Durham, England. The site is a large one and this sequence deals with just one aspect of the museum - the underground tour. It has been put together so that those visitors with mobility problems, who cannot take the underground tour, and those who are claustrophobic, can still gain an insight into what the underground tour covers. All the sound recording, except for my introductory voice-over and the bird calls, was done on location using the Zoom H4. The photography was done using a Nikon D70 with Nikkor 18-200mm VR Zoom lens (on later visits the camera was Nikon D300s with same lens). All images were taken using a tripod. The illumination was provided by a single Nikon SB-600 flash gun. For some shots this was attached to the camera via a SC-17 cord (about 1m in length). There will be one small change made in the near future. Whilst checking that the DVD played OK on the kit at Killhope, I was given the opportunity to photograph a freshly broken piece of galena. One of these new images will replace the existing inset image of galena. When it is a fresh surface it shines like polished silver! regards, Peter Killhope v26.zip