JRR
-
Posts
1,446 -
Joined
-
Last visited
-
Days Won
22
Everything posted by JRR
-
Use the CREATE BACK-UP IN ZIP under FILE and move the zip to the other computer and then you should be fine
-
Peter: Not sure if this is the one you are looking for or not: click here It was on Beechbrook for a long time. Oleg's shows sure inspired me in the "old days"
-
Igor: I had an issue with Windows 7, somewhat different than what you describe above. See posting: here 1. Issue was random slight drag on a transition accompanied by a static sound on the audio. This was for PTE ver 5.6 and before. 2. Windows 7 Home premium 3. 64 bit 4. Clean install on a new laptop 5. Problem was solved to a large extent by re-compiling all my PTE projects in Ver 6. 6. Yes the problem is solved for large part. I still had a very few minor re-occurrences so I turned off AVG anti-virus and a few other things in START-UP. Problem is still there on an infrequent basis but I really have to be paying attention to notice it.
-
I don't think this site has been mentioned before: Mark Johnson Mark Johnson posts a new PhotoShop workbench each week taking the viewer through the use of PhotoShop in image enhancement/manipulation/etc You can watch the workbench on-line or, for a very low cost, download a version for your files. Most of his past work benches (He is at #208 now) are available on the site as well There's always something to learn in PhotoShop
-
here is a "utility" that I use to check sound, focus and “calibration”. The image allows you to “calibrate” the projector for brightness/contrast so as to not blow the whites. Hopefully the computer/projector have been calibrated properly but if it was not done this is a useful check. The bottom line on the left has squares of white and black that are ascending/descending 4 RGB points to Zero or 255 I have a jpg included 2 jpgs that explains the “calibration” I should change the music and add a voice over section as well. That would check that the tone controls of the sound system are properly set for the narration The utility starts on its own and stays on the screen until you hit ESC
-
Thanks for thoughts Stu I got up early this morning and re-built the menu show all over again. I used five ver 6 shows (Hardware Acceleration ON although only one show has any animation) Menu show had hardware acceleration ON (No animation in this show) Bottomline ? It worked very smoothly on XP and Windows 7. Only differences I can see between the new Menu and the old one: - Hardware Acceleration ON in new Menu show, OFF in old menu show - Object used to launch the shows was an invisible gif file. In the new show the name of that file appeared 5 times in the O&A window. In the old show, I used the same file, but in the O&A window it was called "Image 0", "Image 1", "Image 2", "Image 3", "Image 4". Those names were not put there by me, they came up automatically. - I did not try to preview the Menu show, so I don't know if I would have gotten the corruption note that I got before.(see post 33 above) Bottomline is that it works !! The problem might have been the corruption (whatever it was) only affected Windows 7, not XP
-
I said the exe worked, but... I used all ver 6 shows, and used ver 6 to create the menu, using the ACTION: RUN SLIDESHOW AND RETURN. On my PC and "old" laptop, both Windows XP, the menu page worked smoothly, but when I ran it on the new laptop (Windows 7) the menu page came back at the end of each show, then flicked off and then back on. When I switched the action to RUN APPLICATION OR OPEN FILE it ran OK on both XP and Win 7 (Although maybe not as smoothly as RUN SLIDESHOW AND RETURN on the XP)
-
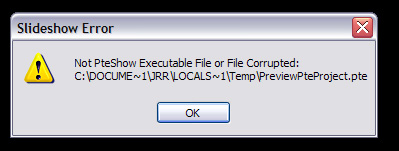
OK now what I wanted "to get with the program" and run my menu shows in ver 6 using ver 6 shows so I could use RUN SLIDESHOW AND RETURN which has been discussed as being smoother. I set up 5 (re-complied in ver 6) AV shows in a menu page using ver 6 and set the action to RUN SLIDESHOW AND RETURN. I saved it as a .pte file and before creating a .exe file I wanted to check it so I clicked on PREVIEW. The first show ran, but then as it returned to the menu page, up came the warning below. I tried it a few more times and always got that message (except when I changed the action to RUN SLIDESHOW and then the first show ran and came back to the PTE program screen from which I had clicked on PREVIEW) I said what the heck and created it anyway, and it worked ! Later edit:(See note below) Does that mean that you can not run a ver 6 menu from PREVIEW, or am I missing something ? Thx

-
Thx Geoff, something else to try
-
In trying to track down the "static" and slight transitional drag, I re-compiled three shows of various vintages into ver 6. So far, fingers crossed, the problem seems to have gone away using these shows. Does this make any sense ? (Or am I just lucky for now :rolleyes: ?) I am going to re-compile more and see what happens
-
Peter: I am using "Run Application" as not all the shows are ver 6. That was the same with the problem experienced at our Club in the fall. (Not all were PTE shows) Running behind the menu page seems to be a random problem.
-
Eric: I would say lucky Based on an example I was working on yesterday when I left the Hardware accelerator turned ON, one of 5 shows started behind the menu page, but not each time I tried it. At our club in the fall, about 30% of the shows started behind the menu page when it had the Accelerator left ON
-
John: Good summary (we all have our little ways of doing it slightly diffidently) One word of caution - in PROJECT OPTIONS > SCREEN you want to have HARDWARE ACCELERATOR turned OFF. We have experiences with launched shows running behind the launch screen if it is left on.
-
Ronnie: We were looking at this: Gaming laptop which is HD But we decided it was too big to haul around. We have a small laptop with a lousy screen that we used for traveling, we wanted to upgrade it but the gaming laptop was just to big. So we compromised with the one that is giving us issues now. The video card in the problematic one can certainly handle Lin's seasons cube with no problems. I think the video card in the gaming one is better (should be !) than the card in the problematic one. I tend to favour Toshiba, (we have three Toshiba laptops of various vintages) but there are other good ones out there. Laszlo, one of the forum members, had his last laptop built to his spec at a local computer store. It is powerful enough to handle anything, but it does weigh quite a bit. There might be a local computer store in your area that would custom build one for you.
-
I have been presenting PTE AV shows since late 2002 publicly using Toshiba laptops and never had a problem. Nor have I had problems when playing the shows on various PCs. I just purchased a new laptop, Toshiba A500-02J. Specs are here It has Windows 7 as the OS. The problem I have is that randomly, a transition will "drag" just a little and I get static in the audio. If I play the AV again, it will happen in another spot during the show. Some shows it will happen 4-5 times, some only once or twice. The shows are either ver 4.48 or ver 5.6 The problem does not occur on my PC, or the other laptops, both running XP. I suspect it might be something running in the background that happens to be more active at certain times than others and co-incidently at a transition in the AV being shown. The techie is ordering in another hard drive to swap with the one in the laptop to see if that makes a difference. But he suspects it might be something in the background as well. Anyone else have any ideas ? The fact that I haven't heard the issue on the forum before makes me think it is not a Windows 7 issue. Thanks
-
Thanks Peter Guess I missed that discussion Makes sense, I will try to cut back on my "panic attacks" :D
-
Not a major point, but in ver 6 (maybe there in 5.6 as well?) if you use an image, or text as an object from which to run an application, the mouse cursor changes to a hand when over the object, however if a button is used, the mouse cursor does not change shape. It stays as an arrow. It still works, but after being used to seeing the shape change all the time when I used an image file as an object, I have a small panic attack :) when I see it doesn't change on a button and I think it is not going to work.
-
Eric: Not sure if 5.6 and 6 are the same as ver 4.48, but it you click on the object twice (like we are so used to doing - double clicking) the show you want to run, will run twice a split second apart. Sounds just wonderful !! So train yourself to click once if it is the same as the earlier versions
-
Laszlo/Ken: I don't have a divided screen. I don't recall ever having had one. (Maybe I did) Anyway my posting space scrolls dutifully when I go past the space initially available.
-
Peter: I suspect you are correct, but can't say with any authority. Unless the intention is to create as small an exe file as possible, is there a reason to vary the bit rate ? Is the example you are thinking of voice over only? Or are you keeping the voice over file separate from the music in the final version. My workflow has me keeping everything in wav forum until I have the final version (music in PROJECT OPTIONS>MUSIC and voice-over attached to individual images) and then combine them into one single MP3 file which goes into Project Options>Music. I understand that an MP3 is the same as a jpg, the more you save it the more quality you can potentially lose. So just like I work with .psd/.tif files until I am happy, I work with wav files until the last step
-
How many layers of snow in there Lin ? I think I counted 5 or 6 ? I was looking for one of your pikas to come scurrying down the tree trunk at the end Another good one !!
-
Stu: I suspect there would certainly be interest in such a utility. It sounds like something that would get the job done quickly and efficiently. I would still want the shows ahead of time for the reasons following, but your utility would make life easier for the person running the presentations. One of the reasons we ask for shows a few weeks ahead is to make sure they actually work and hopefully open and close on their own. As you know PSG, depending on how the producer sets it up, will not fully start on its own, and may only go to partial screen. PTE shows aren't always set to close after the last image. Some people try to submit shows with massive files as they don't bother to re-size their images, I could go on. We always have to ask some producer to re-do their shows...... (In my personal case, I likely would not use the utility except in an emergency, as my presentations are done in Seniors homes, libraries, schools etc. I have each presentation's launch screen customized to that "client". Small things like make them feel very special.)
-
Well Eric, hope it works for you. At our club we insist on getting the files a few weeks ahead and to the extent possible test everything thoroughly before "show time". That solves any issues and allows for a smooth, professional presentation.
-
Just remembered.... If using ver 6 or 5.6 make sure your PROJECT>OPTIONS>screen> hardware acceleration is turned off
-
Eric: Forgot to add re your question that the shows might not be PTE produced... AS mentioned in my posting above, I regularly launch .avi files and ProShow Gold shows from the menu page. I have tested and run QuickTime and Wings AVs from the menu as well. I haven't found anything I can't open from a PTE menu page.