All Activity
- Past hour
-

How to compress and save in a smaller sized slide show
BenHerrmann replied to BenHerrmann's topic in Slideshows & AV Shows
Yes, that was the MP size I was talking about. -
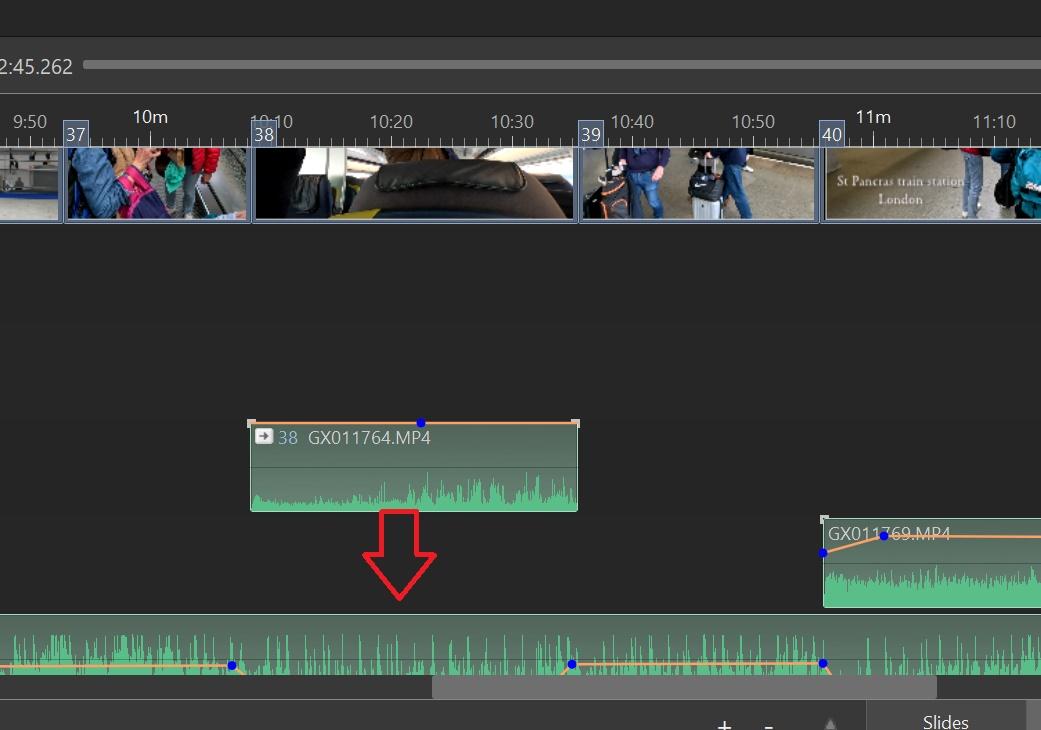
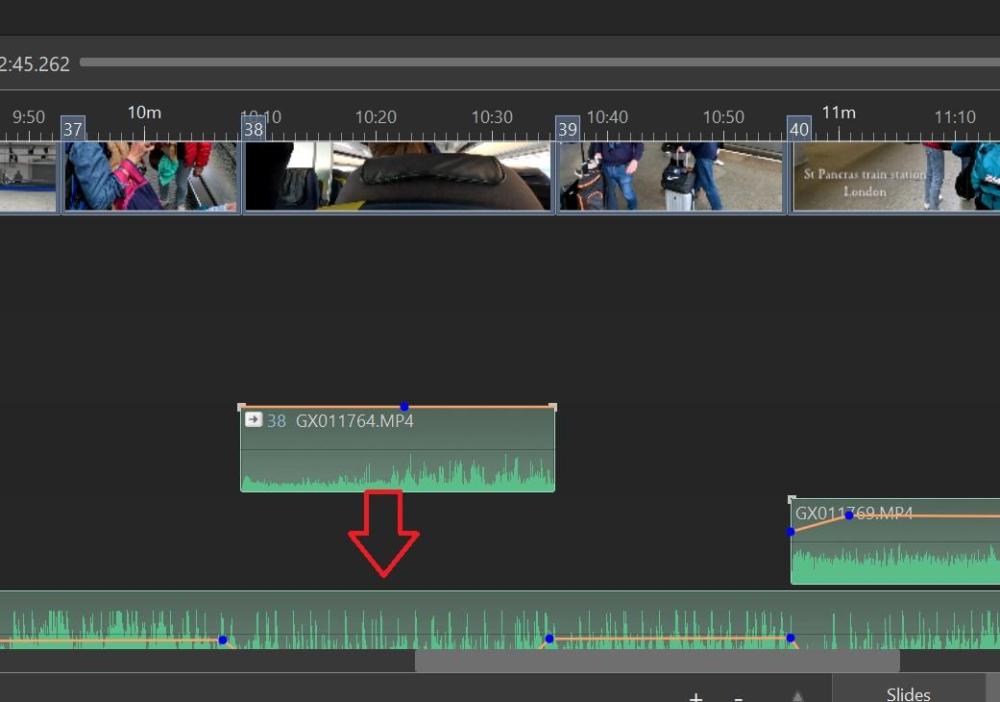
How to move an extracted audio clip to another track?
jkb replied to goddi's topic in General Discussion
Hi Dave, Thanks. I know several of the Hotkeys, but there are so many options it is difficult to remember them all. I knew there was a Shift+Left Click to Constrain Vertically but I see that is for a KeyPoint. I think these two would be better swapped over Shift + Left Mouse Click on a Key Point- Constrain movement of Keypoint to Vertical Plane It would be better if we could keep the Volume level but move the Keypoint horizontally - So constrain the movement horizontally Trying to get 2 KeyPoints to have the same Volume level is tricky, even when the Track height has been maximised. Shift + Left Mouse Click on an Audio Track- Constrain movement of Track to Horizontal Plane This would be better if we could Constrain the position of the Sound clip and just move it to a different Track - So Constrain it Vertically Jill - Today
-
How to move an extracted audio clip to another track?
davegee replied to goddi's topic in General Discussion
Hi Jill, The entry in the OH / Hotkeys is Shift + Left Mouse Click on an Audio Track- Constrain movement of Track to Horizontal Plane It is difficult to remember where and when these Hotkeys originated - maybe Igor can help when he returns. https://docs.pteavstudio.com/en-us/11.0/hotkeys/main DG -

How to compress and save in a smaller sized slide show
SeismicGuy replied to BenHerrmann's topic in Slideshows & AV Shows
By show are you talking about the resulting mp4 file size? -

How to compress and save in a smaller sized slide show
digartal replied to BenHerrmann's topic in Slideshows & AV Shows
Hi You could look at the options in the show when you export it. Reducing the file size can be achieved by reducing the AV export dimensions. To reduce the file size of your exported video in PTE AV Studio 11, lower your export resolution (e.g., from 4K to 1080p), select the H.264 (MP4) codec, and reduce the Frame Rate (FPS). Additionally, use the "Quality" slider to balance sharpness and file size. Alternatively, you could use another free application like Handbrake to reduce file size after export as I often do with my 360-degree videos. I am guessing that this should be posted in another topic as this is for the slideshows made by PTE users, but admin may relocate. Regards Mark -
Free PTE AV Studio Pro project - The Newspaper
digartal replied to Bad Dancer's topic in Slideshows & AV Shows
Thanks for sharing. I am glad the original post gave you some inspiration to create this. My idea was initially just to create a simple text for a single image AV when posting on social platforms, but this is next level. Regards Mark - Yesterday
-
How to move an extracted audio clip to another track?
jkb replied to goddi's topic in General Discussion
Double Click so that the Audio Tab of Project Options opens. That clip should be highlighted. Drag it down to the Track you want, if there are already preceding clips on that track then make sure you slot it into the correct place. So if there are 3 clips in front then drag it into 4th place on that track. You are supposed to be able to hold down Shift & drag in Timleline to keep the position but I have never managed to get that to work. The other method is to note the time it starts, in the box just above the Timeline, then drag & make sure the Time is the same by adjusting it if necessary. Jill -
Greetings, I want to move the extracted audio clip to another existing track. I know I can drag it down but if if I am not exact, the audio clip will not match up with the lips of the person talking. Is there a way to move it so it stays in the correct position with a key stroke? Gary
-

How to compress and save in a smaller sized slide show
JRR replied to BenHerrmann's topic in Slideshows & AV Shows
Bernd: Congrats on creating the AV show. Re the user guide, did you look at the Online help at: https://docs.pteavstudio.com/en-us/11.0/main -
Hello all... I'm very new to this program - in fact, I just purchased it today as of this writing. I saw enough to fall in love with the program, but I do have one initial question that I couldn't find in the user guide. I've just created a slide show for a friend, but with the photos and everything, the total slide show came to 140 Megabytes. How can I save the project in a smaller format - or do I have to save it in a compressed format? Is there a way to compress or make smaller prior to saving the project? Thanks, Bernd Herrmann
-
BenHerrmann joined the community
-
Free PTE AV Studio Pro project - The Newspaper
chanfi22 replied to Bad Dancer's topic in Slideshows & AV Shows
Very nice and interesting effet. Thank you for sharing.Thank' -
Free PTE AV Studio Pro project - The Newspaper
JRR replied to Bad Dancer's topic in Slideshows & AV Shows
Nice effect when carefully used Thanks - Last week
-
The alternative I chose for simple beginning and ending trimming of the slide in question was to right-click the mp4 clip in the file list and choose Convert/Trim Video Clip and then do the trimmimg similar to this Beckham tutorial. This ends up creating a revised video clip that can be added as a slide and is done entirely within PTEAV. Actually it was this tutorial that led me to believe that the O&A method I was fiddling with would accomplish the same thing.
-
This is so easy to do in PTE. I should have added that most of the time I just do video straight in the timeline. Add your video as a Slide. Drag the play head to where you want it start. Right click and select trim beginning of video. Then drag the play head to where you want it to end and drop your next slide or video at that point. If this is your last slide then just add a Blank. Very quick and easy. To join lots of clips together just do the same. Simply add to the Timeline in the order you want. No need to physically join them first. I only use the trim in O&A when I want to adjust the speed. No need for any external programs. Jill
-
Hi everybody. I saw a video with a heron from Digital and decided to offer this kind of design for such files. It is not necessary to use the entire project. You can apply one or more slides. All text blocks are editable. The slide duration can be extended for easier reading of the text. The slide movements are edited by the overall frame. Due to the lack of layer overlay modes in the program, the file with the crumpled paper effect is superimposed with a change in the opacity of the layer, adjust it yourself if necessary. Information about the project and the download link in the description of the video on YouTube. https://youtu.be/DUej61T06rU
-
My usual need is when I am making one of my travelogues which normally have a mix of jpg's and video clips. With the videos I may have anywhere from 2 to 4 clips on my Galaxy related to some experience (e.g., taking a gondola up a mountain) where each clip might be 20 or 30 seconds and I end up taking pieces of each to create one single clip that I end up using in PTEAV. When doing so I have been using Movavi to accomplish the editing and piecing together to create the single clip. But there are times like this where I have a single clip and I may need to cut a bit from the beginning and a bit from the end. I thought it would be easier to do entirely within PTEAV but perhaps it is easier just doing in Movavi.
-
I have never had a problem with this. But then I normally set my Slide Duration first to match the Music/Voice & then Trim the video to fit that Duration. I will adjust the speed of the video to match the Duration. Obviously I wouldn't do this if I needed Lip Sync, but I very rarely have a video with speech on it. I guess it depends how you work, but I am very happy with the way it works now. Jill
-
If the only "object" in the slide is the video clip and you trim from the beginning and end of the clip on O&A doesn't it seem like the duration should also adjust to match the duration of the revised clip? I guess I can just change the duration myself but it seems like this should be automatic.
-
It has always been so and has been discussed ad nauseam. You are trimming the object (the video clip) and not the slide duration. I have always seen a case for trimming the slide duration when trimming a video clip IF the video clip is the Main Object but.......
-
That is exactly my point. Why bother with any "clip" adjustments if they don't actually translate to the slide? Again it seems like there is something missing here.
-
jmc, Agree, very strong app. A lot of potential. Hope this is just the beginning. Thanks for the comments. Best Alex
-
Very nice work, and a really beautiful song too... Well done! You must spend hours on PTE, but it's definitely worth it. What mastery of this wonderful software... once again, congratulations.
-
Gerald joined the community
-
When you trim a video, the clip duration changes, but the slide duration remains unchanged.
-
The commentary in this sequence was written by me, but read by Grok AI in the accent I determined. So, for those who find commentary a bit challenging, here is a way to avoid all the microphone issues, mis-spoken words and spoiled recordings and no dealing with noise in the audio
-
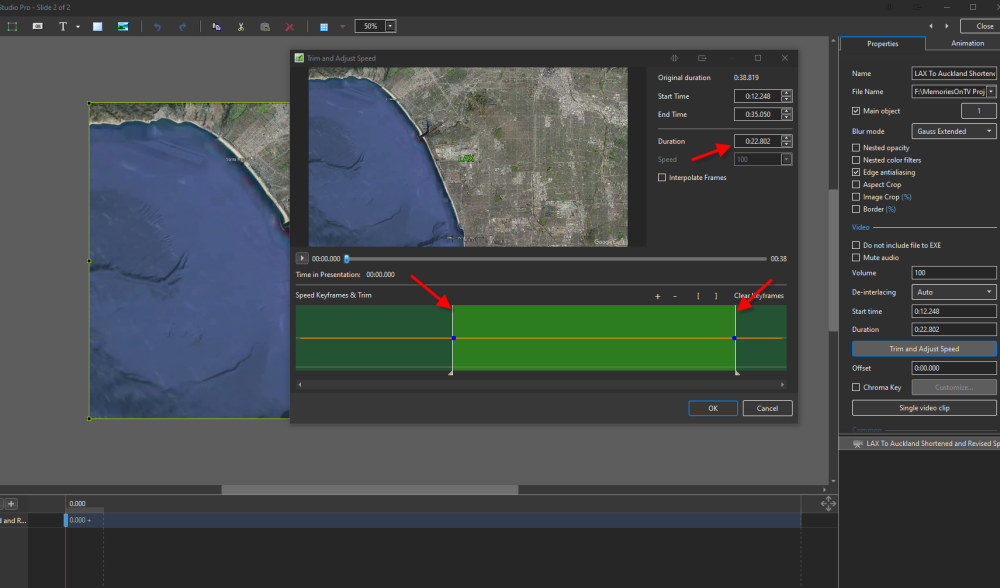
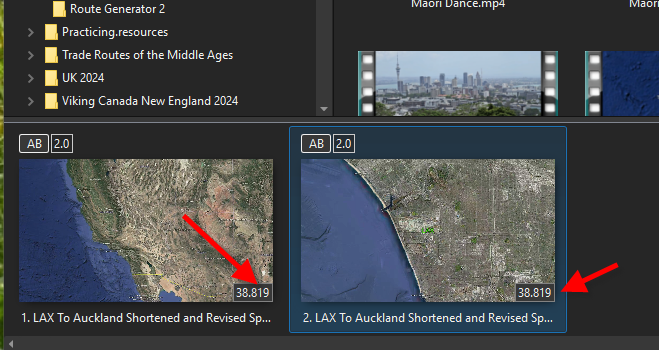
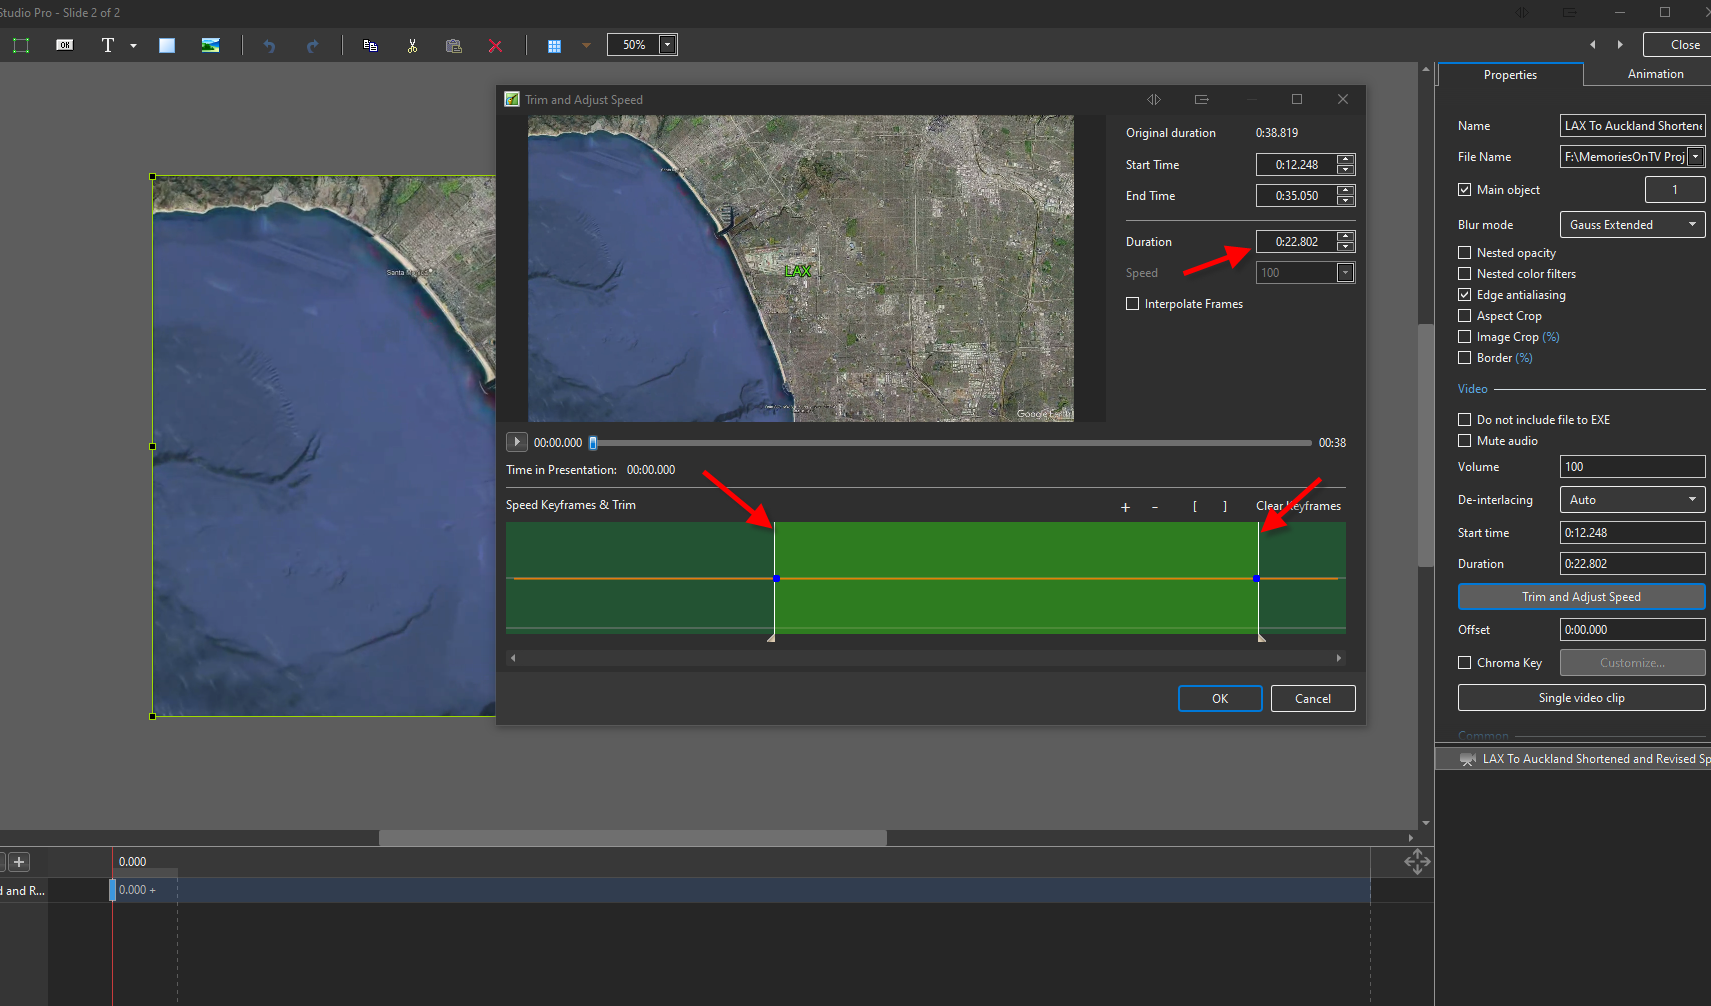
I am still stumped with the Trim and Adjust property feature with a video. I have a video clip that is about 38 seconds long. I add it as a slide and then add it as another slide right next to the first just to play around. On the second slide I go to the Properties and choose Trim and Adjust Speed and move the start and end points and it shows doing so changed the duration to about 23 seconds. HOWEVER when I go back to the main screen the duration shows the same on both slides and then when playing the second slide which I thought I reduced to 23 seconds it still shows the 38 second duration and it plays for 38 seconds although the last 14 seconds or so is just really a freeze frame. What am I misunderstanding or doing wrong since it seems that the Trim is not really having the desired effect?