davegee
-
Posts
9,323 -
Joined
-
Days Won
59
Everything posted by davegee
-
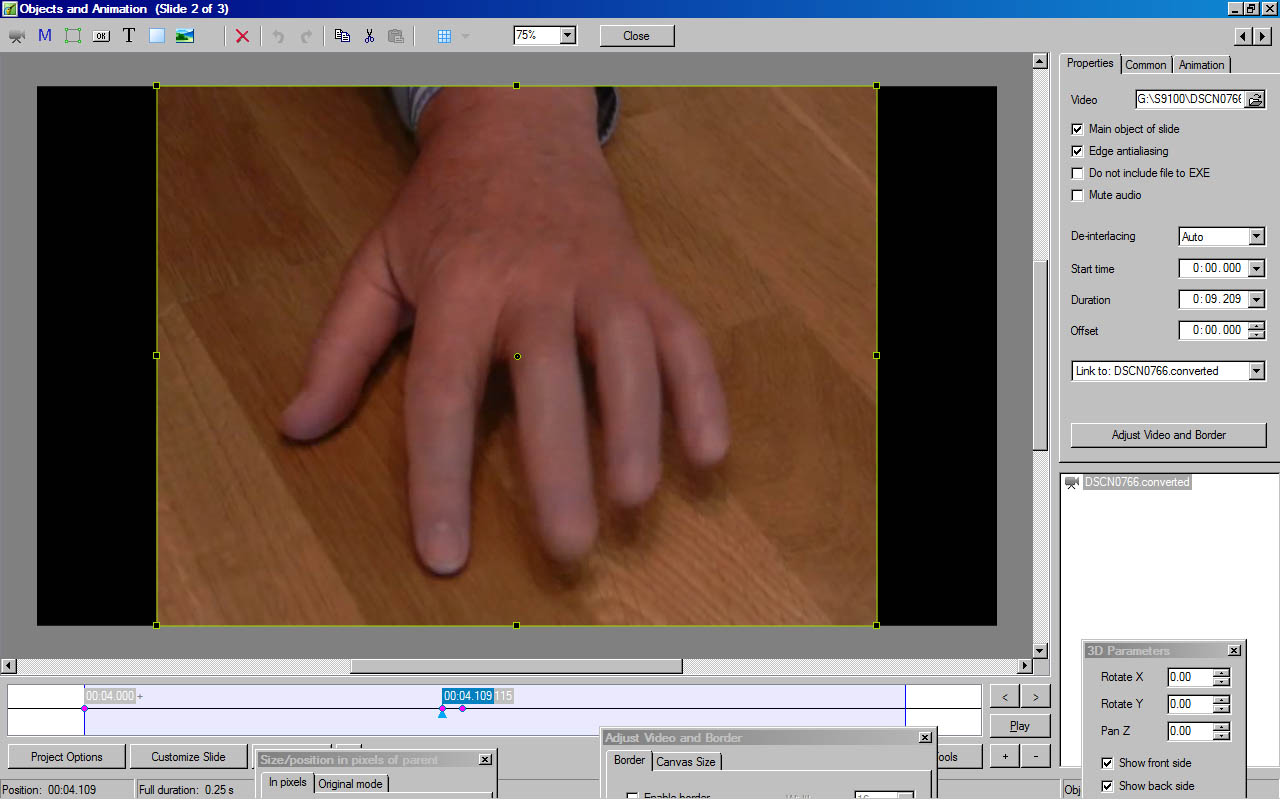
In addition to Lin's comments I would offer the following. After "Muting" the video's Audio track the the Audio can be be added via the "Add Audio or Voice" button. The result is the same but it has an advantage in that if you have to move the position of the Slide containing the video or the timing of previous slides during the project construction the Audio will move with the slide and will not require adjustment of the "offset" value. Just another way of approaching it and worth consideration. DG
-
I totally disagree with the last post.(POTWNC). Whatever else they may do they should not alter the projector res. If they are indeed running a 1024x768 comp on a 1920x1080 projector they need to get their act together and take some tech advice on board. I would ask another question: do they have a HDMI equipped laptop? Leave the projector res alone. Sorry POTWNC, DG
-

Should I remove old P2E programs - 7.5.6 will not load
davegee replied to dbolt's topic in General Discussion
Are you OK now??? DG -
Should I remove old P2E programs - 7.5.6 will not load
davegee replied to dbolt's topic in General Discussion
Did you try closing your computer and re-opening?? It looks like you had multiple versions open at the same time. DG -
Should I remove old P2E programs - 7.5.6 will not load
davegee replied to dbolt's topic in General Discussion
What security warning?? My security is pretty tight, but I never get a security warning when opening PTE. Is it only with the 300 slide show that you get the problem?? PTE is trying to open that show every time and if there is a problem with the show itself then it will never open. Trying going to an earlier / smaller project folder and clicking on the PTE file for that project - if your file associations are OK then it should open that. It's easy to be wise after the event but when starting out on a BIG project it is a good idea to save different versions of it along the way so that if you run into problems you can go back a couple of versions and find the problem. Good luck, DG P.S. To open an earlier version go to C: Program Files (x86) > WnSoft PTE > 6.5 (or 7.0) > Main and Double Click on the PTE Application File. -
If you are projecting at 1024x768 or 1920x1080 then SOMETHING has to re-size your images. in this case it is PTE and once you have squashed those 5000 wide pixels into 1920 wide they cannot magically grow in number at any stage in the process. I find that it is far better to re-size the images myself and have full control over the quality (and the EXE size). It is only when zooming or panning that having anything bigger than project size images makes a difference or is necessary. DG
-
Here you go: Video formats MPEG-4 video up to 2.5 Mbps, 640x480 pixels, 30 frames per second, Simple Profile with AAC-LC audio up to 160 Kbps, 48kHz, stereo audio in .m4v, .mp4 and .mov file formatsMotion JPEG (M-JPEG) up to 35 Mbps, 1280x720 pixels, 30 frames per second, audio in ulaw, PCM stereo audio in .avi file formatConvert your PTE into MPEG4 (PUBLISH) and play that. DG
-
Does Apple TV support MPEG4? DG
-
Steven, Here is the promised Template. I have added a "Black BG" JPEG to act as a MAIN IMAGE (Parent Image). If you unzip this and open it, all you have to do is go to Project Options and set the "% of main Image" to 90-92% before you begin the Burn to DVD process (click on "Apply to All Slides") - I think that you will find that it works. On my TV the 92% figure is just about perfect. Try it as a test? Steven.zip DG
-
Steven, In order to progress quickly, here's my suggestion. Ignore PTE's TV Safe Zone (for 1920x1080) - it does not represent what actually happens and needs to be looked at again by PTE. (Your project highlighted this). I have tried the following with your project and burned a DVD with it to play on my oldest DVD Player. It works fine. Add any of your 1920x1080 images to a Blank Slide and change its opacity to zero. Mark this as the MAIN OBJECT of the slide (O&A Properties). You can use this as a "MAIN IMAGE frame" to which you can add all other images. Now add the various other images, text etc as CHILDREN of the MAIN OBJECT. Do the same for all slides. When you are ready to burn, (with Fixed Size of Slide unticked), go to Project Options / Defaults and set 90% of slide to show Main Images. This will reduce everything to the same relative percentage. Burn it and try it - if 90% is too much and you get a black area outside of your white line frame, try 91% or 92%. Some other observations: Try to keep a Key frame at Zero for all Objects. Your School image is not a true 16:9 image - there is no need to reduce it in size - use 1920x1080 and place it behind your frame in ORDER and you will get the same effect. I will send you a Template or post it here later. DG
-
Steven, You can "Show TV Safe Zone" by clicking on the option in Preferences > Editor. Go to O&A and make sure that your project then fits inside the Blue area. Project Options > Defaults > % of slide to show full image will adjust the image if required. Could you post a single image Template or Backup in Zip so that we can see your setup??? DG
-
Steven, In your case I would play with the TV Safe percentage to see if a larger/smaller percentage does it for you. It used to be around 90% on the OLD DVD Player that I had. DG
-
Here's the Page: Do this for all tracks after adding your 10 second first slide. If the track has no Offset value make it 10 seconds. If the track already has an Offset value, add 10 seconds to the value. DG
-
Try: Untick the Fixed Size of Slide box?? Is your dvd player an upscaling model?? Blu Ray players with HDMI handle this best. DG
-
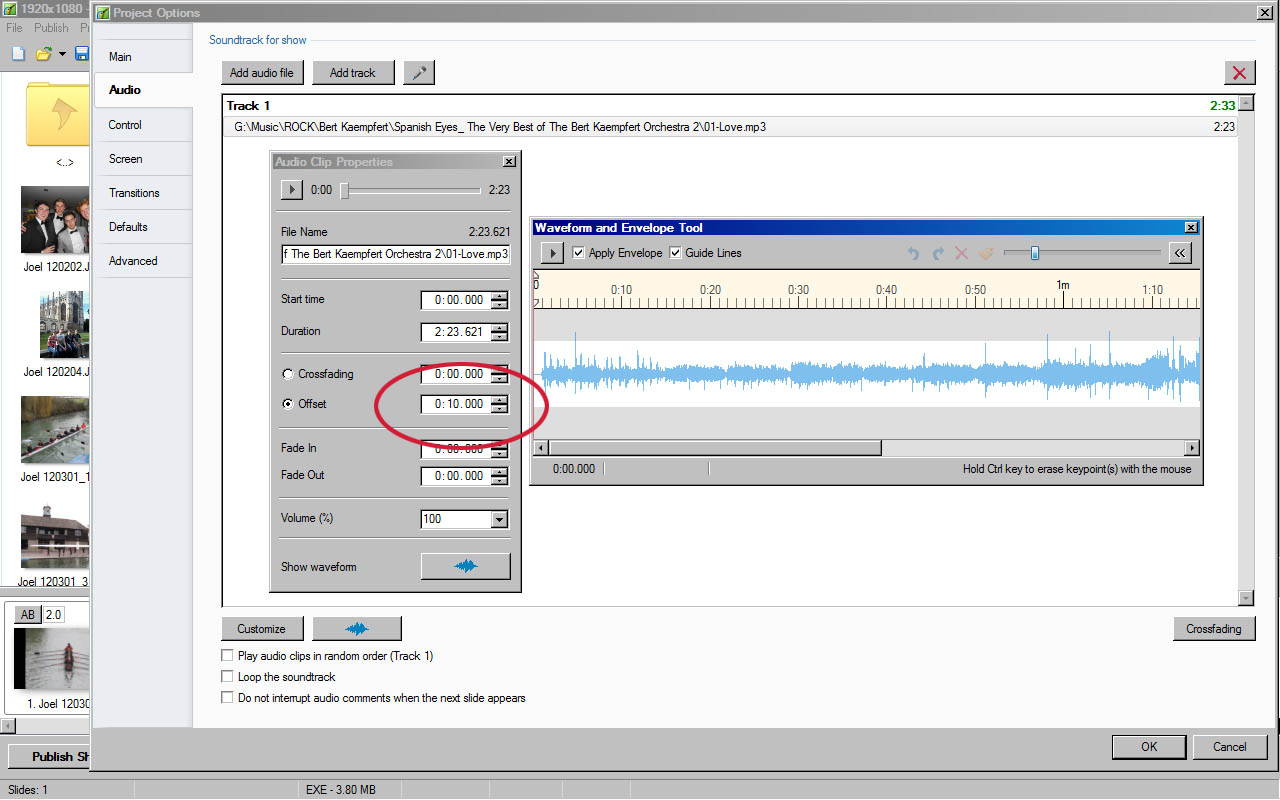
Do you have just one audio track or more? If just one it is simple - there is a parameter called OFFSET - make that the same duration as the inserted new slide number one? If more than one track highlight each in turn in Project Options / Audio / Customize and apply the same offset to all. DG
-
For any out there using NX2, Nikon have released 2.4.1 which claims to cure the problems which have been plaguing some users for a while - the "Temporary Folder nearly full" issue. It also updates the software for all newly released cameras. (D7100 etc). https://nikoneurope-...tail/a_id/55827 DG
-
Hi Igor, 7.5.6 is looking good!! DG
-
Insert your blank slide and set it to 10 seconds. Go to Project Options , Audio, Customize and OFFSET the music tracks by (further) 10 seconds. (Add 10 seconds to existing offset on all tracks). That's just one way. DG
-
Made in Version 7.5.5 at 1920x1080: Double Flip 3D.zip DG
-
Hi Wideangle, Thanks, I have repaired the link - both now work. DG
-
Two Page Menu Template Two Page Menu Notes: In its Extracted folder it (the TEMPLATE) will only work with Version 7.5.5. It could be loaded into another version and, if the Target EXE's are made in the same "other version" could be made to work. The EXE Demo will work regardless of which Version you have installed. The Template is fully customizable. The Template was constructed at 1920x1080. The "Show 1", "Show 2" etc Icons can be made in Photoshop etc at 400x225 pixels with appropriate text and, if saved as the "Show 1", "Show 2" JPEGs in the Template Folder, will overwrite the existing Icons without need for further editing. The existing target slide show will be maintained. The Target Slide Show is changed in the O&A Tab by clicking on the dropdown menu below "Run Slideshow With Return" and pointing to the new EXE file. (Version 7.5.5 is necessary). If using a different version, please use a different option to "Run Slideshow With Return". The "Menu 1" and "Menu 2" Pages are 1920x1080 and can be changed in the same way as the Icons by constructing a 1920x1080 Page in Photoshop etc with your own choice of colour, image and font. Save as "Menu 1" and/or "Menu 2" and the Page will automatically update. The Background image can be changed as required by loading a different 1920x1080 image in Project Options > Screen > Background. The Keyboard has been disabled to force the user to point to Shows or the next Menu Page via the Mouse. DG
-
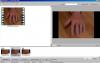
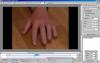
Gary, If you are interested in a "workaround" until what you really want comes along you can use the following method with video: Fig 1 shows a video clip spread over three slides. Fig 2 shows the "resolution" of the middle slide being such that the two key frames in the centre are 6 ms apart. You could easily get down to 1ms. DG
-
Gary, I agree about the 16Gb thumbdrive. I tried one of my HDDs just after getting my TV and found that I could use a 500Gb connected to the TV via USB. I then tried a 1Tb but the Sony would not (at that time) recognize it. I'm told that later models will read 1Tb. DG
-
DG

-
Do you know how to post a screen shot? DG