

Lin Evans
-
Posts
8,206 -
Joined
-
Last visited
-
Days Won
12
Posts posted by Lin Evans
-
-
I don't agree that it's disadvantageous. How would you program this without this feature?
Lin
-
It's by design. There are many animations possible using the hierarchical properties which require "children" to be visible when the parent object's opacity is set to zero.
Think of this example. You want to create an animation where an object begins at the top center of your screen and rotates 360 degrees describing a complete "circle" on your display as if following a giant circle passing to the far right or left, bottom and far opposite before returning to the top. But while rotating in this manner, you want the object to remain in a perfectly upright position throughout the journey around the screen. How do you program this?
It's easy to do by setting the parent and child to identical sizes beginning at top-dead-center. You set the rotation of the parent to negative 360 degrees and make it invisible. You set the center for the child to the proper place on your display and rotate it 360 degrees clockwise with full visibility. The parent's rotation with center of rotation being center of the object keeps the child in perfect upright orientation while the child's center of rotation allows the visible child object to circumscribe a perfect circle on your display. Without having separate opacity, this would not be possible. This is but one of many possible hypothetical situations where not passing opacity to child objects is useful.
Best regards,
Lin
-
Hi Gary,
Yes, that was my point. It's not PTE which is doing the deleting it's Windows Explorer. Again, we will have to wait for Igor's input to further explore this.
Best regards,
Lin
-
Hi Gary,
I don't think that's a PTE feature. PTE is allowing you to open the Windows explorer. In your above screen capture you see many things which are not PTE related such as Multi-Extractor, ShareX, Zemana AntiMalware, etc.
I suspect this may be a Window's glitch of some type. We won't be able to know until Igor gets back from his 14 day vacation.
Best regards,
Lin
-
Gary,
I may be wrong about this, but PTE has NEVER had the feature of allowing one to delete files.
Best regards,
Lin
-
In addition to JT49's suggestions, if you are willing to have an "only" manual advance, you could set a lengthy time for each slide display (say 4 minutes or so) and add your bird sound as an audio comment and repeat the sound to cover the full 4 minutes duration. Then if you advance manually before the 4 minutes has expired, the sound will cease and the next slide will appear. This would not be suitable for an automatically advanced show because of the long slide time for the ones with bird sounds, but it might solve the problem of having the sound cease when you advance to the next slide.
Best regards,
Lin
-
I'm afraid there is no way that I'm aware of to do that If you stop on the slide manually.
You could set the audio time to the duration of the slide but then when that time has passed it will cease. There is no way to make it stop only when the subsequent slide is played.Best regards,
Lin
-
Hi Isabel,
Here's a quick little video showing you how to do this - very easy...
Lin
-
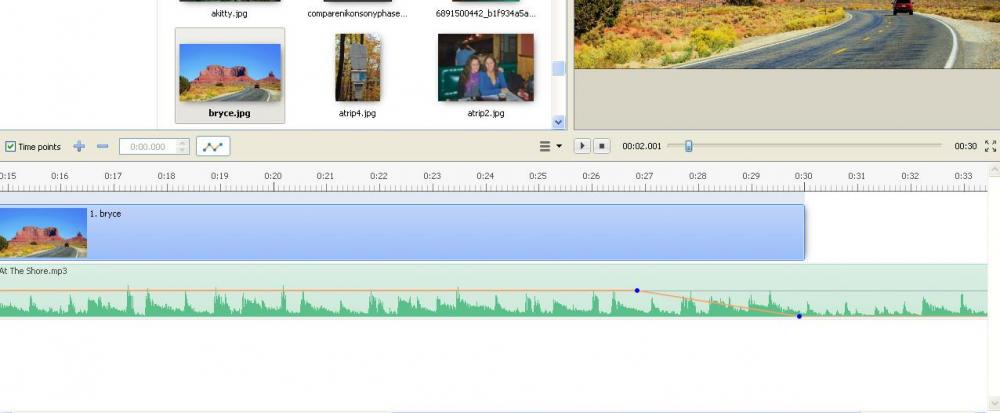
Hi Isabel,
Go to the timeline (from the slide list). You will see a waveform representing the sound. There is an orange line (all defaults) click on this line with the mouse where you want the sound to begin fading. Move further to the right and click again where you want the fade to end and drag the little dot down to the bottom.. This should fade the sound completely..
Best regards,
Lin
-
Hi Nelson - thanks ! I had hoped it would be fun for the kids!! Happy halloween to all !!!
Best regards,
Lin & Ruby pup
-
4 hours ago, JRR said:
well done Lin
Thanks Jim - just a fun thing ! Happy Halloween to you and your family !!!
Lin & Ruby pup -
Back in 2010 after my wife Sherry passed away, I took a long trip with my pups and travel trailer (over 8,000 miles) to both coasts to see friends and relatives. While I was in Pennsylvania, I photographed this ancient house in Coudersport - I thought it would make a nice backdrop for Halloween.. So for the kids in us all.... Happy Halloween Folks!!!
Lin
-
Hi folks,
Thanks for the comments... Below is a quick summary of how this is done - my video tutorial #71 will make it very clear I think.
=========================
Although I have created a video turorial to show how to do these paintings (#71 in my PTE Made Easy Tutorials), I’ll go through a quick verbal description.
These painting shows are done using a combination of PTE and VisiSetch Pro by David Fitzgerald.
I began by creating PNG files depicting a tripod to hold the painting, a tripod to hold the paint pallette, the paint pallette itself and a canvas to place on the painting tripod. The VisiSketch Pro software for this purpose requires two 640x480 images which are identical except in the “primary image” the completed painting is placed on the canvas and the background image is identical except it has only the canvas on the easel.
So it one takes the original total image being used into Photoshop or other image editor and places the background image with the canvas on it adds the png image of the tripod to hold the paint palette and the PNG of the pallett then flattens and saves as a jpg the main PTE image is constructed. Next one selects a 640x480 crop which includes the painting on the easel and the tripods and paint pallette and saves it as the “primary image.” Then take this saved primary image and the image to be painted on the canvas and place it on the primary image within the confines of the cavas and save this as the “background image.”
Now go into the VisiSketch Pro software and import the primary and backgroun images and follow my instructions on the video tutorial to create your VisiSketch Pro AVI file. Convert the AVI with your choice of video software to an MP4 or WMV format.
Open PTE and load the original main image and add in Objects and Animations the converted AVI 640x480 into a rectangular mask to “blend” into your main image.
In my demo here, I have also created masks and a PNG file to allow layering of the windows in the other parts of the image so I can run the rain and lightning animation visible through the windows. I also create a mask allowing me to run a fire video inside the fireplace over the VisiSketch Pro video. This entire ensemble is played as the "child" of a controlling frame which is used to size the entire view near the end.
If you watch my video tutorial it will be very clear how to proceed with creating a painting using VisiSketch Pro and PTE.
Best regards,
Lin
-
Hi Folks,
Those who make AV slideshows for competition say that a good show tells a story with images and sometimes with video, and is enhanced by good background audio. This is an attempt to tell a story with a painting. I think perceptive observers will understand and "get it" but to be clear perhaps an explanation might help.
The title is a major clue. As we see the painting unfold, we notice the differences that outside in the real world it is raining with thunder and lightning. In the fireplace, a roaring fire is burning in the room but in the painting, if we look carefully, only a small fire burns perhaps indicating a different day, and on the upper left through the window panes it's bright and sunny outside. As the painting unfolds, near the end we see that on the foot rest in front of the couch, the subject which is not actually in the room appears.Using this technique, perhaps some additional dimensions in telling a story with audio and visual might be realized?
Best regards,
Lin
-
Thank you Igor for the tremendous tool, PTE, and for the incredible amount of time and effort you have put into making this product into the finest presentation software available. You've dedicated half your life to this end. I hope people appreciate the great sacrifices you have made in the interest of producing this amazing software!
Best regards,
Lin
-
The first release version of PTE was in 1999 and Wnsoft LTD began in 1998. I've been using it since shortly before the first release. We had a forum of sorts but it was revised, I think, in 2002 and most of we old timers registered on the present forum on 7 December 2002.
Best regards,
Lin
-
Thanks Gary,
They can be fun to do... This one wouldn't be complete without a portrait for the kids so....
Best regards,
Lin
-
Last night I did a show for two special friends. They were married this summer and I've had the pleasure of watching this young man from his birth to his present occupation as a Research Fellow at Harvard University Medical School.
The show took a total of about 15 minutes to create almost entirely with slide styles using PTE. It shows that a busy professional can make a decent slideshow very quickly for clients using this fine product. Yes, I could have carefully sequenced the slides so that a completely logical progression from the beginning through the ceremony to the reception was organized, but that wasn't what the young couple really wanted.
Thanks to the various contributions from members of this forum and from the developers, using my own styles and modified styles from others and original unmodified styles, the show was quickly and efficiently created and the young couple and their families loved it so I'm happy to have been able to give them some great memories of their special event.
Published to Slideshow Club in Mac and PC Safe Versions...Best regards,
Lin
-
By holding down the CTRL key and left clicking mouse cursor on objects on different layers you can see the individual keyframes for each object simultaneously. You can also change the width of keyframe appearance by the "tools" button "Keyframe width" if this helps.
Best regards,
Lin
-
Hi Ale,
From the User Guide -
CRTL + F11
CTRL + F12
CTRL + Mouse WheelLin
==============================
Timeline
-
F5 - Quick Preview
-
Ctrl+E - Shift Transition Points (by selected amount and direction)
-
Ctrl+Alt+H - Cut All Transition Points
-
Ins - Insert a Transition Point at the Cursor Position
-
Ctrl+L - Lock / Unlock All Tracks (See icon at end of track)
-
Ctrl+M - Mute / Restore the Sound in a Track (See icon at end of track)
-
Ctrl+F11 - Adjusts the Width of the Timeline (Zoom in)
-
Ctrl+F12 - Adjusts the Width of the Timeline (Zoom out)
-
Ctrl+Mouse Wheel - Adjusts the Width of the Timeline (Zoom)
-
Ctrl+PgUp - Move Track Up
-
Ctrl+PgDn Move Track Down
-
Ctrl+Shift+T - Set Time of Points ????????
-
Ctrl+Shift+Mouse Wheel - Height of selected audio and slide tracks in timeline view
-
Alt+C - Opens the Folder containing the selected Image
-
Shift + Left Mouse Click on a Track - Move all Clips in the Track (to the Right of the Click Point) to the Left or Right
-
Shift + Left Mouse Click on a Key Point- Constrain movement of Keypoint to Vertical Plane
-
Shift + Left Mouse Click on an Audio Track- Constrain movement of Track to Horizontal Plane
========================================
-
-
8 hours ago, museumj47 said:
I have created manual controlled show in studio 10 on desktop PC. Created zip file, copied and pasted to windows10 laptop. Can I open up these photographs in studio10 on my laptop to save having to redo my workflow even though I do have copies of all the photographs on the laptop. I wish to continue adding to the show. Hope I make sense.
disappointed that I cannot now create executable show and play on my MacBook Pro.
Use PTE 9 (you can install it with your same key) to create MacIntosh executable apps until the full MacIntosh version is released.
Best regards,
Lin
-
Actually Doug,
There are hundreds of free tutorials right here in the Tutorials section of the forum to help you quickly learn to do about anything you wish with this program Both Barry Beckham and I have loads of free video tutorials. Among many other explanations, my tutorials explain how to do all the animations shown in the sample video and Barry's are amazingly instructive.
You can create a great show in 10 minutes of installing this program. Once you understand the very basics it's amazingly intuitive. Dave's instructions in the user guide go into great depth of detail but you will find the video tutorials make it very, very easy to understand exactly how to proceed.
Many of the animations you saw in the demo are very quickly and easily accomplished with "styles." Some of our experienced users have created styles which you can simply use by selecting the proper number of images in the slide list and applying the style in a very few key strokes. For example, the amazing Rubik's Cube you saw is a style one of our very experienced and talented French users (Jean Cyprien) gave us. You just select one 16:9 aspect ratio image for the background and six "square" images for the sides of the cube and apply the style and in seconds you have the entire animation. If you would like any of a number of beautiful snow globes with falling snow and the image of your choice inside, just select the image and apply one of my snow globe styles and instantly you have the complete animated snow globe with your image inside and snow falling. There are hundreds of styles available and more being introduced daily. Click the link below and download, extract, and run the zipped executable. It's a demo of about a hundred different styles which were available over a year ago. Just use the space bar to stop and proceed and the back arrow or back key to go backward. You see what each style does.
http://www.lin-evans.org/styles/stylesdemopc.zip
Best regards,Lin
Best regards,
Lin
-
Doug,
PTE AV Studio 10 Pro is THE software chosen by the most critical users in the world, people who make championship audio-visual shows for competitions. It's the leading software for this venue by a literal LANDSLIDE and there is a very good reason. It is by far the most powerful software of its type available. Though is doesn't directly support BluRay creation (BluRay is rapidly being replaced by MP4's on thumb drives) it still supports DVD and has powers and capabilities which are unrivaled by other competitive software. Here is one of my sample shows to see some of the more esoteric things which "can" be done with this software. There are boatloads of examples of normal and beautiful audio-visual shows including video, multiple audio tracks, styles, themes, etc., available to see, but my reason for creating the show below was to show the possible and this show was created a couple years ago before the current 64 bit capabilities were even available. Watch the entire show and then look at various shows available to see all the conventional possibilities as well. This product is incredible - literally incredible. I've used about every major presentation slideshow product available and nothing compare in my experience.Best regards,
Lin
-
Thanks JR,
It was a fun project...
Best regards,
Lin

Mac file
in General Discussion
Posted
In addition to Jill's coment... The reason that this feature was dropped in Version 10 is that Apple keeps moving the goal posts. Native Mac "executable Apps" which worked on MacIntosh operating systems a year ago, no longer work with their latest operating system. They are making some MacIntosh users unhappy because legacy software they have used for years is no longer viable with the latest OS. When Apple makes changes which obsolete prior software it make it very, very difficult to create files which can be guaranteed to function. Go ahead and use version 8 or 9 to make Mac native apps and when the Native PTE Mac version is ready you will be able to use it to make Mac or PC executable files.
Lin