
Paiche59
-
Posts
132 -
Joined
-
Last visited
-
Days Won
9
Everything posted by Paiche59
-
A particle system is a collection of many particles that together generate an amazing graphical effect. Over a period of time, particles are generated, move, evolve and die within a system. There are advanced software programs (such as TRAPCODE PARTICULAR) to produce systems containing tens of thousands of particles. Smoke, cascade, fireworks and many other effects can be achieved. The Excel generator for PTE is a very basic generator and cannot compete with specialized software. However, it does the job of generating simple systems. This rudimentary generator is designed for people who are used to handling PTE objects in the object editor. Some basic knowledge of the Excel worksheet is also required. The Particle Generator in Excel does not include a value control, so it is necessary for the user to have a good knowledge of the allowed values of the different settings. Generalities: - Generator under Excel version 2016, but probably compatible with other versions (and probably also with OpenOffice) - Excel is configured with the point (.) for decimal separator (not the comma as in France for example) - The generator uses an Excel macro to create the PTE objects. Therefore, it will be necessary to activate the execution of the Excel macros when opening the Excel file. - Excel generates in column "A" of the "Result" tab a list of PTE objects (one object per particle). Column "A" must be copied and then pasted into the PTE object editor. Principle: - Each particle is a PTE object with two control points: the first control point corresponds to the birth of the particle (initial point) and the second to its death (final point). - A particle has all the properties of a PTE object at the starting point and at the end point: Position, size, opacity, color, rotation, etc. - For a particle system, it will be necessary to define: . the particle image file . the number of particles. Do not exceed a maximum of 5322, as Excel will generate an error beyond this limit. In practice PTE is no longer fluid when the number of particles exceeds 800, but it still works with more than 5000 objects. . the trajectory of the particle flow (Bézier curve) . the lifetime of the particles . particle flow: acceleration, gravity, diffusion Instructions for use: - General: . Cells with white or gray fill color are fixed or calculated values, they must not be modified. . The cells with the blue fill color are property labels. . Cells with the orange fill color correspond to a property that can be set. . Many properties of a particle are set according to a random function between a min and max value. If only one particular value is desired, the min value must be equal to the max value. - Setting the particle system parameters . Specify the number of particles in the system . Set the duration of the animation (in thousandths of a second). It is the duration between the appearance of the first particle and the last particle. . Set the maximum particle lifetime (in milliseconds). This is the time between the appearance of a particle and its disappearance. . Set the offset time for the appearance of the first particle . The path and image file of the particle. It is preferable to have png files with transparency management. The particles are preferably white so that they can be easily colorized with a PTE color filter. . Set the particle flow parameters : Gravity: defines the intensity of the attraction, a value of 100 corresponds to the half height of the screen. A negative value corresponds to a negative attraction: movement towards the top of the screen. Angle: scattering angle of the particle emission. Between 0 and 2*pi. Radius: radius of diffusion around the emission of the particle. Acceleration: coefficient applied to the acceleration of a particle calculated according to the particle system curve. - Generating the particle system . Just click on the "Calculation run" button. With my laptop, 12 seconds are necessary to generate a system with 800 particles. . The result of the calculation is stored in the "Result" tab that is displayed when the generation is completed. - Importing the particle system under the PTE object editor . Copy the entire column A of the " Result " tab to the clipboard. . Paste the contents of the clipboard under the PTE object editor, preferably into a frame object. . It is possible to generate several particle systems, then to include them in the same slide. The attached Excel file contains the settings that generated the particle system presented in the video above. I hope you will find this particle generator useful. Let me know if it works for you. Best regards, Pascal. Particle demo.mp4 Excel particle generator and sparkling star.zip
-
Don't worry Lin, every discussion is interesting. I post below (because I can't post on the Tutorials & Video Lessons forum) some explanations on how to create a particle system for PTE with Excel. I am aware that this is not an appropriate interface for this, but it might be helpful for some of you. The explanations are very brief and probably insufficient (my English is limited and I don't have the pedagogy of my compatriot Jean-Cyprien). Moreover, it is preferable to have some notions of how to use a spreadsheet. Hopefully this tool will be useful. Best regards, Pascal.
-
Good morning, Inova, your example animation is light, but as Lin writes, it is not a particle generation. It is true that animation under PTE is a bit jerky when the number of objects is important. On the other hand the creation of an mp4 video of the animation allows to obtain a perfectly fluid result. When the number of particles becomes too important to have a good fluidity under the PTE editor, it is also possible to generate a video of the animation then to use it as a video mask. Lin, which software do you use to make this particle animation? Best regards, Pascal.
-
Hello, Tom, In fact, I have created a particle system generator in Excel that calculates the displacement of all particles along a parameterized trajectory. I submitted this particle generator to Dave for a first test, if it is conclusive or if the generator interests someone, I can publish a tutorial on the forum. Pascal.
-
Hello all, Below is a style that produces a flow of sparkling particles. Each of the stars is a PTE object (800 in total). Other examples are available for free here on the DiaporaShop site. Pascal. Particle flow sparkling.mp4 Particle flow - sparkling.ptestyle
-

Problem with .wma audio file [NOT SUPPORTED FILE]
Paiche59 replied to Paiche59's topic in Troubleshooting
Thank you Igor for that quick analysis. Strangely, the cut file does not actually work with PT9 (freeze), but the full version of the file works correctly. I will try to convince my client to use mp3 audio files instead. Best regards, Pascal. -
Problem with .wma audio file [NOT SUPPORTED FILE]
Paiche59 replied to Paiche59's topic in Troubleshooting
Hi Igor, I get a coupe of WMA audio files with VLC. The orginal audio file has a size of 22 MB The coupe has the same problem. Personally, I use mp3 audio files. I have a customer who buys audio tracks on the net in wma format, it is these files that are the problem. Pascal. vlc-record-2020-02-05-08h33m52s-Fields Of Gold-.wma -
Hello, It seems that the PTE AV Studio 10 version has a problem with the playback of .wma audio files: no sound. Playback of this file format is not a problem in v9. Pascal.
-
Hello Manuel, Very nice effect, really impressive. Best regards, Pascal
-
Happy New Year 2020 to the WnSoft team. It's a pleasure to see the picture of the team who worked hard to offer us the version 10 of PTE. Best regards, Pascal.
-
Igor, very nice presentation of the main features of PTE AV Studio 10. Best regards, Pascal.
-
Hi Igor, The problem is now fixed with this test version. Thank you very much. Pascal.
-
Hi Dave, Yes curiously, it works fine with a single variant or with multiple variant in list, but not with a multiple variant buttons. Pascal.
-
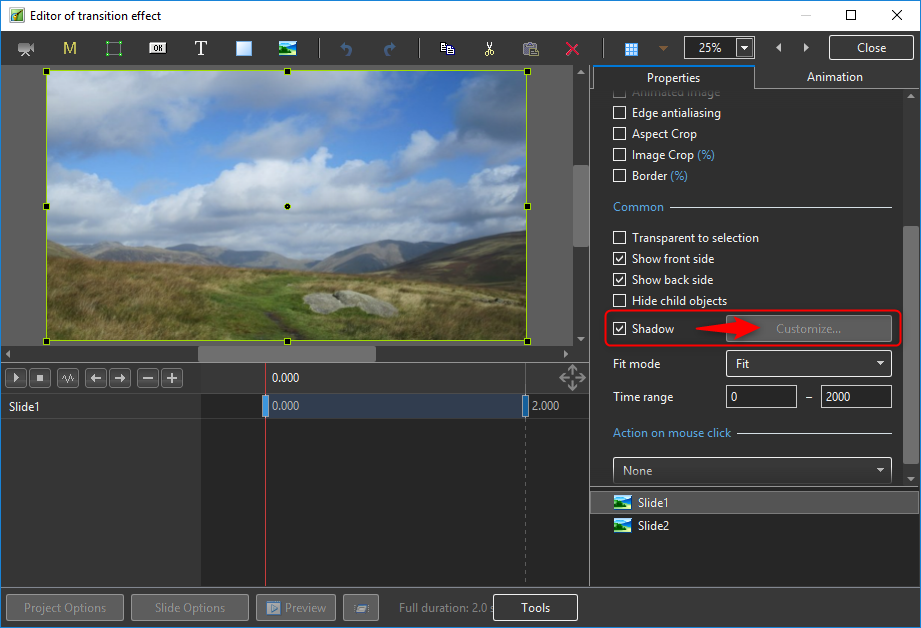
Hi, The Customize button for the Shadow option is not be activate in the Editor of transition effect only when I set multiple variants - buttons. Pascal.
-
Hi, The installation of the new PTE AV Studio 10 version went without problem. The import feature of the parameters from a previous version has allowed to find all the syles and transitions created with version 9. And good news, all styles and transitions in version 9 work perfectly well with the PTE AV Studio 10 version. Congratulations to Igor's team and the many members of this forum who contributed to the success of this new version. Pascal.
-
Thanks a lot Tom, The facets version of this transition is also my favorite, it is simple and works well with most images. Best regards, Pascal.
-
Thanks Igor. Pascal.
-
A short video demonstration of the Split pattern transtion effects.
-
Hello, Here are two sets of four transitions. These transitions produce zoom animations (in and out) on images cut according to a pattern: facets, stained glass, circles, square blocks. You can easily adapt these transitions using your own patterns (masks patnn1.png ... patnn4.png). These transitions are fully compatible with PTE10. Best regards, Pascal. Zoom in pattern.pteeff Zoom out pattern.pteeff
-
Thank you Igor, I couldn't have hoped for better! Having the motion blur option in PTE 10 is very good news. This new option will undoubtedly be an important source of creativity. Igor, just one question: will the motion blur option also work for a zoom in/zoom out effect as in the example below?
-
A whip pan is a type of pan shot in which the camera pans so quickly that the picture blurs into indistinct streaks. It is commonly used as a transition between shots, and can indicate the passage of time or a frenetic pace of action. Wikipedia source : https://en.wikipedia.org/wiki/Whip_pan This effect can be simulated in post processing by applying a directional blur filter to the images. PTE has a blur effect (Gaussian blur type) that acts in all directions at the same time, but does not provide a directional blur filter. However, this result can be approached by superimposing a significant number of the same image, each layer being shifted in the direction of the desired blur. In addition, each image will have to be configured with a low opacity level to be almost transparent. These transitions are to be used with a short duration (0.3 to 0.6 seconds). I think that an interesting result is obtained with a transition time of 0.4 seconds. These transitions are very CPU intensive, so I only use them with mp4 video output. Below is a demonstration of the transition effects : Whip pan direction.pteeff
-
Hi Lin, A pretty slideshow with very beautiful coloured jewellery certainly full of memories. A beautiful tribute to your wife. Kind regards, Pascal.
-
Hello Jean-Cyprien, Indeed, these transitions should be used sparingly and in an appropriate image context. Best regards.
-
Here is an example of my last series of transitions using the threshold mask principle. This transition shows the second view separated from the first by a colored border (white and blue). 11 other transitions of this type are available on DiaporaShop. I also explain how to change the color of the border. You can create your own effects based on the example in this post. To obtain the colored border effect between the two transition views, I use three groups of threshold masks stacked on top of each other. Each of these groups embeds exactly the same pattern and therefore produces the same animation. The three groups contain from the highest to the lowest: the final image the secondary color of the border (blue) the main border color (white) The colored border appears due to the time shift of the key points of the different mask groups. The larger the time difference between the mask groups, the thicker the coloured border. Enjoy, Pascal. White border.pteeff
-
Slide Styles for transitions by threshold effect.
Paiche59 replied to Jean-Cyprien's topic in Styles & Templates
Thank you Jean-Cyprien for this great work of pedagogy and formalization about the technique of the threshold mask. I hope that this technique will open up new perspectives for creativity, not only for transition effects but also for other animations to be integrated into the views. A brief remark about the rendering between softness (denevele) and blurred: I prefer the rendering of the blur effect to that of the denevele (difference between the values of the black and white points), but the blur leaves the edge of the image of the second view slightly transparent. As a result, at the end of the transition, the full display of the second view causes a slight start. That's why I use the denevele for transitions. Best regards, Pascal.