Hawk
-
Posts
392 -
Joined
-
Last visited
Everything posted by Hawk
-
Digi Sorry to hear it did not work. There is a chance that " Repeat playback of disc " may not be enabled yet in Video Builder. However, I will also give it a try on my end possible later today and advise.
-
Hi Phil, welcome to the forum. If you know ahead of time that you are going to be creating a DVD I would recommend when constructing your show in PTE in the “ Object Editor section “ under “ Tools “ to check mark “ Show TV safe zone “ to see the actual TV image. Sometimes I leave this on or check periodically when making an EXE presentation in case I decide later to burn a DVD. You can turn it off and on at anytime. Also in Video Builder second page “ Menu Page “ it can be turned on under “ Edit “ to view lost section of the menu. This would explain why your images look perfect in the .EXE and cropped smaller on the TV if this is the case. ** Safe TV zone
-
Hi Digi - welcome to the forum I have never done it, but under Project Options - Advanced Options - check " Repeat playback of disc " should do it ! I would have to think that on main page of VideoBuilder you would have to un-check - " Create Menu " ?
-
Hi Peter - centering Not sure how you made out with Barry’s suggestion, but here is a method I use to get opening centered creating a mask. I use PTE and Print screen key option to center objects. For example – add any image to PTE “ Slide List “ Open this image in the O&A section and resize the image to opening size you wish – right click and choose “ Put to center ”. Go back to main PTE interface and click your image in the “ Slide list “ to highlight and in the larger “ Preview section “ click inside the area to view FULL SCREEN. Hit the “ Print screen “ key. Open Elements New – Blank file – 1024 x 768 – Transparent. Then I choose “ Edit “ – Paste ( pasting the clipboard print screen image onto the transparent ) Now using the rectangle “ Marquee Tool “ I simply trace around the inner picture and hit the delete key. This leaves you a transparent center with a black border – save as .PNG file. ** If you wish a different color border – use paint bucket before saving. Now as Lin explains add this into O&A – bring this .PNG file to the front. Your grandfather images ( 1 back ) can now be zoomed out within the transparent opening in the mask you created. ** If you prefer a color background in the opening behind your grandfather’s picture as you indicated, create an image file with the desired solid color 1024 x 768 – add into O&A as an object, right click on it and in the section " Order " choose – “ Send to back “. Do not use “ Customize / Main / Background as this color will show in the transition.
-
Hi John Also glad to hear the evening went off to your satisfaction. This was a first try for me with the sample, could you take a moment and explain what procedure you finally used for the benefit of anyone else wanting such a structure.
-
Hi John I have created a quick demo for you with ver 5, one method that should work for you. You will see in the menu demo show “ Menu_Demo.PTE “ once opened, in section “ Project Options “ I have checked “ When show ends keep last slide on screen. Also I duplicated slide one and made some changes in slide two. Slide one I have no active links, as you do not want the links to work with music playing in background. The music would play while Photoshop is being used, so slide two will turn audio off. Slide two has the links active once the music is turned off, and will not interfere with audio in your presentations. In order to turn music “ On “ and “ Off “ in this demo I used the “ Customized settings in ( Music ) Also I used “ Stop at end of slide “ in both slide 1 & 2 If you download the demo ( all files ) check out the settings in the .PTE file. Their maybe ways of tweaking it further. Just a quick thought, as to your request. Some members may have another method. Posted Demo on MediaFire – 14.21 MB ( all files ) ** I substituted “ Notepad.exe “ for program Photoshop http://www.mediafire.com/?11mfezdzchy ** Further If your menu is a small intro show ( say 1 to 10 slides ) then the above would be added as slide 11, the audo " off " would take you to slide 12. Also make sure in " Project Options / Screen - that " Hardware acceleration " is unchecked in the menu presentation.
-
Ken Here is something else you may want to consider adding to your extra burn folder. ( even in a sub folder ) In PTE main interface under “ File” section – “ Create Backup in Zip “ Add the .zip file. This would be a back up on the DVD disc in the event you wanted to EDIT your presentation. The backup .zip does not include an .EXE file but includes the .PTE working file and all edited images, sounds, music and settings to your show. To edit at any time would be as simple as copying the .zip file back from DVD disc to your hard drive and extracting the files.
-
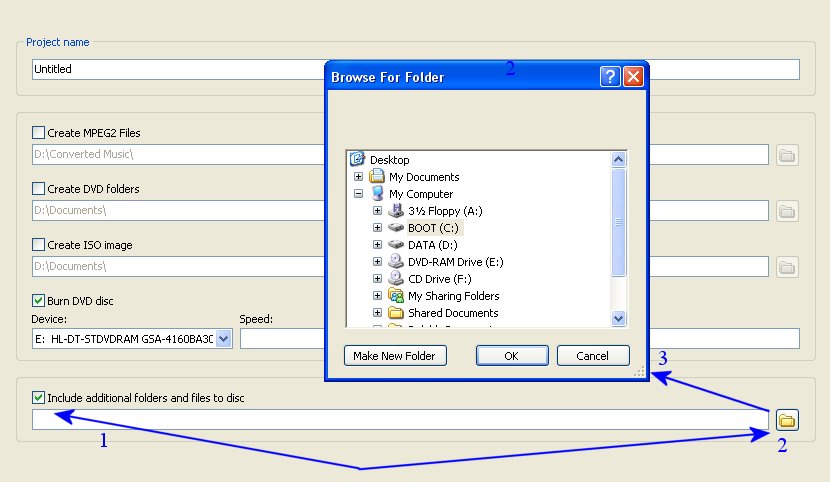
Hi Ken - welcome to the forum Yes - by all means you can add / burn any files to the DVD. When you get to the "Burn" section, there at the bottom you will see " Include Additional Folders and Files To Disc " just check the box and then click the "Browse" button to go to folder. Video Builder I have also used Nero 7 and there are others, however very simple with Video Builder.

-
YG The link you have provided is just the .PTE working file. It would have been better to include the complete test show. If you open the test and click “File” – “ Create Backup in Zip “ and post the new .zip file one could see if the test show runs on their computer, also check the images and burn procedure using Video Builder. Unless alrobin or another member can read the .pte file and pick up on something.
-
YG YG Is there a chance you could " Create Backup in .zip " - In " File " section. Take the first 10 slides and create a sample show for some members to have a look at to see if they could spot any errors. Post a link for download to a web site or you could use MediaiFire file sharing. http://www.mediafire.com/
-
TG I could be wrong about DirectX for Video Builder, and may only apply for version 5 - pan and zoom. Quote from FAQ: For slide shows with Pan/Zoom effects: PC with 1.4 GHz CPU, 256 MB of system memory, video card with 128 MB of video memory. Windows XP, Vista, 2000, 2003, Me, 98 or 95. DirectX 8.1 or later. I would not be concerned with sync this at this time, as this problem is another different one and can be fixed - at least we know you now have pictures. With Video Builder, could you supply some other computer specs, specially available hard drive space and version of Windows. The show you were working on seems to be large, Can you create a small show as mentioned above.
-
YG Direct X - is important for WnSoft Video Builder. Not sure if the problem is here or not ? You can check your installed version by: From the Start menu, click Run , and then type: ( dxdiag ) It will be listed at the bottom of the main page - post your findings. ------------------------------------------------------------------------------ I take it as it Previewed OK - did you try leaving PTE open and a burn with Nero ? I would fully advise to create a small show - 5 - 6 slides using some of the same images until problem is solved.
-
Paul Always nice to view a presentation with a different twist. After just purchasing a D40X, I questioned what you could capture using ISO 1600 Job well done.
-
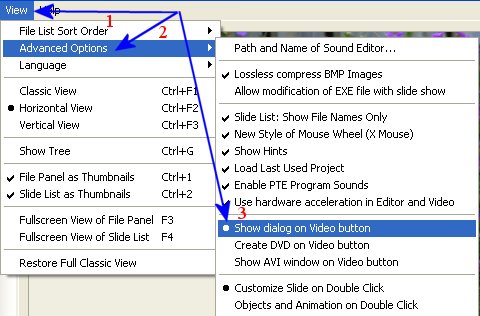
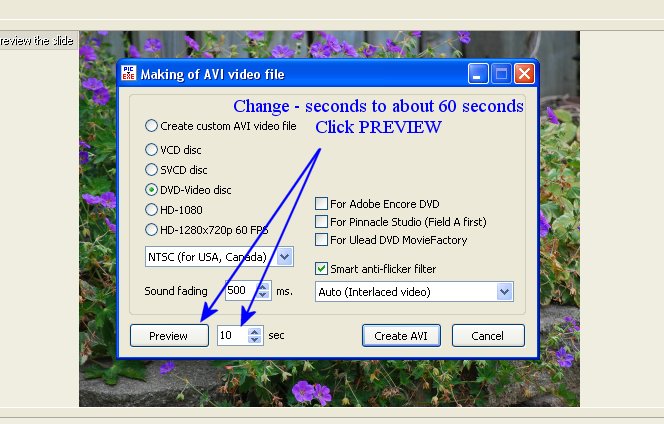
Hi YG It appears you have made a change at one time - In section - View - Advanced Options and chose ( Create DVD on Video Button ) Check this section and click " Show Dialog on Video Button " - you will then have both options show ( AVI & DVD ) To narrow down your problem I would recommend choosing AVI - click on ( DVD - Video Disc ) then the Preview button to check if your show previews OK in Windows Media Player. ( change Preview time to about 60 seconds ) Lets us know results if it previews OK. Preview If you choose " Create custom AVI " - accept the default " Picture to EXE Video Codec " ( in Video Codec ) Audio Codec should default to " 44.100 kHz - 16 bit - Stereo Then Preview If all seems OK - if you use Nero - as Ken suggested - DO NOT CLOSE PTE until burn is complete. Are you getting a " No pics - black screen using " WnSoft Video Builder " ?

-
Hi Ron Open Project 1 With left mouse button down, drag mouse right to left to highlight slides you wish to copy - right click and choose copy slide. DO NOT CLOSE PTE Go - File - Open Open Project 2 Right click in the slide list – choose paste. Seems to me that you maybe copying slides closing PTE and re-opening PTE ? Ken Cox mentioned just this morning to me that he has combined two show using this method, however some tweaking may have to be done. A recent finding by fellow member davegee ( Dave ) you may want to read this thread. Post #8 – also Post #7 by Igor http://www.picturestoexe.com/forums/index....amp;#entry43847 Any problem with the temp - copy / paste method above – let me know.
-
shito I did view your images and a very nice job you did indeed. Glad you accomplished what you set out to achieve. Michel What else can I say, but a completely outstanding presentation!. Nice demonstration of sound over. Great sound effects and fantastic images. Thanks for sharing. Noticed this was your first post, hope to see more of your creations.
-
loftphoto By your initial post I am not sure if you want to add / create icons for a self made navigation bar with ver 4.48 with action, or customize the navigation bar in ver 5.0. Both can be done in either version. In 4.48 you can create buttons with an action import using the picture icon at top left in the Object Editor and then Group them as a navigation bar copy and paste into every image. Ver 5, I create a new folder in the Navbar folder found in the path Ken mentions above and name it Hawk style.pt for instance. Do not forget the .pt as it will not load without it. Then I copy all files from folder ( Sky style.pt ) and paste into this new folder. There are actually only two files you need to edit just to keep it simple. Files: NavBar_Background.png NavBar_ButtonsBg.png You could also edit the buttons seperatly. Sample: You may want to look at this first try of ours and thedom who had a very nice sample done, but unfortunately his link does not work at this time. http://www.picturestoexe.com/forums/index....avigation%20bar I thought there was a " Blow by Blow ' thread on how to edit navigation bar ( possibly by Igor ) but using search, I cannot find.

-
Howard In my test Howard I used only two images ( rotated ) all files in one working folder and it did not pick up the .ini file in the .zip file. Give it a try, just to verify. In your case were you have more than one .ini file, it may only create one main one from the path when " Create Slideshow As " is clicked. Just a wild guess on my part. I would definatly choose " Create Slideshow As " - " Save As " (exe) before choosing " Create backup in zip "
-
Thanks Al If this is the case Howard I do hope you still have your working folder. Lets hope you do, and if so in this folder you will see a file named “WnsoftFolderInfo.ini “. If you copy and paste this file into the not working extracted folder – it should work as intended – all images you chose as rotated. If your friend puts this .ini file into the folder on his machine after extracting the not working .zip, he should be able to view as you wanted him to after opening the .PTE file. I am sure Igor will be pleased at you finding this error as it is actually a major one when someone like your self has 100 or more rotated images in a large presentation. Lets us know how you make out. Thanks Al and Stu for following along with your input.
-
I notice that in the working folder when one “ Rotates an image “ it creates a “ Wnsoftfloderinfo.ini “ file. ( Rotation information file ) However when “ Create a backup zip “ is created this .ini file is not included ? is it compiled in the .PTE ? Howard thanks for bringing this to our attention – sure is a mystery. I have to run to a family outing but will work further with this later in the evening.
-
Howard / Stu It seems something is very strange here ! It seems to have something to do with “ Extracting the .zip “ Makes no difference if I “ Save As “ and “ Create As “ before backup If I click to “ Create Back up in zip “ – then double click the zip file and then the .PTE file, Pictures to EXE opens and all is saved / showed as it should ( portrait images ) But - if I extract the .zip file and then click on the .PTE file which opens Pictures to EXE the images are landscaped ??? Ver. 5.2 of 5.0 I use XP – right click extract. Do I need a tutorial about the characteristics of a zipped file? , I know I am loosing a few feathers. Howard / Stu can you or someone else verify the above. ** I might add, that I was using original images 1024 x 768
-
Hi Howard I take it that in your construction you used “ Rotate Clockwise / Counterclockwise ( lossless ) in the slide list section with right click - which does show proper in the O & A and previews as you would expect. I fully agree that I also would have thought PTE should have generated the saved backup with the intended settings. Note – What is strange is if you had used “ Rotate “ 90 degree for instance in the O & A section, this does Back up with proper settings of image. Possible “bug “ I have to agree. I am sure Igor will explain if this was intentional for some tech reason.
-
Hi Brian I must admit I am not keen on much animation in my shows, but others are. I do like animation in a menu show on the menu, as an intro into a DVD; also possible in the Start up Screen, which does not support animated gifs at this time. No doubt Igor will do his best to be able to add this format in future development if it is possible. As you are aware, but for the benefit of any new users there is a work around. As we have seen over the time of beta testing, Lin Evans, JPD, thedom and many others have shown us tricks that seemed unbelievable at first thought. ( Both with graphic work and the power of PTE ) The animated .gif file can be broken down into separate frames, your sample above was 200 frames with a heavy file size of 35 Meg +. ( at 800 x 600 ) With all 200 images added to the presentation it runs basically very smooth with certain settings. Your sample for instance with a Project Option – ( Main ) - Time Interval for new slide set to 50 MS. Project Options ( Effects ) - Fade in/out set to 50 MS effect duration, gives the rotating text a rather smooth motion. No doubt it could be tweaked even further. ( by someone with more expertise than I ) A single animated .gif file format sure would be a welcome addition. Thanks for the info.
-
olivier I do not know if this has any bearing on your problem or not. But in early beta testing we were advised to upgrade our Direct X Can you advise what version Direct X you have installed.
-
Hi Brian Thanks for the comment. No secret here! I have a Nikon 4500 digital, I simply use my tripod and set to "Fireworks" mode. This auto sets the camera for landscape - no flash Once a couple of fireworks are set off, looking through the preview screen I get an idea as to height and set - no zoom. When I hear the (hiss) as they are lit, I click the shutter. I just keep clicking through the entire show. Out of about 60 shots I would say I end up with about 45 - 50 decent ones. On this setting "Fireworks mode" the shutter speed is slow (3-4 seconds?) long enough to capture the burst. The last outing the other evening (Canada Day) they were set off rather rapidly so it was a matter of just keep clicking the shutter. Between each shot it does take about 10 seconds to digitalize and save the image. A tripod is a definite must have. Not a photographer - just a happy clicker!