davegee
-
Posts
9,323 -
Joined
-
Days Won
59
Everything posted by davegee
-
I have downloaded the ZIP File. I have opened the project and made an ISO File, which I will play tomorrow (too late now). Looking at the Timeline on my PC one thing is obvious - The waveform shows a gap between Blue Danube and Just a Closer Walk. However, audibly there is no gap. My suspicion is that it has something to do with the types of audio files being used. Maybe the MP3 files are Variable Bit Rate (VBR) and they should be Constant Bit Rate (CBR)?? Someone else might jump in overnight - if not I will continue tomorrow. DG
-
Greyspider, PLEASE follow instructions carefully: 1. Open your project 2. Go to File / Create Backup in ZIP 3. You will probably find that this file is BIG. 4. If you can possibly do it, reduce the number of images and Audio Files in the project to the MINIMUM required to show the problem. 5. Repeat the Create Backup in ZIP Process and upload to MediaFire or DropBox. Your ZIP file above is unopenable on my PC and a .pte file will NOT show your problem. DG
-
The rar is another zipping format and whilst totally unnecessary should upload here in advanced options. I have seen it here before. The Windows zip sometimes becomes unavailable when something like rar is installed and then has to be re-installed. Check "right click/new/compressed zip folder".
-

How can I make my video clip brighter?
davegee replied to smokinggoldfish's topic in General Discussion
WORKS OK HERE LIN. DG -
Are you saving after the adjustments? Can you upload a template/BIZ? DG
-
Can you post a short example template or BIZ which will show the problem. A couple of slides and two short audios?? Dropbox or Mediafire. DG
-
Do a search of your hard drive using the exact full name that appears when you publish. Do you have multiple incidences of that file in different folders? DG
-
Guidance for a beginner using PixBuilderStudio
davegee replied to Highland's topic in Equipment & Software
Pixbuilder is no longer being developed by WNSOFT and AFAIK the the only spport is here: http://www.wnsoft.com/files/pixbuilder/user-guides/PixBuilder_User_Guide_EN.pdf There are a number of users who, if they spot your post, might jump in. If you post specific question (in OFF TOPIC) someone might help? DG -
P.S. As I said in Post#2 this has been discussed before: http://www.picturestoexe.com/forums/index.php?/topic/16465-video-clip-length/ DG
-
Thanks Jose, You have, basically, repeated what has already been said and is correct. I would, however, like to take you up on one point. There is NO Automatic Conversion. I think that what you refer to is the fact that if you accept the offer of Optimistion the the Conversion window is hidden from view in the background. You can view it by minimising the PTE Window. You can then halt the process and change any settings that you wish. We are talking about two processes here: 1. Conversion of a Video 2. Trimming of a Video The only "problem" or "issue" which Gary originally spoke of is that PTE does not re-calculate the Slide Duration when a video in an existing slide has been trimmed. How you add video is irrelevant to this issue. It is the Trimming of the video in existing slides and its effect on the duration of existing slides which is being discussed. DG
-
Gary, The recently posted Video Demo on this subject is a good example of what I described above - including the use of KFSD. "You do the Right Click thing on a video in the File List and it creates a Converted/Trimmed Version named whatever you want to name it by using the BROWSE Button in the converter interface. You can eliminate the "converted" bit altogether. So you now have two versions in your File List - the Original and the Converted/Trimmed versions. THEN, you drag the converted/trimmed file into the Slide List and it creates a slide which is identical in length to your Video Clip." DG
-
Jeff, Analyse this? Project1_Nov12-2014_20-48-18.zip DG
-
Hi Jeff, Sorry if I confused. As Peter said tick the image or video option and browse to find your diamond. DG
-
A white rectangle of any size can be used and added (as an Image in) a mask. It can then be re-sized as required. I also find that a white "diamond" shape can be useful. DG
-
It is equally ludicrous that Clubs, Societies and Federations etc having 1920x1080 Projectors also have to comply with the 1400x1050 Resolution/AR restrictions if they want to participate in the competitions of this body. Images submitted at 1080 high at club level must be downsized to comply. I have been out of touch with these resolution issues for around a year now but it seems from Jeff's comments that they still apply. DG
-
Mick, That's correct - not wider than 1400 and not higher than 1050. It is (or was) governed by the resolution of the PAGB projector. DG
-
Regarding 1400x933 - if you choose a width which is divisible by three you will get a true 3:2 output. You could choose 1200 or 1500 and you would get: 1200x800 1500x1000 These are true 3:2 AR and will, as you say, cover screen - but for those times when it really matters, like when adding a border, they would be true 3:2. You would get the same problem when using 1400 wide in a 16:9 AR - 1400 is not divisible by 16 (whole numbers). 1920 wide is a great resolution to use - it is divisible by 16; 5; 4; 3 etc and will always give a true AR: 1920x1200 - 16:10 1920x1080 - 16:9 1920x1280 - 3:2 1920x1440 - 4:3 1920x1536 - 5:4 DG P.S. Regarding 1400x1050 - are you also plagued by the disastrous decision of the PAGB to adopt that Resolution/AR?
-
DG
-
Let's try again. You have an empty Slide List. No Slides. You do the Right Click thing on a video in the File List and it creates a Converted Version named whatever you want to name it by using the BROWSE Button in the converter interface. You can eliminate the "converted" bit altogether. So you now have two versions in your File List - the Original and the Converted/Trimmed versions. THEN, you drag the converted/trimmed file into the Slide List and it creates a slide which is identical in length to your Video Clip. If your project has Keep Full Slide Duration Ticked then the Video will run from the beginning of your slide's transition to the end of the next slide's transition. Your video will be running as it fades in and will continue to run until it fades out completely. That's the way I use it. DG
-
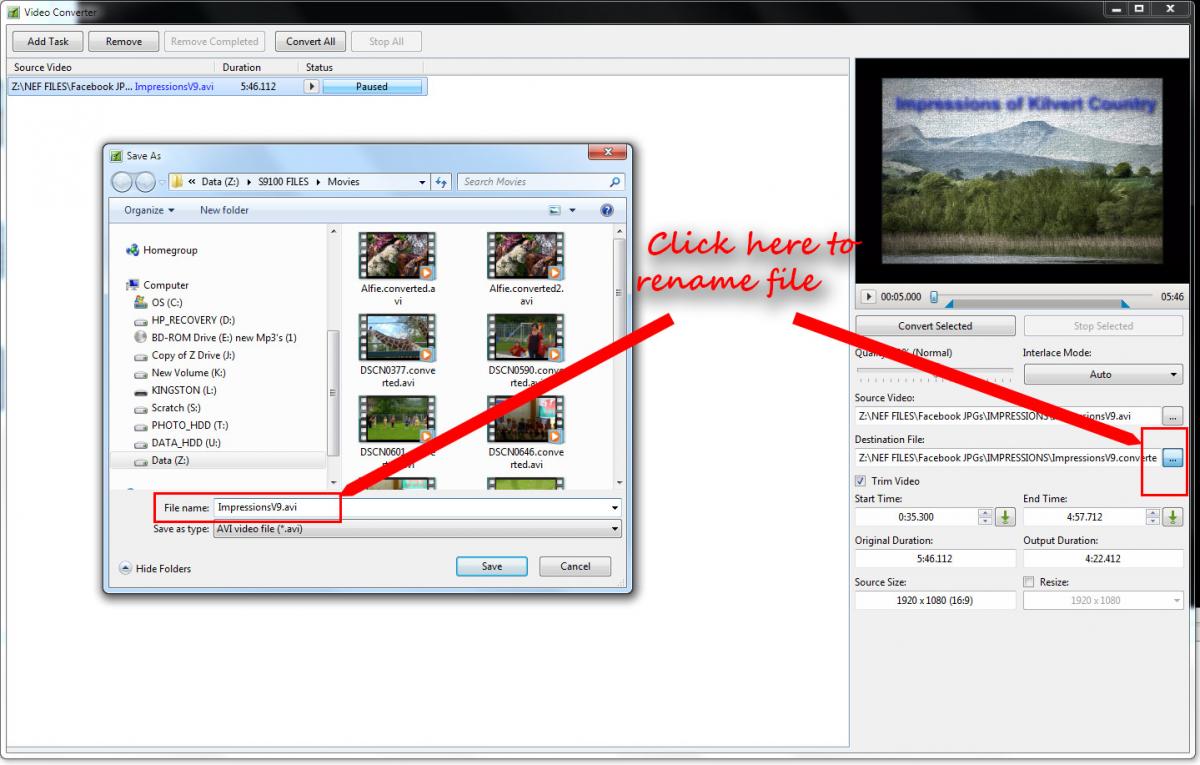
Hi Gary, Perhaps it is unfair to say that you are doing something wrong? Maybe I should have said you are doing something different to what I am doing. I add an AVI to the Slide List by dragging it in. It is 5:46:112 long and I want to trim a little from the beginning and the end. I adjust the Start Time (35:294) and the Duration (4:24:138) in the controls in O&A Properties. I leave O&A and press the play button on the main screen. The video plays complete with soundtrack from the new beginning right up to 4:24:138 at which point the Image freezes and the Soundtrack stops. The progress marker continues (silently) to the end of the original Video/Slide Duration. Alternative: Right click on the original AVI in the File List and choose Convert Video Clip. Click on Trim Video. Adjust Start Time to 35:294 Adjust Output Duration to 4:24:138 Name your destination File by clicking on the Button at the end. Click on Convert Selected. When this has completed drag the resulting file from the File List into the Slide List and its Slide Duration will be set to 4:24:138. DG P.S. At this stage I have no other Audio Files in the project - are you perhaps hearing an Audio File that you have added in Project Options / Audio??
-
Gary, It seems that you are doing something wrong. I agree with your analysis of what is happening except for one point. At the chosen "END" point of the trim the music/soundtrack STOPS and the image is frozen until the end of the Slide Duration. In other words the TRIM function trims both Video and the audio of the Video. It makes more sense to TRIM before adding to the Slide List and, if you don't get it right first time, go back to the original and trim again. DG
-
When a video file is dragged into the slide list the slide duration is set to equal the video clip duration. There is, therefore, a certain logic in expecting that if the video clip is the Main "Image" for the slide that any adjustment to its duration should be reflected in a change to the slide duration which it influenced when it was first added. I have adopted the procedure of determining the video duration before adding it to the slide list. Is this not what you would do when using a third party video editor? It has been this way for quite a long time now and anyone who adds video to the slide list on a regular basis would be aware of the anomaly and make his or her own mind up about what to do under these circumstances. It is not a new problem and neither is it a new request. DG
-
Are you outputting in sRGB? It sounds like you might still be in PROphoto RGB. There is plenty of info (and opinion) about colour space on the forum. The sRGB SPACE is a good place to start until you have digested all of the info. DG
-
Hi Jeff, For future reference it might be easier to choose a resolution/AR that suits your Monitor? In my case (for a 1920x1080 monitor): 4:3 = 1440x1080 3:2 = 1620x1080 16:9 = 1920x1080 I enjoyed version two. DG
-
"Why shouldn't Slide Options/Slide Duration automatically be adjusted to match what you set it during the timming??? Or, if there is a good reason not to make this automatic, perhaps there should be a check box next to 'Duration' to give you the choice?"Ask Igor - maybe I asked him privately about it during beta testing of the Video Feature - it was a long time ago. What did you search for? DG