davegee
-
Posts
9,323 -
Joined
-
Days Won
59
Everything posted by davegee
-
The "bar" between the two sections of the screen is moveable. Click on it and drag to the right? DG
-
Hi Gary, The point is frequently made these days that Memory is so cheap that we don't really need to worry about file sizes. Therefore, why worry about Low Quality or High Quality for the kind of use that I am talking about? The show will be projected to 12 foot plus across so why take the chance on the quality issue? Again, when making MPEG4 files for TV, there is no disadvantage in using High Quality over Low Quality - no jerkiness because of the increased "file size" - so why even bother with Low Quality? For You Tube use or Vimeo, I would agree, but most of those that I have seen leave something to be desired quality-wise. I'll keep on using Igor's High Quality 1920x1080 Preset until I see for myself that there is some advantage in lowering the quality setting. ;)/> DG
-
Hi Gary, By "Same Size" I meant same resolution or pixel size - in my case 1920x1080. File size is obviously bigger. 30Mb converted to 300Mb. The animation in the 30Mb EXE was giving the Laptop problems but the 300Mb MPEG4 played smoothly (in MPC - Home Cinema). I have never used anything other than the 1920x1080 Preset at Highest Quality. Publish Show > HD Video> HD (1920x1080)> High Quality. I have never used anything else for my own use - I see no need to. The point is that the EXE failed because of the elaborate animations but the MPEG4 worked extremely well on an underpowered Laptop. DG
-
If you find that you have made an EXE which is "too much" for your PC (Laptop or Desktop) to handle because of System deficiencies, try making an MPEG4 of the same size. You might find that it works a LOT better. I recently constructed a show on my Desktop M/C which played smooth as silk but when trialling it on my Club's Laptop PC it was not smooth enough - the Graphics card had only 512Mb of RAM. The equivalent 1920x1080 MPEG4 was smooth as silk and played satisfactorily. I used a 7.5.4 Menu and linked via "Run Application or Open File". The MPEG4 opened in Media Player Classic Home Cinema - I had to use Ctrl+Return to get full screen - and closed MPC at the end of the video to get back to my Menu with no flashing etc. DG
-
You could plot the Logarithmic Path against Time in Excel and lift the X / Y co-ordinates out and apply to Key Frames spaced at regular intervals? The number of Key Frames would depend on just how much you need to refine the path. Alternatively, add the image to a frame and rotate the frame through xxx degrees while moving the image away from the centre and zooming it. Apply Minus xxx degrees rotation to the image. DG P.S. The frame would need to be SQUARE.
-

Problem with Version 7.5 giving only sound
davegee replied to Roger Chapman's topic in General Discussion
Go to Control Panel / System and copy the details from there? Processor, RAM etc. Monitor resolution? First impressions - the computer and graphics are not up to it? It would possibly run a 1024x768 show with minimal animation - but the Palma show is 1800x1200. DG -
Problem with Version 7.5 giving only sound
davegee replied to Roger Chapman's topic in General Discussion
Laptop or Desktop? Specification? DG -
It is wonderful that PTE can bring such stunning scenery to us when we (some of us) are unable to go to it. Up to your usual standard Maureen and a couple of new twists each time you present a show - well done!! DG
-
When a text box is added to a slide in O&A it can be made to fit the height of the screen by using the Size / Position Controls and setting the height = Project Height (100%). Then use the Zoom control to set a suitable Text Size. This is then repeatable. Once you have a size that suits your objective you can copy and paste text boxes between slides and the Font Size will remain the same. DG
-
DaveGee 10. Modify or try and then delete. DG XY SLIDE.zip
-
Please note that the Transition turns over a central portion of the image which is dependent on the Resolution of the Project. In a 1920x1080 this is 1728x888 In a 1280x720 project this is 1152x592 DG
-
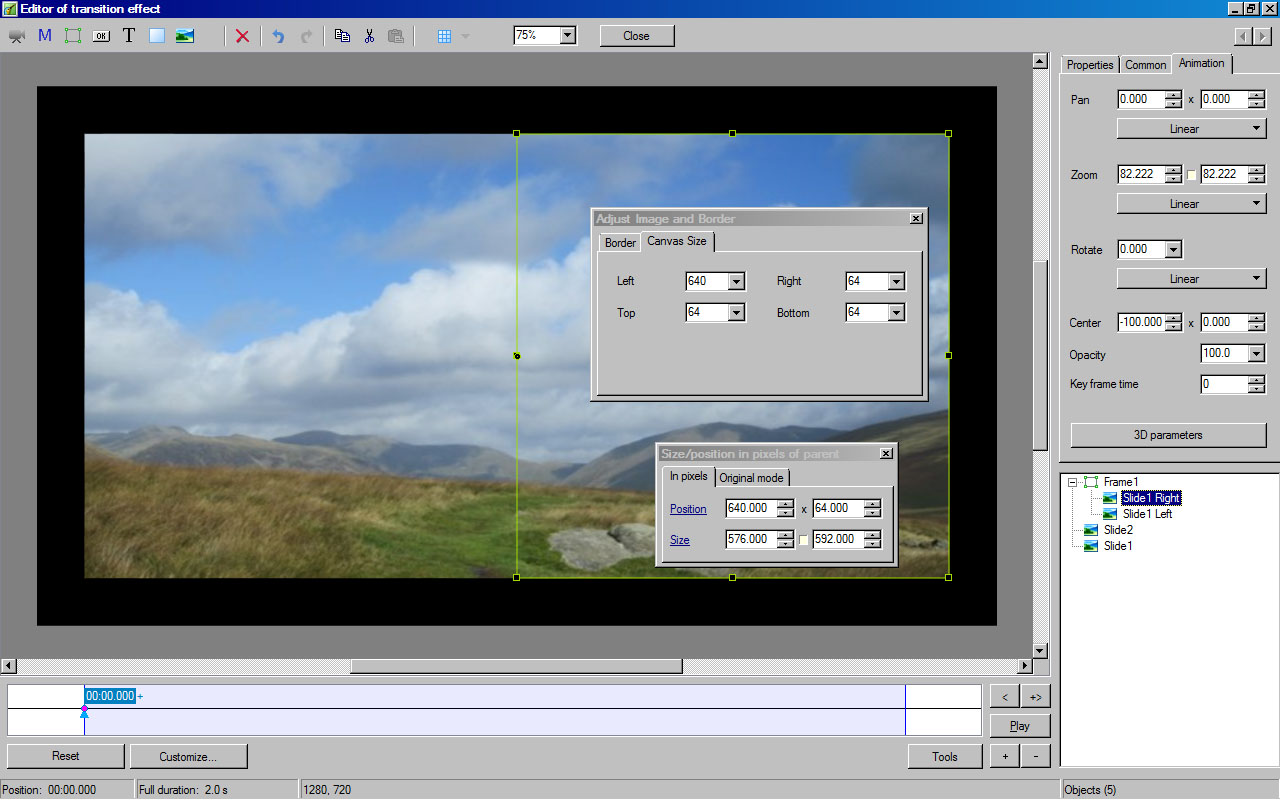
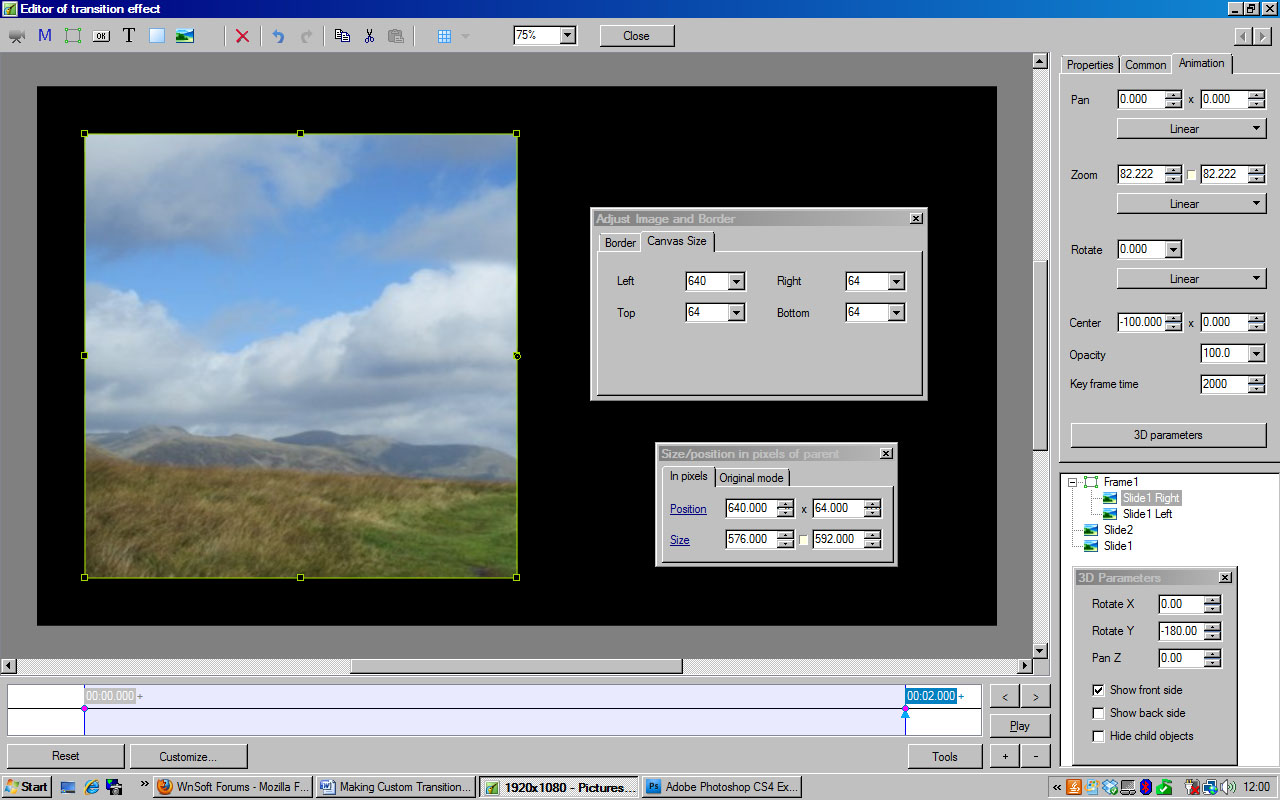
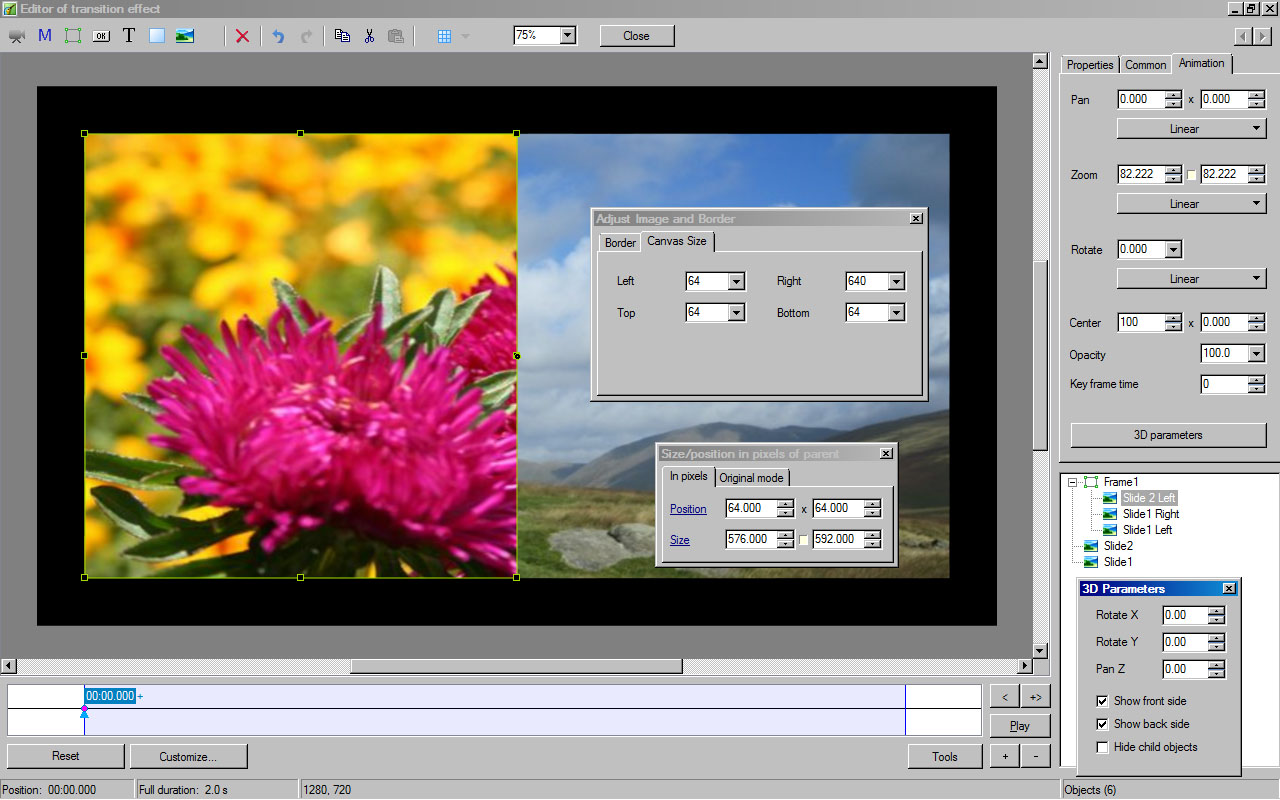
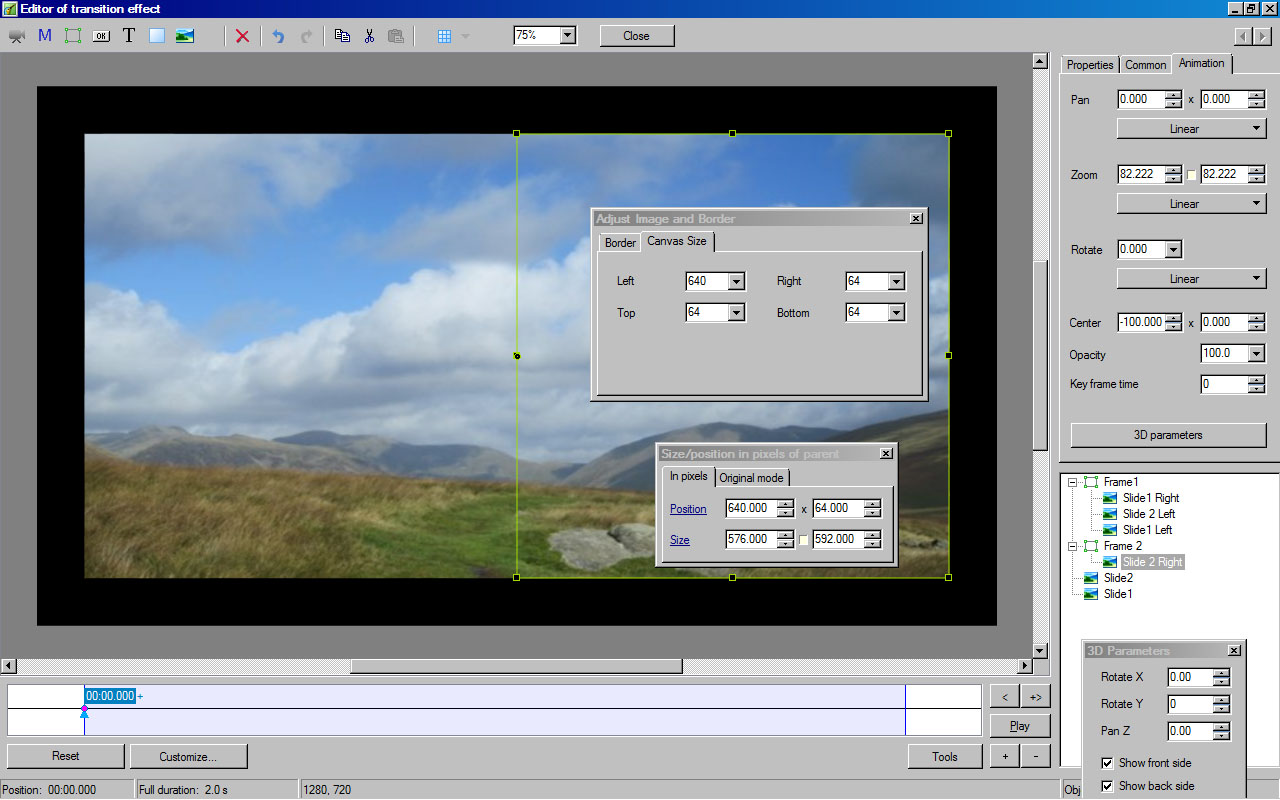
Making the “Bookish” Custom Transitions – BOOK 5 First, some ground rules for Custom Transitions: You cannot edit an existing Preset Transition – you must start from a new or existing Custom Transition. You can “save as” at any time by using “Ctrl+S”. If you make a change in the editor and then click on the “x” you will be asked if you want to “Save”. There has to be an "unaltered" “Slide 1” and “Slide 2” somewhere in the Custom Transition - it is possible to reduce the opacity for these to zero and use full opacity copies for the Transition Animation. An error message will show if this is not the case. The following applies to Version 7.5.5 and later – previous versions might show different values (errors have been “ironed out”). Enter the Custom Transitions Editor via Customize Slide > Transition > Create Transition. The starting Default is a 4:3 1024x768 “Template” from which to start. Other Defaults (via “CUSTOMIZE”): 3:2 – 1152x768 16:9 – 1280x720 I used 16:9 almost exclusively for the Bookish Transitions. I started by removing all but the Starting Key Frames from Slide 1 and Slide 2 in the Custom Transitions Editor and resetting the Zoom and Opacity settings to 100 and Zero respectively. Add a frame (Frame 1) and Copy and Paste the existing Slide 1 to the Frame 1. Rename this Slide 1 to “Slide 1 Left”. Change its Opacity to 100 in the Animations Tab. Now, using the “Canvas Size” tab in Adjust Image and Border enter the figures: Left=64; Right=640; Top=64; Bottom=64 Click on Size in “Size/Position in Pixels of Parent ” to make the “cropped” version of “Slide 1 Left” actual size. Change the horizontal “Centre” setting in the Animation Tab for Slide 1 Left to 100.000. (Fig. 1). Copy “Slide 1 Left” and Paste to Frame 1 – Rename to “Slide 1 Right”. Change the Canvas settings to: Left=640; Right=64; Top=64; Bottom=64 Change the Centre setting for Slide 1 Right to Minus 100.000. (Fig.2). Right click on Slide 1 Right Start Key Frame and Clone it. Move it to the far right of the Timeline. Open the “3D Parameters Box” from the Animation Tab. In the Right hand Key Frame of Slide 1 Right change the “Rotate Y” setting to 180.00. Untick the “Show Back Side” Box in 3D Parameters for Slide 1 Right. (Fig.3). At this stage, if you click on PLAY you will see Half a Page turn. Now, Copy Slide 2 and Paste it to the Frame 1. Rename it to “Slide 2 Left” and Change its Opacity to 100.0. In the Canvas settings for Slide 2 Left set as follows: Left=64; Right=640; Top=64; Bottom=64 Click on Size in “Size/Position in Pixels of Parent ” to make the “cropped” version of “Slide 2 Left” actual size. Change the horizontal “Centre” setting in the Animation Tab for Slide 2 Left to 100.000. (Fig. 4). In the original (Left Hand) Key Frame of Slide 2 Left, change the Rotate Y setting in 3D Parameters to 180.00 and Un-tick Show Back Side. Right Click on the Key Frame and Clone it. Move it to the Right Hand side of the Timeline. Change the Rotate Y setting to Zero for this Key Frame. Right Click on Slide 2 in the Objects Panel and click on ORDER. Send “Back One”. (Fig.5). Pressing PLAY shows Slide 1 turning over and revealing the Left Hand Side of Slide 2. All that is left to do is add the Right Hand side of Slide 2. Add a New Frame to the Objects Panel – Frame 2. Right click on it and click on ORDER. Send “Back One”. Copy the original “Slide 2” and Paste to Frame 2. Rename it to “Slide 2 Right”. Change its Opacity to 100.00. Apply the following settings in Canvas: Left=640; Right=64; Top=64; Bottom=64 Click on Size in “Size/Position in Pixels of Parent ” to make the “cropped” version of “Slide 2 Right” actual size. Change the horizontal “Centre” setting in the Animation Tab for Slide 2 Right to Minus 100.000. (Fig.6). That’s it – it is finished. Press PLAY and the transition should turn over the Slide 1 and reveal Slide 2. Press “CTRL+S” to Save As in a Folder designated for Custom Transitions. All that remains to be done is to construct a Frame around the Book’s Pages and add it to both the Slides in the Project and to this Custom Transition. That’s a job for Adobe and the subject of another tutorial. N.B. The original Slide 1 and Slide 2 are needed to prevent an error message appearing when trying to Save the Custom Transition. DG E&OE!!


-
Hi John, When you insert an image in a project it will either "Fit to Slide" or "Cover Slide". In the Objects and Animations Editor - Common Tab>Mode. Click on the "Size / Position...." Button and in the Box you can click on SIZE to make the image "Original or Actual Pixels". You can then change the Zoom Percentage in the Animation Tab. If you Clone the left hand Key Frame and move it to the right hand side you can set a different percentage and the image will change size (zoom in or out) between the two Key Frames. If you mean that you want to resize as in an Image Editor it can't be done. You can CROP but not change the pixel dimensions of the image. DG
-
Great news - Canvas Size is a great alternative to Masks (in some cases). DG
-
I confirm that this error has been dealt with. Well done Igor and team (especially Artem). DG
-
Using "graduated mask" to contain the text would achieve this - Lin might have other ideas? DG P.S. Using a "PNG Frame" would also help. You can order your objects from front to back: Frame; Text; Image.
-
Igor, How difficult would it be to make the Canvas Controls change per Key Frame? DG
-
John, If I read you correctly you must now have an enormous ISO, Some DVD Folders (again large) and an MPEG2, all of which you don't need, cluttering up your computer as well as the DVD? You only need to tick the box that you want i.e. the DVD, the rest are not needed for that? DG
-
OK, I give in. Here is a working Template for you to Dissect. BertTemplate.zip DG
-
Gary, Your mail box is full. PM me when you have cleared it? DG
-
Hi Gary, If you look at the demo you will see a frame around the image? The Transition does not have this frame - you have to add your frame to your slide and also to the transition. The frame has to be ACCURATE. For 1920x1080 the frame is 1920x1080 outside - 1728x888 inside (in my case with a 3 pixel stroke line). If you place a 1728x888 image in your slide without a frame (Black BG) at 100% size and use the transition as is you will see it correctly (without the frame). I am trying to concentrate on Transitions and not Templates. The rest is up to the user /> DG
-
Hi Spock, As I said, you can use the Transition to create your own Template. Live long and prosper!:)/> DG
-
Mpeg2: Last page of video builder. Your options are mpeg2; ISO etc. DG
-
Try making an MPEG2 instead of burning a disc? When you have got that right - then go ahead and try burning the disc. Do the other options work? MPEG4 etc? Is the DVD sound working on your Computer? Is the DVD sound working on your DVD Player? There have been a few threads here recently which advised making the ISO first and then use software which plays the ISO - saves on discs. DG
-
Thanks Igor, My pleasure!! Bert, Please see your PM. DG