

jkb
-
Posts
1,951 -
Joined
-
Last visited
-
Days Won
26
Posts posted by jkb
-
-
what Camera? PTE does not have a Camera
Do you mean the visibility of an Object?
Jill
-
you can't open 2 projects at the same time but can launch several instances of PTE with different Projects open in each.
You can also copy Slides from one to the other easily.
Jill
-
 1
1
-
-
1 hour ago, Brian Nicholson said:
I did download a loop one but won't do it on playback....?
It doesn't automatically Loop, you have to drag the music in as many times as you need to repeat.
Just put one after the other on the Timeline.
It Loops in the sense that the ending will flow into the beginningJill
-
 1
1
-
-
A lot of the tracks have a looping version, so you can repeat them.
Otherwise you can easily split the track in PTE and duplicate part of it to extend it.
Just carefully listen to the music and look at the waveform to find the best part to duplicate
Jill
-
1
-
-
25 minutes ago, goddi said:
Seems like the area where you want to move the track to, in this case, has to be completely empty. So you have to be careful.
Gary, yes you do have to be careful & make sure that in Audio Tab you select all of the Clips you want to move.
If there are already Clips on the Track you are moving to, then again you have to make sure that you drop them into the correct place and that there is space for them.
If you want to move to a new Track, then add that Track first.
I find it is best to make sure that you Link Clips to a Slide first when you have multiple clips, so that any you are not moving to a new Track will stay in the correct position. You can always unlink them later if you need them to overlap.
Jill
-
If you go into the Project Options Audio Tab (double Click the waveform in Timeline View) then you can easily move a clip to another Track by dragging & it will keep it's position.
Jill
-
1
-
-
Surely you know the name of the current pte file as you will have opened it to review your show?
It shows at the top left of the PTE main window.
Again if you are running an exe then you must have clicked on that exe to run it.
Jill
-
Just change the Name in the Properties Tab, very easy to do.
Jill
-
2
-
-
The Vector symbols are just using Fonts such as Webdings etc & have always been available.
It is just now they are much easier to find being grouped together under Vector Icons.
Jill
-
From memory the 0169 needs to be entered on the numeric keypad part of the keyboard.
As denisb suggests find one online and copy and paste.
Jill
-
I have not had a problem with this & just click in the box & change the name.
I am still using 11.0.3
Jill
-
5 hours ago, Igor said:
Please send me .pte project file. Only one file.
Thanks Igor, I have sent 2 .pte files explained in the email
Jill
-
I have just tried to create a Template from a project - containing 13 images & 2 Blanks.
It has thrown up an error of a Duplicate File.
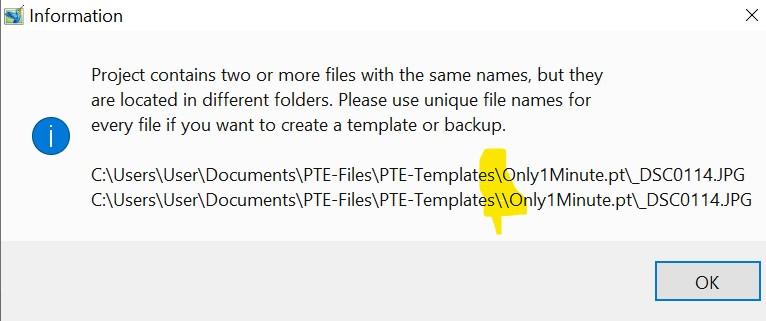
The actual file is only used once as the main Slide & then used within a Mask on that same Slide - Copy & Paste from the main Object.
I do not understand where the extra \ has come from in the Error Message.
Looking at the File Names in O&A both Objects have exactly the same file name with only one \
I am still using Version 11.0.3
Jill
-
To be honest, you are most likely to be in a minority with wanting this change.
A 1 sec pan is very, very short so you are unlikely to see any difference in the modifier settings.
With a longer duration pan you will notice a difference.
Maybe it could be possible in a future version to have a user option in the Project Options to set your own default for the Modifier settings?
Jill
-
3
-
-
Auto Duck can only respond after the event, yes I know you can set how far in front and after to adjust it.
Also you do not want the volume going up and down all the time with every bit of speech.
Much better to do it manually and achieve a smooth change in volume. And what happens when you may have several tracks of both music and speech.
PTE is a Sound mixer, not a sound editor. Trying to cram too much into one program is not always a good thing.
Jill
-
 1
1
-
-
Yes it would help if we could enter a value. But some work in Percentage and others in Decibels.
Also the volume value in Audio Tab is the overall volume level. You could still have key points on the volume line at several points to adust individual parts.
Not something that coul easily be programmed to make them reflect each other.
Jill
-
Gary, what you are observing is correct - you are not missing anything.
There is no way to type in a % - would make it so much easier if you could.
The Volume Line is NOT reflected in Audio Tab or Vice Versa
In the Studio version of PTE there is no volume Line & the only way to adjust a clip is in Audio Tab
Jill
-
Are you sure the Key is the correct one for the Version of PTE you are installing?
Jill
-
Glad you are now sorted
Jill
-
1 hour ago, snapcam said:
the video comes out at the same length
When you change the Speed in O&A you will see that the Duration of that Clip changes, if slowing down it will lengthen.
It WILL NOT Change the Duration in the Timeline Automatically, you have to do that manually.
So your overall length of the Project will remain the same.
Try a new Project with just a short clip, don't use the Convert feature.
Just open the Clip in O&A and use the Adjust Time from the Properties Tab.
Play the Clip in Preview & you should see it running slower.You will need to manually adjust in Timeline View the duration of each Slide that contains a Video Clip.
It is much easier to do Speed Adjustments as you are building the Project rather than trying to do it afterwards.Jill
-
49 minutes ago, snapcam said:
I had given no thought to the length of the original music track
If I am reading it correctly then you have reduced the speed of the completed video which includes the music?
It would be better to adjust the speed of each individual Clip & assuming you still want some of the original motor bike sounds, then separate those from the individual videos. You can then adjust volumes & blend each clips sounds into each other.
Jill
-
You can slow down to as much as 10% but it may stutter a bit if that low.
You can tell by the Duration how much it has slowed it down.
So for a 1 minute video - slowed to 50% would give you a duration of 2 minutes.It depends on the content as to how it looks.
Jill
-
If you are using the adust time feature in O&A to change the speed of the video, then the sound is automatically muted when the speed is not 100.
If you still want the sound from the video, then in timeline, right click the video and select separate sound from video. This will put the sound on a separate track, where you can adjust the length and volume.
Jill
-
Looks like you have been sent the wrong Connector as Part 3 seems to have round pins & Part 2 has square sockets.
But it also looks like a standard USB cable connecting the camera to the Charger.
So if you have a socket with a USB connection you could just plug straight into that.Or it may charge from the USB socket on your computer, but would most likely take a lot longer.
But if your adapter is working then stick with that.
Jill
Camera
in Suggestions for Next Versions
Posted
When you move something around the Frame, PTE automatically adjusts perspective.
You need to create Keyframes to make the movement do what you want.
You may need to make some 3D adjustments to the butterfly, but your video does work as it is.
Jill