goddi
-
Posts
3,593 -
Joined
-
Last visited
-
Days Won
26
Everything posted by goddi
-
Greetings, I am trying to update an older show. I want to change the % of slides from 100% to 95%. I can do this in Project Options/Defaults and change all slides at once. Then I want to add a border around all the all of the existing slides. So I created a Style that is only to add this border. However, the Style retains the Transition and Slide time from the slide used to create the Style. So there is no way to apply only the border to the existing slides, which have different Transition and Slide times . I'd like a way to create a Style that would exclude settings (such as the Transition and Slide times) from the slide where it was created from and be able to use only the setting that I am actually trying to apply to the other slides, such as a border. This would make the Styles much more useful. Otherwise, I have to go slide by slide to add the border. Or, make certain Properties (such as Borders) to be allowed to be changed globally. Gary PS Had a similar discussion back in 2018:
-
Greetings, I am trying to do a Search in the Form. After I place the topic and do the Search, it shows me at least 3 pages. When I click on the '2' page or 'Next', it says something like 'Wait 3 seconds for the next search'. So it is not allowing me to continue to the next page in the Search results. Once it let me get to the second page, but then it, again, it drops me out when I try the third page, or Next. Bug??? Gary
-
Greetings Dave... I see now. First, I create a Text. Then I move the red vertical cursor to the point where I want the Text to show up. The time point is 36:27.710. I multiply the 36x60 and add 27. That comes to 2,187 but I have to add 3 '0' that brings it to 2187000. (I ignore the .710 until I want to really be more precise). I do the same for when I want to make the Text to disappear which is at 36:37.173. That converts to 2197000. This gets you close and you can tweak the settings later to get them more precise. What would be an improvement is to be able to copy/paste the times indicated in the Timeline (at the vertical red line) and paste them into the Time Range blocks. Having to do the math is OK but why should we have to? Also, it would be an improvement if, when highlighting the numbers in the Time Range blocks, we could increase/reduce the times faster than having to go through the milliseconds, using the up/down arrows. Thanks....denisb and Dave... Learn something every day...great discovery on how to put in text into a long video, a bit more easily. Maybe we can figure out how to fade them in/out. Gary
-
Greetings, Found something interesting that I have not noticed before. Even though I don't yet understand the difference in what I put in the Time Range boxes vs. what the time shows in the Timeline view, I see that the Time Range that I set shows up as a faint block in the Timeline. Gary
-
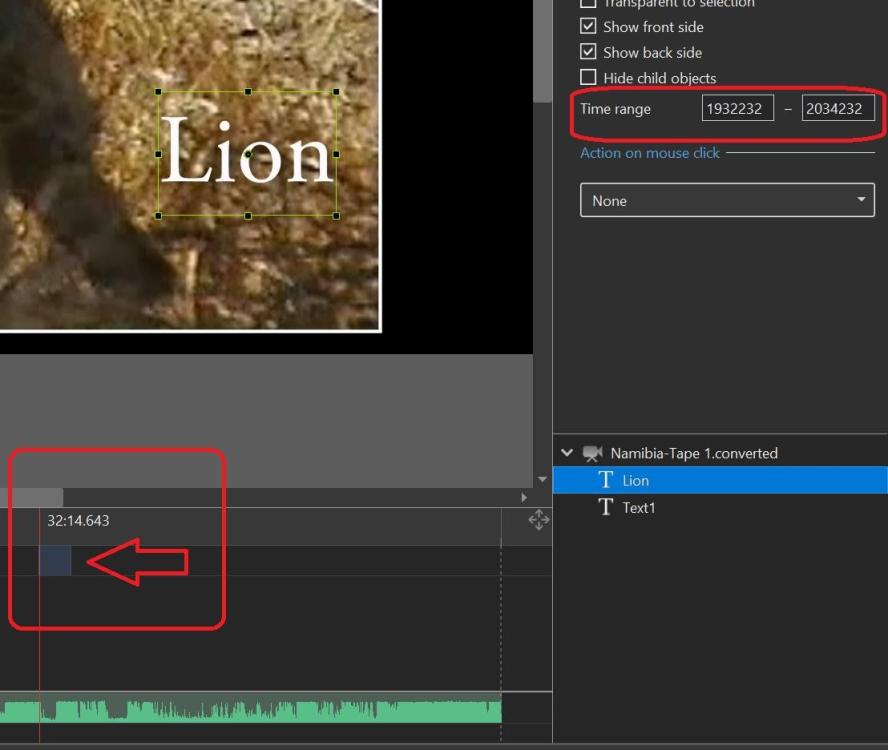
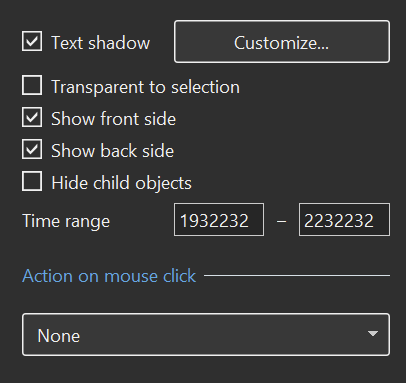
Greetings, Ok...I gave it a try. In O&A, I entered a Text object. I highlighted it. I typed in the 'Time Range' box the time (5:41.456) where I wanted the Text to appear. I see that it does not like to use the '5:41.456'. It seems to want a whole number. How do I convert the '5:41.456' to a whole number? And, then what? So then I tried another 'Text'. I set the Time Range to '1932232-2232232' just as a test to see what would happen. I used these numbers because the actual time in the Timeline that I wanted was '19:32.232-22:32.232'. However, this 'Text' actually showed up at '32:12.891-37:12.941' (hard to be exact), according to the time marker when played on the Timeline, not '19:32.232-22:32.232', as I had hoped. I looked through the Help guide but could not find how to interpret these 'Time' numbers. So it seems it can work, but I am not clear on how to actually convert the time shown in the Timeline to what is needed in the Time Range. Yes, the fade in/out seems not to be something that can be done, but getting to a more usable function. Gary
-
Yes...Dave...I am on my knees!!!! Gary
-
Greetings All, These steps are so 'inside baseball' that I don't think the ordinary user (like me) would even attempt them. None of the links mentioned above even mention 'text'. I'd need a video to explain how to do it. There has to be a better way. When you have a 30 minute video, and you have to split it up just to be able to add text...that is not intuitive. I went through hours to edit down an almost 2 hours of video and now I am supposed to split it into parts just to add text? I am sure these steps are easy if you understand them, but I still don't get it. Adding text to a single slide is an understandable process. But when you have a video clip, you still have to add 4 keyframes for each text. So the splitting up the video into many manageable chucks just so keyframes are further apart just to add text is not something that makes sense. What we need, maybe, is another track where we can just place a text object at any point along the track, and give parameters on its length to appear/disappear, pretty much like the audio track. Gary
-
Greetings Jill, Trying to understand your steps. But, what do you mean by 'split your video clip & have Master and linked video on separate slides.' I have one continuous video that has been edited. There are no slides. Do you mean to split the video at each point where I want to add text? Gary
-
Greetings, I've edited a long video (25 minutes). I am trying to add many text in this video clip. Once I reach the point where I want to add the text, I click on Text. But the keyframe shows up at the beginning of the video. Then when I drag that keyframe back to the point where I want the text to be added, the vertical red line disappears and I've lost that exact point in the video clip. Ok...then I drag that text keyframe back to the spot where I originally had tried to add the text. But then I have to add the initial 0% opacity keyframe in front; then the next keyframe to 0%, all to the left of my initial text keyframe. Then add the final 0% opacity keyframe This is tedious and difficult, especially when you have many texts that you want to insert. And getting the timing between all these keyframes is next to impossible since they are so tight. And trying to not have the text slowly appear...then slowly disappear. Just very hard to control the time on the screen. Is there an easier method? Is it possible to make a 'macro' that will allow the insertion of text at any point within a video clip that provides all of the required keyframes at the exact point where you positioned the vertical red line in the video clip? And, with the ability to adjust the time the text stays on the screen, easily? Gary
-
Greetings Dave, Yes, I could spit the video as you suggest. But that is quite a pain to do if you already have an hour long video project completed as you want it to be and then you want to just add some text here or there. I've seen in video editing programs, the ability to add a 'cut' sections at any point in the video do add animation, etc. within that cut section. It would be more helpful if we could just add a 'cut' lines for a section while in O&A and add text, etc. within them. For example, if you want to 'add' a keyframe, the first keframe will stay at the red insert line. The second 'added' keyframe goes to the end of the clip and you have to drag it back to where you want it to be. It would be helpful if you could constrain the addition of keyframes within a section of the long video clip. Maybe I am doing it incorrectly but it is impossible to manipulate keyframes that are sitting on top of each other to try to have a text object appear for a short amount of time.
-
Greetings, The main question is, is there a way to 'zoom' into or expand a set of keyframes? I have a project that is one long video of about an hour. So, if you want to add text to appear and disappear anywhere in the project, you need several keyframes (zero opacity, zero opacity, 100% opacity, and zero opacity). When you have a very long video, these keyframes are difficult to enter and stack up almost on top of each other and they are nearly impossible to adjust. You have to reposition them which is very difficult with such a long length of the video because the keyframes (not sure of the technical term) almost sit on top of each other. If we could at least zoom into the keyframes, we could manipulate them more easily. In another project, which is a long video, it is made up of many video clips to complete the show. I notice that it is so much easier to add text in any of the short video clips because they are relatively short clips. Adding keyframes for text was much easier. Perhaps, it would be helpful if, for long video clips, we could insert a 'cut' (beginning and end of a section) where we could more easily enter text as if they were just a single short section and the keyframes would stay within that 'cut' section. Or...just be able to 'zoom' into the keyframes. Gary
-
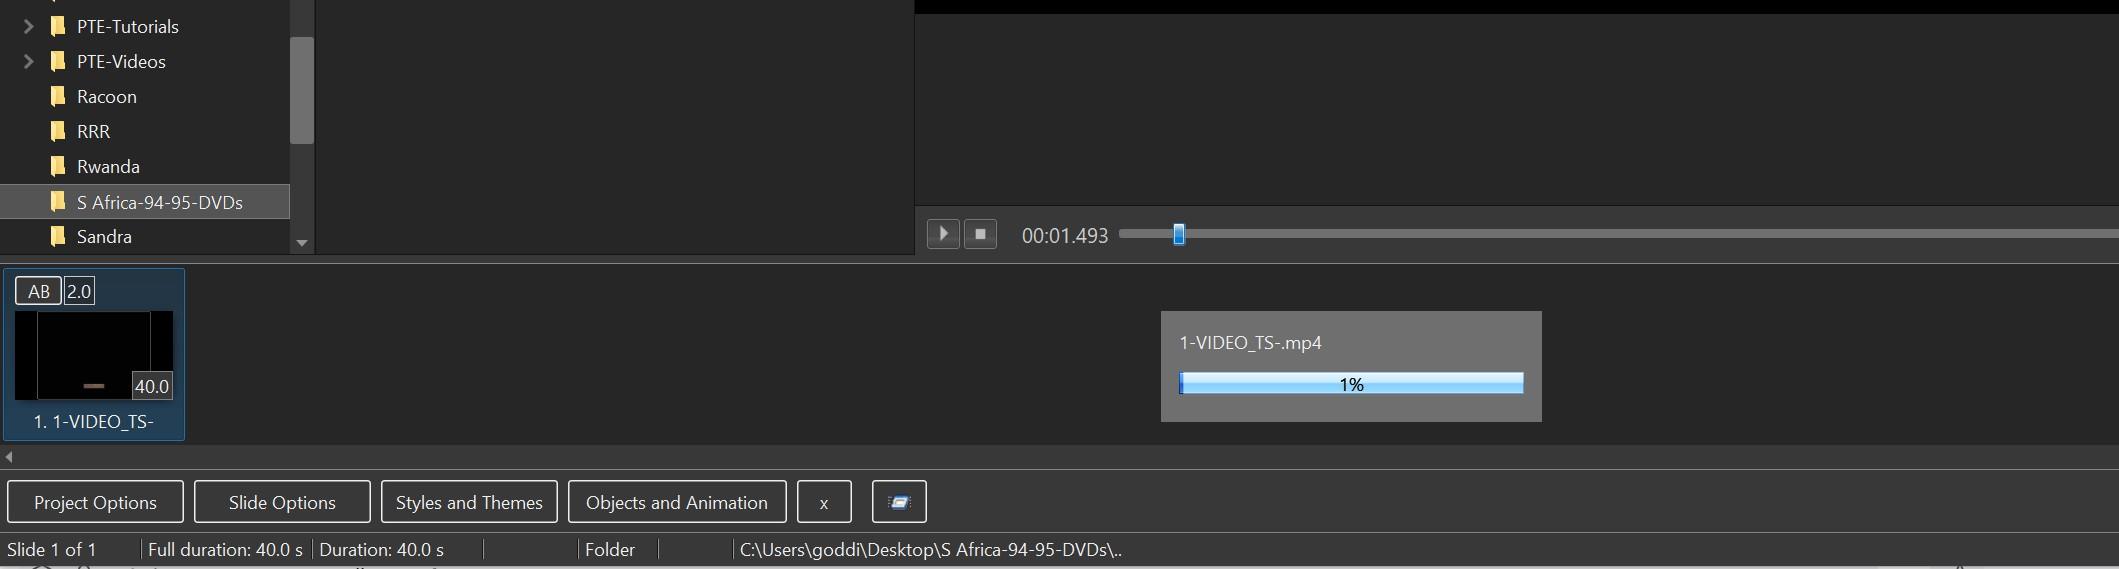
Greetings, Ok...I figured out that I can use the 'Export Soundtrack to file'. I had a vague recollection that there was something like that in PTE. Never understood why or when I would use it. Light bulb went off... But it is in a strange place in the menus. You'd think it would be shown when you right-click on the audio track in Timeline. Need to make a Suggestion, later. But...when I made the 'Backup in Zip', it still had the strange progress bar showing only 3%, then disappeared. But seemed to produce the correct Zip file. Gary Added Later: I tried to do a 'Backup in Zip' again and I did see that after showing 3% in the progress bar, it seemed to freeze, but then the 100% flashed quickly. So the progress bar must just not be working very smoothly. It just jumps from 1% or 3%, then to 100% and then closes.
-
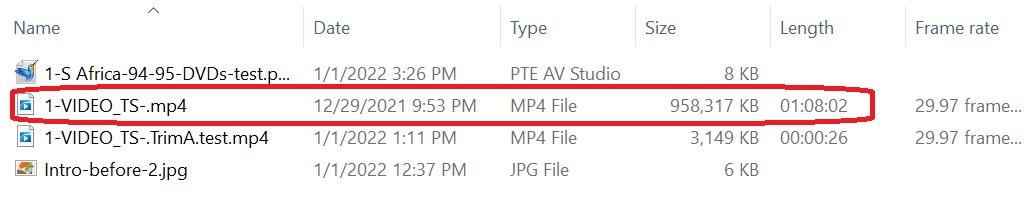
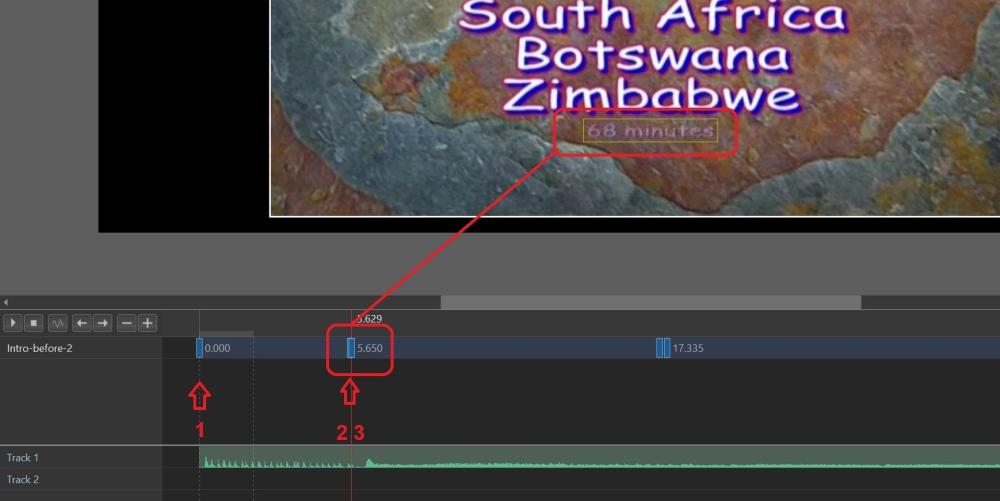
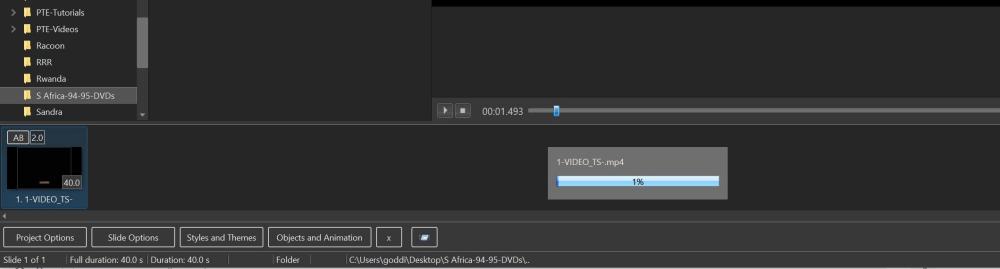
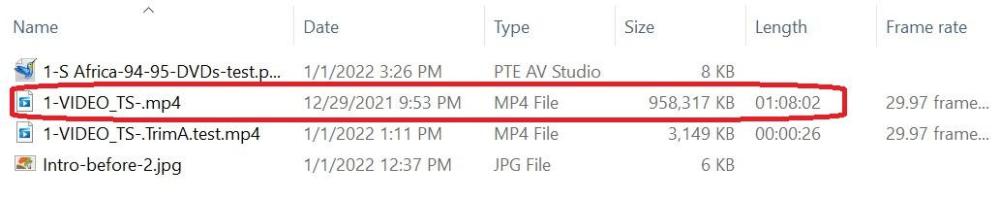
Greetings, I have a couple problems that I have not been able to solve. I am trying to hide some text in a video where the text is embedded (or encoded?) in the video. I am putting a small jpg file over the text. I have finally come close to making this work except that I can still see the text that I am trying to hide where it will still show for a short moment. In the screenshot above, keyframe#1 is 0 opacity. Keyframe #2 is also 0 opacity. Then, keyframe 3 is set to 100 opacity. The problem, as you can see in the screenshot, is that the ’68 minutes’ text that I am trying to cover will fade in, in between the keyframes 2 & 3. I can not get rid of this short fade-in of this text. When it is played, you can hardly see it, but I'd like to find a way to deal with this in a better way. 1- How can you avoid this fade-in in-between keyframes? 2- Is there a way to spread out the distance between keyframes so I have more room to work with? 3- When I try to create a ‘Create a Backup in Zip’, after I had trimmed down the size of the original file, the progression bar stops at 1%, pauses for a few seconds, then disappears. I had separated the audio from the original video clip. And then I trimmed out all but about 40 seconds of the video to be able to send a ‘Backup in Zip’ to show the problem. However, it seems that even though I have trimmed out most of the original video clip, it still saves the entire video clip since I am still using the audio portion. Is there a way to remove the audio from the video clip so the new file will not have to retain the full video clip? The 'Create a Backup in Zip' saved the entire '1-VIDEO_TS-.MP4' video clip from where I separated the audio, when I only wanted it to save the shortened '1-VIDEO_TS-.TS-.TrimA.test.mp4'. Gary =================================================== =======================================

-
Hardware Acceleration + fade transition [SOLVED]
goddi replied to goddi's topic in General Discussion
Yes, Igor. It has been an interesting discussion. There are so many different ways to produce a show, especially when it comes to video clips, and older analog video clips. Just today, I realized that many years ago I had produced DVDs using PTE of this same trip. I had totally forgot and really now don't remember how I did it. The DVDs look good but I am going to convert them to MP4s to re-do them in PTE. So much to learn...and to remember. Thanks...Gary -
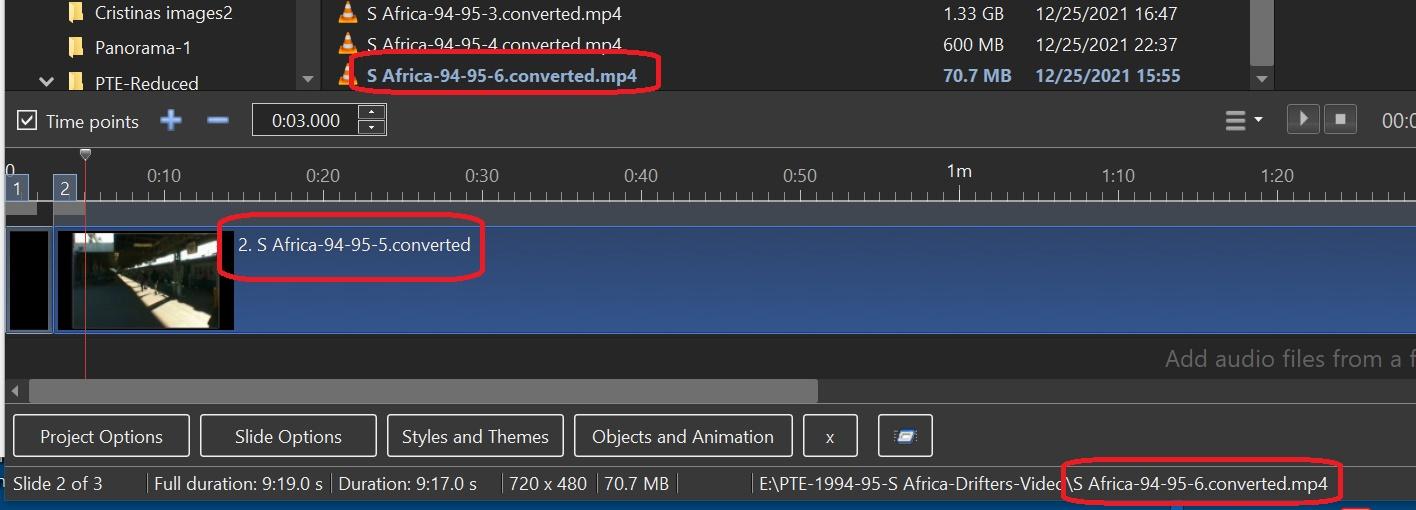
Greetings Igor, Thanks for the info. I was able to correct the filename as it is shown in the Timeline, as you indicated. But I have never had or noticed this problem before. I had right-clicked on the file in the file list and changed the name using Explorer, then added it to the Slide List, but it retained its previous filename. It seems that PTE should recognized that filename change when I bring it into the Slide List. This also happened when I had a Missing File warning. I then selected the correct file but the filename in the Timeline was not correct, though it was the correct file. Seems to me that this is a bug. Can this be fixed so we don't have to manually update the filename as you have indicated we'd have to do? It can really cause complications and confusion when this happens. I took a look in the .pte file after correcting a Missing File and see that the incorrect filename, '[Slide2] SlideID=S Africa-94-95-4.converted', is still there when it should be '[Slide2] SlideID=S Africa-94-95-5.converted', even after correcting the Missing File. Can this problem be fixed so we don't have to manually correct the filenames in such situations? It seems that if you want to change a filename, do it outside of PTE? Gary
-
Hardware Acceleration + fade transition [SOLVED]
goddi replied to goddi's topic in General Discussion
Greetings Igor, I did a test where I Published a project that was only an 8 minute video clip. It is an analog video clip from a High8 camera that was digitized. So the quality was not really great to start with (720x480). I Published this project it at 30fpsLQ and 30fpsMQ and 60fpsHQ. There is a pretty good difference in file sizes. However, I could not really see any big difference in quality. And, strangely enough, I thought the 30fpsLQ was a little better than the 60fpsHQ, not much, but I could detect a slight difference. Gary
-
More tests. No matter what file I used in 'Change Video File', the original file that had been inserted did not change its filename to the new filename in the Timeline filename info. It kept the original filename. Gary
-
Hardware Acceleration + fade transition [SOLVED]
goddi replied to goddi's topic in General Discussion
Thanks, Igor. There are so many possible combinations of settings it takes a while to see what is best. Will try High Quality, too. Thanks... Gary -
Greetings Igor, I just tried something similar and got the same problem. Here is what I did: In MyComputer, I changed the filename that had a '-5', to a '-6'. Since it was already in the project, when I opened it, it indicated that it could not find the old filename as expected. So I browsed to the file with the new filename and selected it. Again, the filename still shows the old filename with the '-5' in the Timeline, but the correct filename in the information at the bottom of the screen with the '-6'. Gary

-
Greetings Igor, Here is what I think I did. I originally had video file in the project. This video file had been modified with various setting in O&A. But I did not like the file name, so I renamed the filename in the file list. So not to have to rework the settings (aspect ratio, border, texts, etc.) I had already applied to the original video file, I just did a 'Change Video File', which just used the same video file but now had a different file name. The new file name shows correctly everywhere, except where it is in the Timeline screen, where it retains the old file name. I have dragged the this newly named video file into the project and it does correctly show the new file name in the Timeline. It just does not do that with 'Change Video File'. This is happening in two different projects that I went through the same steps to change file names of some video files used in the project. I am trying to avoid having to re-create all the things I've done to this video file. It is a long video with many text inputs throughout its length and other things. I just want the file name to be correct as it shows in the Timeline. Kinda strange.... Gary
-
Hardware Acceleration + fade transition [SOLVED]
goddi replied to goddi's topic in General Discussion
Greetings Igor, I normally have used 1920 x 1080, 30p, but low quality. I've tried high quality but I have not seen the difference, so I use low quality to keep the file size down. But I will try to use 60p because I do see a difference in the fade transition. Gary -
And, even the .pte file has the correct file name.

-
Hardware Acceleration + fade transition [SOLVED]
goddi replied to goddi's topic in General Discussion
Greetings Igor, I have used 30fps to have a smaller file size. Though, now I'll switch to 60fps to get better smoothness. I do see the difference in the fade transition. This was a habit I had when trying to upload to the SlideShowClub, which as a size limit. So now I upload shows to my Facebook and YouTube channel. I'll also experiment with your other suggestions. Thanks. Gary -
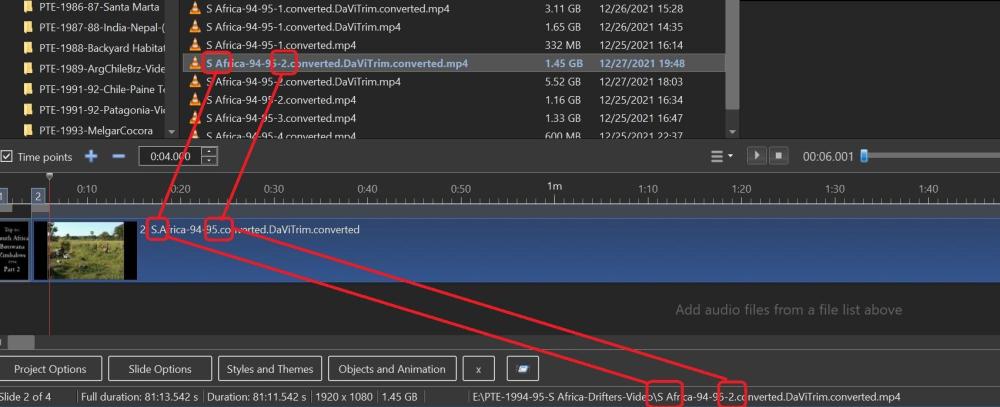
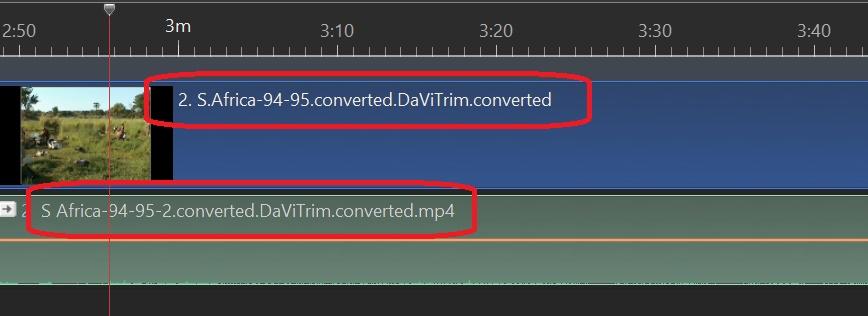
Greetings, I 'Changed Video File'. The new video file is correct but it did not update the file's name in the Timeline. And the file name's info at the bottom of the screen is correct. When I look at the file's name in the Timeline, it is still the name of the old file, even though the added video file is correct. I can bring down the new file and it shows the correct name in the Timeline, but why does it not correct the file name when I do a 'Change Video File"? Notice the new file name has a space between the 'S' and 'Africa' and there is a '-2' after '95'. The old file name has a period instead of a space and does not have the '-2', as it shows incorrectly in the Timeline's file name. This was the old file's name. (Even right-click on the file in Timeline and choosing 'File Info' also shows the correct file name). Gary When I separate the audio from the video file, the separated audio shows the correct file name.
-
Hardware Acceleration + fade transition [SOLVED]
goddi replied to goddi's topic in General Discussion
Rosy, Do you use 30fps or 60fps? Gary