goddi
-
Posts
3,596 -
Joined
-
Last visited
-
Days Won
27
Everything posted by goddi
-
Greetings, I was not sure if I had imported the 'Stop motion style' previously, so I imported it again just to be sure. The name of the style is shown as 'Stop motion animation.ptestyle'. After I imported it, there is no indication where it was imported to. I have to search one by one to find it. I find that it now appears as a slightly different name as '(DS) Stop motion editing'. First, am I looking at the same style? If so, why did the name change? Secondly, why is there no indication as to where a style goes when importing it? What am I missing??? Gary
-
Greetings, I couldn't really follow the instructional video that AleAle5025 provided above for his Summer Trip. So I just jumped in and tried to noodle through his project to be able to replace the images, text and music...and add additional text. The Russian text really threw me but after hours of working with his PTE show, I think I figured it out. Thanks so much to AleAle5025 for his PTE show. I have no idea how he does all the graphics, etc. But it all comes out so well to be able to recreate it with my inputs. Thanks... Gary
-
Greetings Tom, After looking at both the GP and YT, I see that the video quality of the GP is much better. Gary
-
Greetings, Nope...no gimbal. Just suction-cupped to the windshield or held down on the dash. Just can't remember exactly. But, taking another look at it, it shows too much of the top of the dashboard and hood of the car so it must have been just setting on the dashboard, held down by my wife... Gary
-
Greetings Rosy, Hard to remember. I noticed that too. But I was certainly was not holding it as I drove. My wife could not be holding it that still either. So it must have been either held pressed against the dash or I used a window attachment (suction cup). But what might be happening is that the camera's 'stabilization', which reduces some of the outer section of the video to provide for the stabilization function, might must be repositioning the image as it is being taken, using the outer portion of the image as a buffer. Just guessing... Gary
-
Greetings, Here is one with the same GoPro Black7 in a car. Pretty good stabilization, I think. https://www.facebook.com/gary.oddi/videos/10217848785085545 Gary
-
Rosy, Yea, the Stabilization of the Black7 GoPro is pretty good but not perfect. The GoPro10 should be better. Hope Tom will give us a preview. I've been thinking of getting the 10 but I see the 11 is coming out in September (?). https://www.digitalcameraworld.com/news/gopro-hero-11-what-we-know-so-far Here is another video I took on my bike, and sped up the video (in PTE). https://www.facebook.com/gary.oddi/videos/10214048050269550 Gary
-
Rosy.... The only 'suspension' it has is the shock absorber over the front wheel. Pretty standard, I think. Nothing else . The road surface is just the normal asphalt, mostly smooth. But the GoPro was on a chest mount so that helped somewhat to avoid shakes, I'd think. And the Black7 does have Stabilization. Gary
-
Greetings Tom, Just got back from being out of town. Here is a link to a biking video I had made. My GoPro is the Black7. Must have used a chest-mount. https://www.facebook.com/1660410137/videos/10214113058094705/ Gary
-
Thanks, I was able to play the .pteav fille. I like the blur but not worth all the effort needed to make the change. I just wanted to be able to soften the appearance of each image. Well done style...Gary
-
Greetings Jean-Cyprien, What I was trying to say is that, after the rotation of the cubes for an image, the next images will rotate in cubes and then come together rather sharply. I was just wondering if the snapping together of the cubes for the next image could be somewhat softer or gentler. Or, in other words, make the transition from the separated cubes to the non-separated image, a smoother (dissolve?) transition. What you have done is way above my capabilities so I was just wondering if it could easily be done. But if you have to modify each of the cubes, not to worry. I downloaded the .pteav file but not sure what to do with it. Thanks...Gary
-
Greetings Jean-Cyprien, Just found your style. Very neat. I am wondering how I can make the images show up with a slight dissolve. If I am using it correctly, they come in with a quick transition. I tried putting a dissolve time in each of the slides but it did not take effect. I read the .doc but I did not see anything about transitions. Is it possible to put in a dissolve in your style? Gary
-
Greetings, I was cleaning out my PC of programs that I did not use much and I deleted a program called LosslessCut. But, that same day, I saw a suggestion for this program on the PTE Facebook site, I think. I had an older version that I could not figure out how to use too well but I saw they have an updated version (easier to use). I downloaded it and I think it will come in very handy to trim or cut up long videos. It was a little hard to figure out at first but I finally see how to use it. For example, it you have a very long video and want to cut it up into several shorter clips to bring into PTE, this program works very well (and much more). It is called LosslessCut. It is free and great to have handy when you need it. https://github.com/mifi/lossless-cut Demo: Another demo: Gary
-
Greetings Jill, Dang it!!! I hardly every use Tools...but thanks. Learn something every day!!!! PTE is a great program but sometimes you have to look in a dusty corner to find something you need. Much has been revealed. Thanks...Dave and Jill Gary
-
Dave, Ha! Just too obvious! Thanks... Once you understand it, it can be done easily. But this whole process can be more intuitive. For example, since the 'Time Range' is 'local time', it would be helpful if there was a choice where you could flip back and forth to show the 'Global Times' or 'Local Times' as you worked on that slide, so you don't have to go to Settings/Preferences/Editor and uncheck 'Show Global Times of Key Frames'. And use the decimal points in the 'Time Range'. as shown in the 'Global Times' to be consistent in the format. Thanks....Gary
-
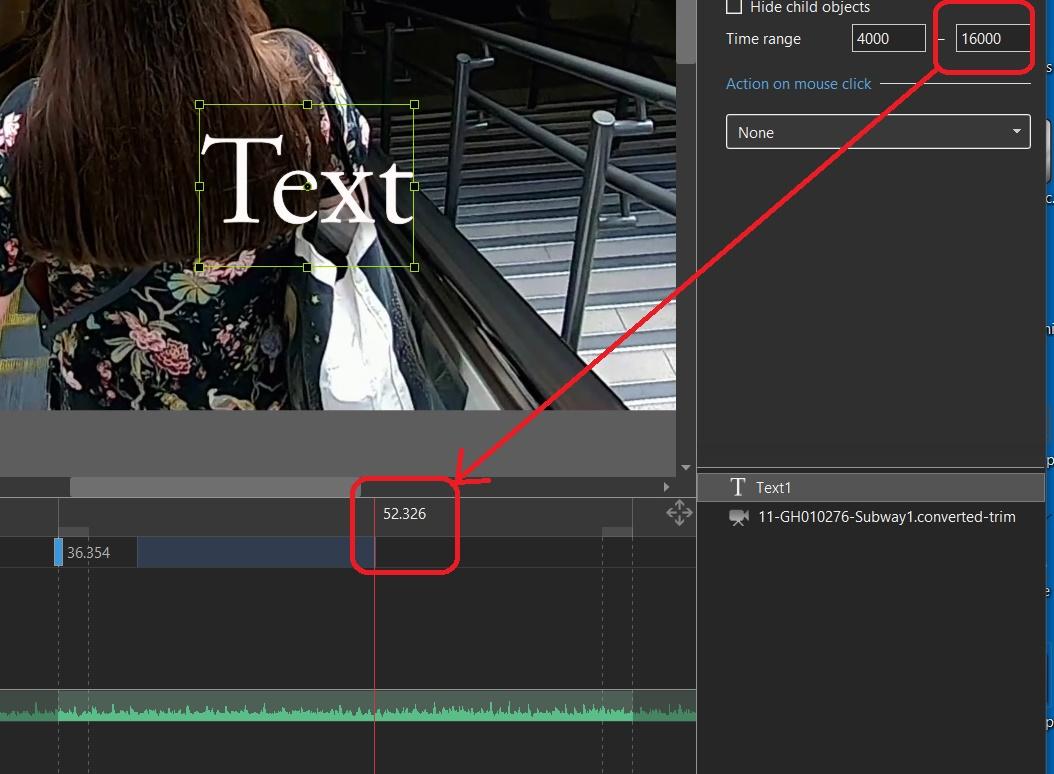
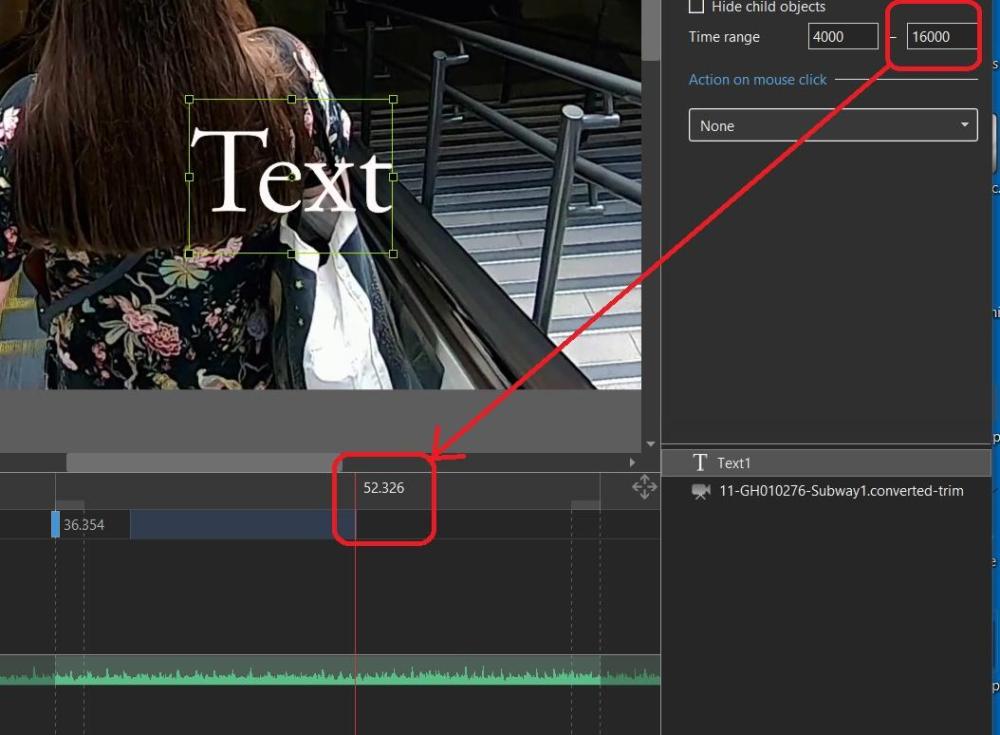
Yes, it took a bit of playing with it until I notice the indicator bar actually moves. I used the mouse to drag the setting to a point where the text would appear and dragging the end to where I wanted the text to disappear. Would be nice to be able to move it faster, especially if you have a very long video clip. And would be nicer if you could use the mousewheel, instead of dragging. I now understand that, if the 'Show Global Times' is checked, you can enter into the 'Time Range' when the text is to appear/disappear, but you have to use the actual time for that slide (local time?). So you have to sort of guess. In this example, the ending time for this text's Global Time is 52.326 but its 'local time' is 16000. There is no reference to the slide's actual times, only the Global Times. However, if you use this technique to input text, the problem is that it is either on or off instantly. You can not fade in/out as you can do with keyframes, unless you know of a way to do this? Is there a way of doing this without using keyframes? So, it would be nice if both the Global Times is shown and the 'local time' is shown. This would make the use of the 'Time Range' easier, which only accepts 'local time'. (I do notice that you can place the vertical red playhead line at the point you want the Time Range to be set and then drag the mouse to that point). Gary
-
Dave, Yes, I now see that. Seems that we should be able to input the Timeline's time into the 'Time Range' whether the 'Show Global Times' is tick or not ticked. Having to go back to the Preference/Editor to untick the 'Show Global Times' just to be able to enter the appearing/disappearing of a Text Object is not intuitive. But good to know how to do it at this point. Thanks...Gary
-
Thanks, Dave. I had remembered there was some setting that I might need to change but I just could not remember what it was. But I still have a question. If 'Show Global Times' is ticked, why can't we use the timing that we see in the Timeline? For example, if the time range for the clip is '36.000 - 1:05.001', why can't we use put in, say, '40.000 - 55.000' (or 40000 - 55000') for the text object? Seems you have 'Show Global Times' to be unticked to do this and use its figures? If I re-tick the 'Show Global Times', the '8000 - 18000' in the 'Time Range' does not change and the text appear/disappears correctly. Though the Timeline time range for the text appearing/disappearing does change to about 44.000 - 54.000'. But if I use those figures in the 'Time Range', the text does not show up in that range. Why can't we use the figures we see when the 'Show Global Times' is ticked? Is this a 'bug'? Gary
-
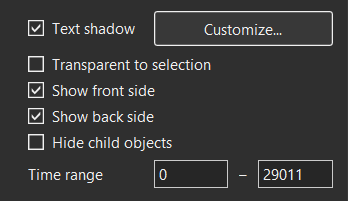
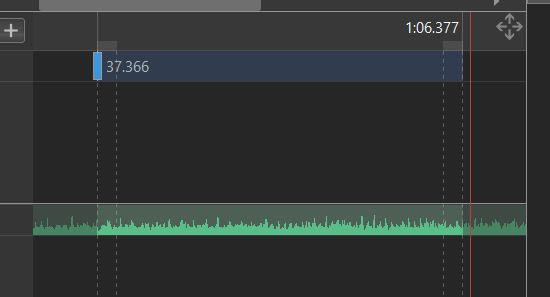
Greetings, I thought I understood how to add text to appear/disappear during a slide using the 'Time Range' function. But I'm not doing it right. I have a video clip that has a time range of 37.366 to 1:06.377. I want the text to show up at 45.000 and disappear at 50.000, for example. The current 'Time Range' for this clip shows 0 - 29011. The Help does not address this issue, at least I could not find anything. What do I change the current 'Time Range' to? I tried various combinations of '00:45.000 -00:50.000' but the text does not show up. Gary
-
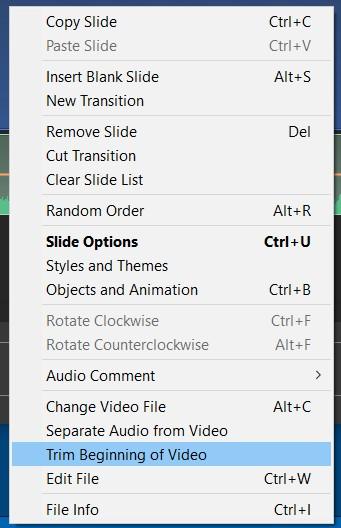
Yes, Rosy , I usually do to. So you can still use the 'Trim Beginning...' on the Converted files when in the Timeline. Gary
-
Greetings Jill, Yes, it is a way to do it. I still think that it would be useful to also have 'Trim the Ending of Video'. Quick and easy function to save a section from the middle of a video clip. If you have '...Beginning...', then you should have '...Ending...' Gary
-
-
Greetings Jill, I understand that we can do that. But it just makes sense that if you have a function for the beginning, you should have one for the end of the video clip. One of my concerns is, if you have a video clip that is, say, an hour long. You'd have to find the end and drag the following slide to your point of the edit. Why not just have a 'Trim End of Video'? Also, I am wondering if you do just drag the following slide to the position you want, as you suggest, and the video is a very long one, will the final Published project be larger than it would if you had actually trimmed off that section? Not sure, haven't tried it yet. And if you want to trim out multiple sections within a long video, dragging the end of following slide for each edit would really be too many extra clicks. Wouldn't be bad for short video clips, but why not just have that function available to trim the end of the video, too? Then you only have to assemble the clipped out sections. Gary
-
Greetings, The primary method of trimming video is to use the 'Convert/Trim Video Clip' function. It allows you to trim the beginning and ending of video clips. There is another trimming function, 'Trim Beginning of Video' when you are in the Timeline. This is handy because you don't have to go through the Convert process that you have to do with the other method. But it is only for trimming the beginning of a video clip. I suggest that it would be useful to also have 'Trim Ending of Video', too. When these functions are used, you don't have to go through the 'Convert' process. It cuts the sections immediately. And after doing it multiple times to the same clip, the remaining sections can then be strung together. Having both of these functions would make it easier and quicker when you want to trim out portions in the middle of the clip Gary
-
Greetings, Got a bit more info that Adobe just revealed that it a bug is their programming. Got this from the AskWoody author: "Noel Carboni of Adobe Quality Engineering says in the AskWoody forum today that the S-Quit bug is due to an errant substring match function in PS and PSE. Please distribute the following explanation as widely as possible (it's the fourth comment on the page): https://www.askwoody.com/forums/topic/secret-photoshop-feature-wont-open-images-with-certain-filenames/ I'm trying to get a link to this forum post added to the end of my column online. Thanks for your help! Brian Livingston"