
tom95521
-
Posts
3,697 -
Joined
-
Last visited
-
Days Won
48
Everything posted by tom95521
-
AI like ChatGPT can recover much more detail. After AI identifies the subject (or you describe it), then it can add more detail to the feathers because it knows what a Night Heron looks like. You can use a budget low resolution camera and get good results by enhancing with AI. AI masking, sky replacement, resizing, and noise reduction is common in most photo editors today. I almost always use AI to help identify new birds I have never seen before.
- 1 reply
-
- 1
-

-
Interesting. That was a clue that I missed.🙂
-
The Picture comment for videos is fixed on both Mac and Windows. Thanks! Tom
-
I should have posted this here. Thanks, Tom
-
I sometimes have problem focusing my digital camera (Nikon P950) on birds when they are nesting in trees. My camera does not have a manual focus ring. In Affinity I select the bird and create a mask, then use a Live Filter Light layer with texture option which creates a bump map of the image. I have found this method helps to recover detail that unsharp mask does not. I think Photoshop also has a light filter. https://www.affinity.studio/ https://www.affinity.studio/help/filters-lighting-effects/ Thanks, Tom Example (I probably recovered too much detail in this example)
- 1 reply
-
- 1
-

-

Backlight Frame Style - 16:9 aspect ratio
tom95521 replied to tom95521's topic in Styles & Templates
Very nice. I like your version better. I have many ideas but sometimes I get distracted and don't finish what I started. Thanks, Tom -
Simple backlight frame using two masks and gaussian blur. LED backlight is sometimes known as Ambilight available on certain model Philips HDTVs. https://www.philips.co.uk/c-e/so/tv-buying-guide/what-is-ambilight-tv It is slightly different than the Border Simple Style in PTE AV Studio. Thanks, Tom Update: New version should work with any aspect ratio. LED Backlight Frame.ptestyle
-
Male Superb Fairy Wren - Long and Slow Version
tom95521 replied to digartal's topic in Slideshows & AV Shows
I ordered a P950 and probably a monopod next. This photo of a Sandpiper sunning on a rock at high tide was taken with my old FZ150 a few days ago. We also have many ducks, pelicans, herons, and egrets at our local wildlife sanctuary, https://photos.app.goo.gl/1z59MEWwsT9irKnT8 Thanks, Tom -
Male Superb Fairy Wren - Long and Slow Version
tom95521 replied to digartal's topic in Slideshows & AV Shows
Very nice. I like the animation. I am thinking about purchasing a Nikon P950 for wildlife photography. Thanks, Tom -
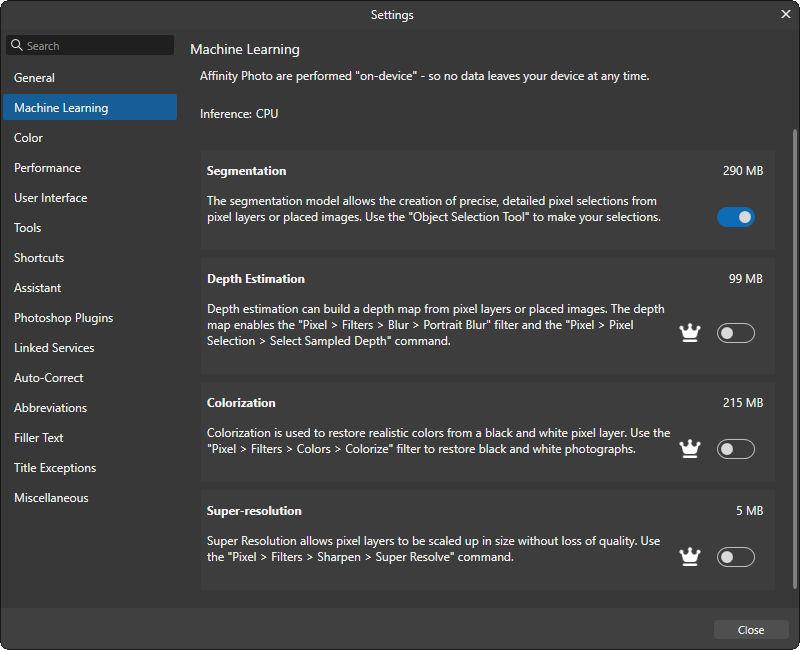
The new Affinity all in one app (Pixel, Vector, Publisher) is now available and basic functionality is free. If you want the AI features then it is US $15/month subscription. I don't know if AI is local or cloud based. Canva is a competitor to Adobe. https://www.affinity.studio/get-affinity
-
- 1
-
-
That should be interesting. Thanks, Tom
-
Topaz is considered by many to be one of the best AI image resizing software but recently switched subscription. If you are looking for alternatives to subscription based image resizing then you might try Upscayl which is free open source software and available for Mac and Windows. Like most AI software it works best on a Windows computer if you have a good graphics card or a Mac silicon computer. https://github.com/upscayl If you install Gimp open source image editor on a Windows or Linux Vulcan compatible GPU then this is one of my favorite free AI upscale options. https://www.gimp.org/ https://github.com/Nenotriple/gimp_upscale?tab=readme-ov-file Example of a popular non-subscription AI software. https://www.aiarty.com/ (Part of Digiarty which also sells VideoProc Converter AI) This is a good free online image scaler if you have just a few photos. https://imgupscaler.ai/ Here are a few samples for comparison. https://share.cleanshot.com/LZc2XWxp https://share.cleanshot.com/K3LtRNf3 Tom
-
- 1
-
-
My list of image comparison software that supports Mac and Windows. For the Mac and Windows there is the free XnView MP image viewer. https://www.xnview.com/en/xnview-mp/ For Windows there is the free FastStone Image Viewer and IrfanView. https://www.faststone.org/FSViewerDetail.htm https://www.irfanview.com/ If you want to purchase software there is ACDSee Photo Studio which has image comparison option. https://www.acdsee.com/en/photo-editing-software/ Sample Comparisons Irfanview https://share.cleanshot.com/mM1X6Vl3 XnView Windows https://share.cleanshot.com/1BsSw8Dd XnView Mac https://share.cleanshot.com/vxLzy7cF Software that I have been testing recently. AI is now very common for image resizing, subject masking, and noise reduction. Win/Mac Free RapidRAW https://github.com/CyberTimon/RapidRAW Mac Image Restore AI https://www.neuralmoon.ai/image-restore-ai Tom
-
- 3
-
-
It's fun to experiment with PTE. I created 2 more versions with more blending steps. It seems to improve deflicker on the 20 to 60 version. Thanks, Tom Timelapse Blend 20 fps.ptestyle Timelapse Blend 10 fps.ptestyle
-
Sample of frame blending using dissolve transition. Comparison with single step frame at the end. Taken from an indoor security camera pointed out window towards the sky. It's been overcast and raining so I can't go outside with my camera to capture photos with a better camera. Waiting for the weather to improve. Two Styles. Style 15 fps publish at 30 fps Style 30 fps publish at 60 fps Missing Style 25 fps publish at 50 fps (just modify one of the others to .040 for slide and dissolve time). Thanks, Tom Timelapse Blend 30 fps.ptestyle Timelapse Blend 15 fps.ptestyle
-
Add a new 15 FPS publish option for timelapse videos
tom95521 replied to tom95521's topic in Suggestions for Next Versions
Yes. I have been testing a few timelapse videos and have found that frame blending works best when the publish frame rate is 2x the slide frame rate. You can see the difference when moving frame by frame in the video. Some people may not realize that PTE can create timelapse and hyperlapse style videos from images. I have been comparing results with other software (QT, GlueMotion, TLDF, and CamDoMachine,PTE is comparable in quality. I think frame blending is better when the output frame rate is at least 30 FPS so 15 FPS has limited value. Thanks, Tom -
I have been experimenting with timelapse by combing images with short slide duration. By adding a very short dissolve transition between slides it appears to smooth the video like motion blur (often called blending in other timelapse software). If we had a 15 FPS publish option then the file size would be smaller (depending on movement between frames). Thanks, Tom
-
Enable Text outlined with a color
tom95521 replied to Dodac's topic in Suggestions for Next Versions
An outline/stroke font would be great but might be complicated due to how PTE converts fonts so they can be played on other computers without the same font. If you really need crisp outline font without animation then a high resolution PNG image is another option. Tom -
Very nice. It's interesting to watch clouds move in different directions at different altitudes. On clear nights you can watch the stars move in a circular pattern across the sky. I have added 15 fps and 24 fps timelapse styles to my previous post in styles and templates sub forum. Thanks, Tom
-
Great. It's easy to change the frame rate by adjusting the slide time. I can make styles for 15 fps and 24 fps. .067 ms for 15 fps (14.9 fps) .042 ms for 24 fps (23.8 fps) .033 ms for 30 fps (30.3 fps) Looking forward to your show. Thanks, Tom
-
Sort the images before importing by Date/Reverse order or Name. Apply the style to the images before or after importing. Publish as a video to view. Many newer cameras have a video timelapse option. Camera shutter speed should be 1/2 capture frame rate to add motion blur. If you capture at 5 second intervals the shutter speed should be 2.5 seconds. Thanks, Tom Update: Sep. 5 2025 Added 15 fps and 24 fps styles. Update Sep. 6, 2025 Added frame blending (dissolve transition) style for smoother video. Blending attempts to add synthetic motion blur but can create ghost images for fast moving objects. I also renamed regular version to quick. Update Sep 10,2025 Frame blending moved to another post in this thread. Timelapse Quick 30 fps.ptestyle Timelapse Quick 24 fps.ptestyle Timelapse Quick 15 fps.ptestyle
-
Very nice photos. I have an insta360 camera that I need to spend time learning how to use. Thanks, Tom
-
This is a useful system tray app that allows you to quickly access and configure the screen saver using hotkeys. https://goat1000.com/trayblank.php Thanks, Tom
-
I agree video trim could be improved by using keyboard shortcuts to set the trim points and to single step video frames. I use the Objects and Animation editor without using the Adjust Time Range window. My video trim workflow (accurate to within a few frames). 1. Move the video you want to trim to slide 1. 2. Scrub the timeline with mouse to where you want the the video to start, note the time, and then set the start time of the video (in). 3. Scrub the timeline with mouse to where you want the video to end, note the time, and then set the video duration (if using a transition) and slide duration (out). 4. Move the slide back to the previous location. When using multiple parts of a long video, just make a copy of the slide before moving it to slide 1 to set the trim. PTE is smart enough that you don't have to create links to a master video since it only keeps one copy in the published slideshow. I have not been following posts related to possible PTE 12 features so split and trim may be much easier in the future. Tom
-
One method that does not require a custom mouse pointer is to mouse click to switch between resize and rotate. Sample from Boxy SVG. Thanks, Tom ClickToSwitchResizeRotate.mp4