davegee
-
Posts
9,349 -
Joined
-
Days Won
59
Everything posted by davegee
-
Hi Lin, You said:"Is it really any different in substance than clicking on an Icon and viewing a JPG in Photoshop or Irfanview, etc.? When we open a jpg in any image editor we have the option of viewing it, editing it and re-saving or closing and opening a different file." I really wouldn't know because I make it a habit to always go back to the RAW file in NX2 OR keep CS3/4 open when working on files for PTE so that if I need to, I can make an edit and then save to my PTE project folder. I don't need to send the JPEG to CS3 - it is usually open in the form of a layered PSD. I gave up on shooting JPEG a long time ago. Saving VERSIONS of the same file within NEFs or PSD files is simple and allows for return to any part of the creative process without the need for having numerous TIFF files of the same original. Same goes for sound files - I keep AUDITION open when working on a file for PTE. I make it a habit to save as WAV version as well as MP3 so that I can go back to an uncompressed file if I want to do any editing. During this discussion we have refered to JPEGs and MP3s as though they are always the same in terms of quality. JPEGs, as we all know, can be quality 1 to quality 12. Would you apply the same rules to a quality 1 JPEG as to a quality 12 JPEG? Where would you draw the line? With MP3 files would you apply the same rules to a 20 Kbps file as to a 320 Kpbs file? Again, where would you draw the line? I am of the opinion that it is far safer to make a generalization that JPEG and MP3 files should not be repeatedly opened, edited and re-saved. That way, good working practice is promoted. DaveG
-
OK Lin, Now that we agree on something let's go back and consider Peter's statement: ".....we could right click on an item in the Project Options...Music tab and be taken into our nominated sound editor with that sound file opened ready for edit". That implies that it would be possible to open, edit and re-save an MP3 file, apply further compression and further degradation of the sound and be able to do that as many times as necessary to get it right. I know that Peter indicated (correctly in my view) that he uses WAV files until he has got it right and then converts to MP3. But if that facility were incorporated into PTE it would be implying to someone less knowledgeable that it is "correct" to do the same thing with MP3 files. In my honest opinion opening, editing and re-saving any JPEG or MP3 file is (what I call) "bad practice". I don't think that PTE should subscribe to something which could be interpreted as "bad practice". That's all I meant by my previous comments. It is nothing new - I have said this many times in this forum. DaveG
-
Lin, I'll try to re-word: The point I was trying to convey (the point I have always tried to convey) is that the losses involved when saving to a compressed format (JPEG, MP3) are non-recoverable. "Decompressing" does not recover the losses nor does it "fix" JPEG artifacts. DaveG
-
Hi Peter, I wasn't pointing a finger at anyone in particular. Your first sentence seems to agree with the principle that you should remain in the "lossless" state until the very end - we are in agreement. WRT JPEGs and "Compression/Decompression" - converting to JPEG is a one way street - there is no "Decompression". DaveG
-
Hi all, Sorry to have to disagree, once again, about this. The ability to take an already compressed file into another programme for edited is encouraging bad practice. This subject has been covered before. You should always go back to the last saved TIFF, PSD or WAV file and start from there. With regard to JPEGs there is a whole chapter on it in Martin Evenings CS3 book where he discourages that practice. I know that many people do it and they do not see any differences in the files - but the difference is there, however minute and I don't think that PTE, or any other programme, should be encouraging bad practice. DaveG
-
Steve, A couple of thoughts: Why not make the project 15:10 - same AR as the 720x480 NTSC (and DSLR format)? If the 4:3 AR is absolute and cannot be changed why not make the images 4:3 within the 15:10 AR and create the black lines in the project? Either way - no distortion. DaveG
-
What's this all about? I regularly visit other forums in the thirst for knowledge about photography, techniques, advice etc etc and I visit places like the Nikonians and Nikon Cafe. The question of Slide Show recommendations crops up frequently and is an ideal opportunity to promote PTE to a MUCH wider audience. There is a thread active at the moment here: http://www.nikonians.org/forums/dcboard.ph...50479&page= ....which I have contributed to. Could I suggest to any of you who have the time that a visit and contribution to the thread would help to keep it active and raise the profile of PTE to a huge audience? Membership is free and quite easy to get. Also, if you visit other forums (you might know of some Canon forums) where the same thing applies, you let the rest of us know so that we can do the same thing there? It's infiltration of a sort, but in the nicest possible way - these good people out there deserve to know about good products and PTE is just one such product. We should share it. I have also recommended Beechbrook and Beckhamdigital to those good people at Nikonians as places to download good examples of the product. DaveG
-
Well done Brian, I have been promoting this for the last six months here at the PTE forums. You have to see it to believe it. The DVI / HDMI hook-up is essential for the best quality and it surpasses DVD. Even when Blu-Ray becomes common place to convert PTE shows to DVD the PTE EXE played this way is still going to be better quality-wise. DaveG
-
Barry, Surely you will not be approached regarding something which is not working in a BETA? I would have thought that the version you would be selling would be the last full working version - 5.52? The decision then lies with the customer whether or not to download/upgrade to Beta versions. DaveG
-
Bob, Use 1024x768 (OR 1280x960 to match your DELL monitor). For those with CRT TVs the aspect ratio is 4:3 same as 1024x768 (OR 1280x960). Those with LCDs will see it with black lines to either side. The DVD/Video resolution will be 720x576 anyway so the resolution won't matter that much. It's the aspect ratio which you have to consider. DaveG
-
Quick Time, of all of the programmes which will work with the PTE generated MP4 files on my computers, is the MOST reliable. Furthermore, if you plan on sharing your file with a MAC user, the chances are that QuickTime is the ONLY programme the MAC user will have. So trying an MP4 out in QuickTime before sharing would seem to be a wise thing to do. Rather than uninstalling QuickTime, I would suggest downloading the latest version and getting it to work. On the other hand, I installed my MP4 codec (on my desktop) using Lin's instructions from a while back - I wonder if that's the reason I had no problems from then on. On my Vista laptop I never had a codec problem. BTW - I don't associate these files with QuickTime, I just right click on them, choose "Open With" QuickTime, ignore the offer to associate and they play just great. Doing it this way does not upset my other file associations. DaveG
-
Hi Barry, Just to answer part of your question - it must be fully workable: http://www.picturestoexe.com/forums/index....913&hl=ipod DaveG
-
Tom, It has been doing that on my computer since 5.1. DaveG
-
Hi Stu, I am aware of what you say - it is the AVOIDANCE of the System folder that led me to write this. I don't want to be bothered with the system folder and I'm sure a lot of people feel the same way. I was purely pointing out that it is not a fault that the screensaver cannot be chosen from the list of default screensavers if changed for some reason - it is just a different, EASIER, SAFER, way of doing it. DaveG
-
Peter, The procedure is the same for both XP and Vista. The current screensaver I am using was made prior to 5.6 Beta 10. DaveG
-
Peter, Yes - XP. I'm trying to avoid the System folder route. I will get back to you later. DaveG
-
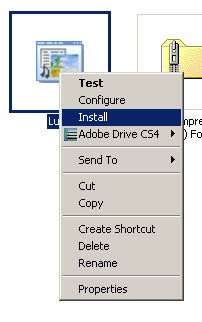
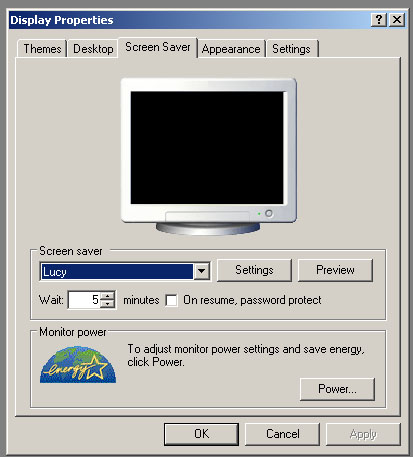
Screensavers the easy way: 1. Create a folder on your HDD called, for example, “My Screensavers” 2. Open your screensaver project in PTE and “Create Screensaver” in your “My Screensavers” folder 3. Close PTE 4. Go to your “My Screensavers” folder 5. Right click on your “xxxx.scr” file and choose “Install” (see diagram 1 below) 6. Set the waiting time (see diagram 2 below), click OK and you’re finished If you edit/modify the project and save to the same file in “My Screensavers” the screensaver will be automatically updated without need for further action by you. If you want to change to a different screensaver saved to your “My Screensaver” folder simply choose the new screensaver and follow steps 5 and 6 above. You can use an existing .exe file as a screensaver by COPYING the file to your “My Screensavers” folder and changing its name from “xxxxx.exe” to “xxxxx.scr”. Then follow steps 5 and 6 above. Your chosen screensaver will only remain in the list of screensavers when it is installed. If you change to another of your screensavers via the method above or change to a Windows screensaver your original screensaver disappears from the list. To re-install one of your screensavers follow the procedure from 4 above. Edited to confirm that the procedure is the same for both XP and Vista. In Options/Main set "Repeat show until ESC is Pressed". I have not tried chaining Screensavers but it should be possible if the last show is linked back to the first. DaveG
-
Peter, I copy what you say about 5.52. When did that facility get dropped? "And, of course, "Create backup as Zip" will always pull everything together into one place" Agreed, but the possibility exists, during a lengthy project, that the "Backup in ZIP" will not occur until the very end and in the meantime things could get moved around. Two possibilities: Either IGOR puts some sort of warning in when copying and pasting OR do as I do and manage your images and folders yourself. I can see where a complicated sequence would be easier to copy and paste rather than rebuild, but the chances of a c**k up occuring are increased if some sort of system is not in place. It has to be intuitive and any suggestion made to Igor should have the INTUITIVENESS built in. He's the one who gets the flack if he blindly follows all suggestions. DaveG
-
More details for these good people here please? Which version of PTE? How big is the file? What Audio file are you using? etc You can try a couple of things: Just create the MPEG2 file on your HDD (untick the Burn DVD disc) and if successful you will know where your problem lies. The MPEG2 file should open in Windows Media Player / Quick Time or similar. Create the ISO file on your HDD (untick the Burn DVD disc) and if successful use whatever DVD authoring software you have to burn the ISO file. I use ROXIO 8/9 and that burns ISO files with no problems. In ROXIO you just double click on the ISO and Burn DVD opens automatically. Have you tried (in v5.6) creating HD video for PC and Mac? This will put an MPEG4 file on your HDD which you will be able to play with Quick Time etc. Find out how far you can go WITHOUT wasting DVDs. If you can't create the MPEG2 file, the ISO file or the MPEG4 report back with more detail. Also if any/all of the above suggestions are succsessful and you still can't burn the DVD come back with more details of your system. DaveG
-
The Behringer unit, whilst perhaps not as versatile as the Edirol, should be exactly what you need. At £19.99 it's a bargain. http://www.dv247.com/invt/32730/ DaveG
-
Peter, Xaver, Whilst not disagreeing with either of you, the procedure you are suggesting could cause problems with images coming from multiple folders. The usual procedure is to make a template when the project is completed. During construction (and before the template is made) the distribution of images across multiple folder can, as you know, cause problems. DaveG
-
Just look at the spec and the inputs/outputs. If they are suitable the quality is very good. It might be just a tad pricey but it will do the job. DaveG
-
The EDIROL - Optical to USB Interface that I use is two way i.e. both in and out. Presumably they make a suitable non-optical interface. The UA-1EX looks about right: http://www.ediroleurope.com/products.php?subcat=UFA OR http://www.rolandus.com/products/productli...px?ParentId=114 Their USB speakers are perhaps worth a look also - depends on the size of your audience. http://www.ediroleurope.com/product_overvi...&country=GB DaveG
-
Hi Ron, Welcome back. Do you create menus? Do you have Vista? If the answer is yes to both you would have had problems in the past with menus - this cures it. Not, only that but "Run Slide Show with Return" is excellent and worth trying for yourself. DaveG
-
Quick Time works well on both platforms. DaveG