davegee
-
Posts
9,334 -
Joined
-
Days Won
59
Everything posted by davegee
-
Ken, I should have said (although it should have been obvious) that I was talking about NEW projects? Best wishes, DG
-
Attention to detail scores points is what I am preachin'. I'm in awe of some of the things being done but where I see room for improvement I see it as my duty to help out wherever I can. DG
-
Great material for a tutorial! DG
-
Technically, this project is showing some excellent uses of the PTE facilities. However, (and this is REALLY picky), Lin's blinds appear to be inside looking out and therefore the overlap is the wrong (?) way. But when they open the "pelmet" suggests two inside rooms. Small details? DG
-
Too late! I had put your typing error down to "too much" Chardonnay/Chardoney/Chardeney? DG
-
If igor can re-instate this feature then why not? Could I respectfully suggest though, that the time spent sorting outside of pte could be diverted to sorting in the full screen view of the slide list within PTE? If, after sorting outside of PTE, you change you mind - what then? DG
-
If Nikon progresses as usual there will be a D4x sometime in the future with around 24Mp or more. There are many rumours of a 36Mp sensor and the forthcoming D800 is a prime candidate for this. I don't think that I would want this sort of sensor but the logic seems to be that with such a sensor in an FX camera greater crops are possible. For instance a 300mm lens on a D4x in crop mode would equate to a 450mm lens with a 12-16Mp resolution. The downside (?) is that a TIFF from a D4x at full res is going to be 140Mb (plus) when converted. New computer anyone? DG
-
Now that's clever and good use of PTE features! DG
-

upgrade 5.6.4 to new Picts EXE version
davegee replied to amandagrantham's topic in General Discussion
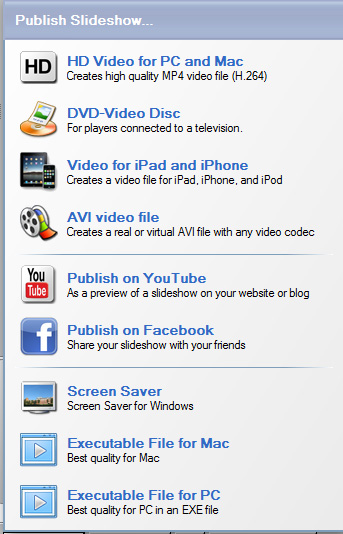
You should find that you can make EXE files as before, but to enable use of VideoBuilder you'll need to purchase the upgrade license. Clicking on PUBLISH will show what you can or cannot do. The JPEG attached will show what it should look like. Templates are things that you can set up your self. Just choose from the the variables in Project Options and add your images. You could choose one of the many transitions or random. Pan, Zoom and Rotate are not part of the Templates - you will have to be a little creative yourself - it's more fun. The standard music file types are MP3, WAV, wma and ogg. DG
-
upgrade 5.6.4 to new Picts EXE version
davegee replied to amandagrantham's topic in General Discussion
AGP, You can load V7.0.3 without paying anything. You then need to look for the UPGRADE price to include VideoBulider. DG -
Mick, The other essential (to avoid the lines problem) is to build at native screen resolution. DG
-
Altering the value of the Rotate X start position works. For instance the two slats nearest to the vertical centre point seem to need and adjustment of only 1.5 degree but the two slats either side (in a ten slat 1620x1080 configuration) seem to need a +/- 4.5 degree adjustment for them to start without being seen. I too, would welcome a "flat plane" scenario for some applications. The ultimate would be a variable perspective but I don't know if this would be possible. DG
-
J, You need to load up - or LINK to - a Template of the Project. Zip it up and post at MediaFire or similar then link here. P.S. Is there a music file playing? If so remove it (temporarily) and try again? DG
-
DG
-
I don't see the Nav Bar not supporting EXIT a problem? (I also wouldn't have a problem if it did support it!). You have two options: Hit ESC Configure Left or Right Mouse Button to EXIT. DG
-
Igor, Would it be possible to use Control and Zero (and Control / Alt / Zero) to set Fit to Screen (and 100% View) in Objects and Animation? DG
-
No, most software allow two copies on different machines. PTE allows this. DG
-
Daniel, Perhaps Igor will provide a better answer but why do you want to use anything other than HIGH quality? I use HIGH exclusively to create MPEG4 for playing on a TV via a USB Memory Key. There are no quality issues but more importantly there are no glitches or stuttering etc. So if the system handles the highest quality that's what (IMHO) we should aim for? By producing a range of MPEG4 files from the same show it is easy to say that the Low, Medium or High satisfies your requirements (for that show) and discard the rest. As indicated by Igor, different content is going to give different results so I'm all for using HIGH exclusively - it can't get better than that. DG
-
A little "CROSSFADE" usually makes the track a little more "professional". It also reduces the overall length of a track - open CUSTOMIZE. DG
-
Problem: (SOLVED) MP3's inconsistency in lengths.
davegee replied to goddi's topic in General Discussion
Peter, I agree, but I go a little further. MP3 - 256 - 320 Kbps (I don't only use MP3 for PTE!). JPEGs - 100% Quality No compromise!! DG -
Geoff, Take a look at BOSE? Bose Companion 2 or Companion 20 whichever suits your budget. http://www.bose.co.uk/GB/en/home-and-personal-audio/digital-music-solutions/computer-speakers/companion-2-speaker-system/ I bought Companion 2 before Xmas and I'm well pleased. John Lewis stock them for demo'ing. Get them to check the power plug in the box - mine was European and I had to do a swap for the right UK one. Alternatively CURRYS or a BOSE dealer. DG
-
Problem: (SOLVED) MP3's inconsistency in lengths.
davegee replied to goddi's topic in General Discussion
Options? DG -
Sorry Celou, Perhaps I misunderstood. Is it the EXE which is "unstable"? Have you tried removing all of the video elements and make the EXE without them? If it runs OK then introduce the MPEG2 files one at a time until the problem occurs. DG
-
Is the EXE or MPEG4 OK? DG
-
The attached Zipped Folder now contains Actions for Splitting: 4:3 (1440x1080); 3:2 (1620x1080) and 16:9 (1920x1080) Images into nine equal rectangles. I have added an action for creating a 24 square grid in a 1620x1080 image. I have also added the action to split a 1620x1080 image into 24 square JPEGs. Demo EXE included. For best results view at 1920x1080. Lines MIGHT occur at different resolutions. Please read the Text file. DG GRID.zip