

Lin Evans
-
Posts
8,206 -
Joined
-
Last visited
-
Days Won
12
Everything posted by Lin Evans
-
Thanks folks! It's Just something a bit calming and for my stress relief. It's such a shame that people in this word can't get Along. There Will Always Be Someone Richer, Poorer, Smarter, Dumber, Taller, Shorter, Stronger, Weaker, More Fortunate, or Less Fortunate Than Yourself So Enjoy What God Gave You And Let Others Do The Same. These Are Just What I Think Are Some Beautiful Nature Images From Pixabay and Wallpaper Set To Relaxing Music. It Works For Me As Stress Relief And I Hope It Does The Same For You... Best regards, Lin
-
Just some Pixabay and Wallpaper Images of the Beauty of Nature - Nothing Special... Lin
-
Which version of PTE are you using? It sounds as if you may not be using PTE AV Studio 10. If not, download the trial version and see if you have the same issue playing this video. If not, there is probably something specific to the video which is causing the issue. Usually converting corrects that but not always. Make certain that after the conversion, the file being used in your slide list has the word "converted" in it. Best regards, Lin
-
Hi Barry, It's a USB Thumb Drive.. Lin
-
Hi Lowell, In case you haven't seen this - my first suggestion would be to watch Barry's tutorial on this which answers some of your questions. Once you've watched this, then we can go on and proceed with more options. Link to Barry's tutorial below: Best regards, Lin https://www.youtube.com/embed/IQ9zK-X7PME?rel=0&autoplay=1
-
Hi Neighbor, Warmer in Yuma for sure but we're having pretty good weather here in northern Colorado (Berthoud) the last few days. It sound like you're doing everything correctly. If it actually took fifteen or twenty minutes, that show is "somewhere" on your hard drive. It's strange that the Windows search doesn't find it. Did it find ANY mp4's? Since we know you have several, it "should" have found them using *.mp4 for the search key. Do you still have the PTE file so you can open the slideshow again? If you open it in PTE then go to create the video again, but stop before clicking O.K., you MIGHT see where the default folder is located. The * in *.mp4 constitutes a "wild card" which means ANY file with the extension dot mp4. That should locate all mp4's on your system. Even if the mp4 didn't get rendered, the PTE file should still be available and you can do it again, nothing should be lost. I'm a bit confused by what you mean by "embedded" it? Usually only on the web with a social site like Youtube or Vimeo or such can you "embed" a video. It's not something you do on your computer itself. Maybe if you explain exactly the steps you took to "embed" the mp4 we can figure out what happened. It's "possible" that somehow the process you used to "embed" this actually moved the file somewhere else, but you should still have the filename.pte file on you hard drive and be able to bring up the show and render it again. Unless you intentionally delete the PTE file it should still be available. The PTE file is a data file which tells the program where the images are as well as everything you did as far as timing, audio, etc., etc. It's like an electronic index to allow you to always load the original show assuming you saved it before creating the video. Best regards, Lin
-
Use the "search" feature of Win 10 to look for *.mp4 Best regards, Lin https://support.microsoft.com/en-us/help/4026289/windows-10-find-your-documents
-
It's getting real close - just a bit more changes then it will be ready for beta per Igor. Best regards, Lin
-
It's probably in C:/users/Lowell/videos rather than Documents Lowell, but use the Windows Search and you will probably find it. One needs to pay attention when creating the video where it's defaulted to go. If you don't find it in the suggested place it may also be in C:/users/Lowell/Videos/Desktop. Tell me what version of Windows you're running and maybe I can help you find it. Best regards, Lin
-
Roll style (like a scroll opening) or unfolding
Lin Evans replied to Scraapi's topic in Styles & Templates
Hi Celia, The way I originally wanted to try to do this with chroma-key extraction won't work correctly because the roll-out transition has some funky stuff at the very end which spoils the effect. What I did was modify my earlier style which I posted for you in a couple significant ways so it can be used with your png map. Below is a video tutorial I made for you so you can easiy learn how to use this if it works for you. This style is a little different than most in the following way. First, you choose an image which determines the colors and texture of the scroll "handles" on the right hand side. The image you apply the style to will not automatically appear but what it does is give the data to the style to create the appearance of the top and bottom "knobs or handles" on the right side of the scroll. You can use the image you eventually want in the background or any image for this purpose. For example, if you were to select a simple brown image of about the same color as the knobs on the left to apply the style to, you would get brown knobs. If you were to choose a solid red, blue, green, etc., you would end up with one of those respective colors. If you choose the actual image you want as a background, the colors and texture on the right hand knobs will compement that image. Once you have select the image and applied the style, you then go to Objects and Animations and chose whatever image you want as a background, but the knobs will remain the colors and textures of the image you applied the style to. I think the tutorial will explain this - it's really simple. Next you replace the image just below the "reference image" (the very bottom of all the code) with the actual background image. Next you go right above where you see "text" and select the text and go to and select the second keyframe so you can see the open scroll and put your PNG (or any PNG) image in and adjust the position and size as indicated in the tutorial. Then just change the transition to "quick" and run a preview to see that everything is O.K. Let me know if you have any questions and if this will work for you. If you want the handles on the right to be identical to the ones on the left, use the mahogany wood linked below to apply the style to before choosing your background image as explained in the video below. Best regards, Lin {ps style to download is under the video as well as the mahogany wood) Parchment Scroll2.ptestyle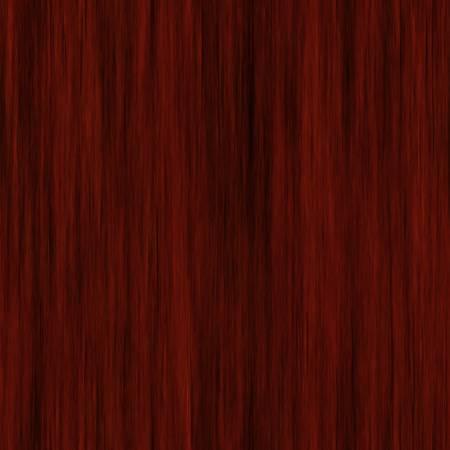
-
Roll style (like a scroll opening) or unfolding
Lin Evans replied to Scraapi's topic in Styles & Templates
Thanks Celia, I'll check it out tomorrow and see what might be done.. Best regards, Lin -
Never say never Paul, I'm 77 By the way, my style Parchment Scroll2.ptestyle is a little different than normal styles in that I created it so that the handles on the right hand side of the scroll pick up their color and texture from the slide you apply the style to. They keep this color even when you change the background image so that it's possible to use any solid color or image to get the color and texture you want. If you want to match the knobs on the left I'll include a link to the mahogany wood that I used and you can just apply the style to that wood and the knobs on the right will match the ones on the left. Also, the image the style is applied to does NOT automatically become the background image. You go to the bottom and right above "reference image" you select the default image and use the change image feature on the "Properties" tab "Picture". This is also different that a normal style which is automatically chosen as the background when you apply a style. I did it this way so users can change the color and texture of the right-hand knobs on the scroll. Also, one can substitute and image for the text so if you want the scroll to open and reveal an image, just click on "text" (near the bottom) then click on the second keyframe so you can see the open scroll. The text is a child image so just click on the parent of the text and add the content you want to reveal inside the open scroll. Just a little fun making it a bit different. At the very top you will find a "frame" and if you click on that you can size and position the scroll as desired. Below is the mahogany wood which can have the style applied to make the right hand knobs like the left hand knobs if desired. Best regards, Lin

-
Hi Paul, Thanks - because so many users cooperate and share their creations, there are always lots of great things coming out with this product. PTE is and has been by far the leading tool for professional AV (audio/visual) competitors now world-wide for a number of years. The developers are not only creative people but listen to their users and make every effort to give us the very best quality at an incredibly reasonable price. The major effort for about a year now is to get the dedicated MacIntosh version finished and I've been amazed at how well the Windows version has been debugged and improved while the Mac version is coming along very well and will soon be available for public beta testing. It's often been said that one's imagination is the only limitation with this product. It's actually possible to do things with PTE which can't be done with some of the most expensive and professional Adobe products. A few years ago Dave G created a neat style which allows the creation, pan, zoom and rotate of an icosahedron (a 20 sided geometrical construct). At the time I had been to the old COMDEX show in Las Vegas and was very interested in creating video walls like I saw there where dozens and even as many as a hundred separate video screens were simultaneously displaying videos. I came back home and thought about it and decided there was no reason why one of these video walls couldn't be created in PTE so by using the various available tools in the software, I created a number of these video walls and also video tutorials showing people how to do it. With Dave's icosahedron and my video walls I created a construct which displayed three thousand six hundred and twenty individual video screens simultaneously playing about 128 different videos on this rotating and zooming construct which was only part of the animation. Later this year, for fun I put four of these constructs containing fourteen thousand four hundred and eighty individual video screens all playing video simultaneously up on Youtube. Just for fun I actually put thirty six thousand two hundred in one animation and it still ran perfectly smoothly. Way back years ago one of our incredibly talented French users JPD was creating things which seemed impossible. He left an incredible legacy of work when he sadly passed away before his time. Now many other extremely talented French users such as Jean-Cyprien, and others too numerous to name are carrying on and demonstrating incredible creativity. There are so many people from all over the world who are using this product to not only create beautiful photo slideshows, but also to create stunning animations and such. Welcome to the family and check out some of the creations on Youtube and Vimeo. I post on Youtube under the psudonym of icejasper. Best regards, Lin
-
Hi Aleina, It's fun to watch them play. I don't get out too much any more and having a little mini-wildlife show in the back yard keeps me from getting bored for sure! Between my pup Ruby and the squirrels, bunnies, birds, butterflies, bees and such we have lots of things to photograph and observe. Best regards, Lin
-
Hi Folks, Just playing with possibilities - if you like this one, the style is below the video to download and play with or modify as you like. Find the text way down near the bottom to modify as desired. Just drag the action manually so you can see what the text reads and modify. The top level frame will allow sizing and moving the scroll. Use on top of a 16:9 aspect ratio image. Lin Parchment Scroll2.ptestyle
-
Hi Paul, You can save any animation as a style if you are using PTE AV Studio 10 Pro. The standard version allows the use of styles, but doesn't allow creating styles by the user. In a galaxy far far away and many years ago we played with this with pictures to exe version 5. There hasn't been much or any discussion about it in years but here's a style I created which you can play with. You may want to slow it a tiny bit before applying. Download style below video... Best regards, Lin Starwars Crawl.ptestyle
-
Roll style (like a scroll opening) or unfolding
Lin Evans replied to Scraapi's topic in Styles & Templates
Hi Celia, I believe I may have a solution. If you give me a few hours I'll create a sample for you. Although we can't modify the pagecurl directly, what can be done is one of the suggestions I had earlier which is a green screen chromakey extraction. The way I will do this is to take your map when you have it ready, then apply the pagecurl in the way you want it, but play it with a solid green background. I have the ability to screen-capture at any resolution up to 4K in a seamless way so I'll play it with the green background and capture it as a green-screen video. Then that video can be played over any image on PTE and by using PTE's chroma key for video, the green background will become transparent and what "was" the green background will reveal the slide beneath so you will not see the slide beneath rolling up. I'll post a sample to show it and when finished, I'll make a video tutorial and post it. Best regards, Lin -
Roll style (like a scroll opening) or unfolding
Lin Evans replied to Scraapi's topic in Styles & Templates
Hi Celia, If you could post a sample of "exactly" what you want to do (like are you trying to roll-up an image or do you want a scroll with text on it to appear over an image) then I think I can make you a style which will do this. Did you download and load the style I created for you? The one which opens a horizontal scroll with text? Let me know. Best regards, Lin -
Roll style (like a scroll opening) or unfolding
Lin Evans replied to Scraapi's topic in Styles & Templates
Let me think about this for a bit. I don't think it's possible to do that with a transition. Probably the best way to do what you want is with a green screen (chroma key) video. Give me a few hours to look around and I'll see what I can find. Meanwhile, since this works fine with a black screen, try this: After the previous slide and before you use the parchment roll-up, add a short blank slide. This will make the roll-up transition from a black screen rather than from an image with color and detail. To roll it up using the transition with an image which isn't black in the background isn't going to work as far as I know. Best regards, Lin -
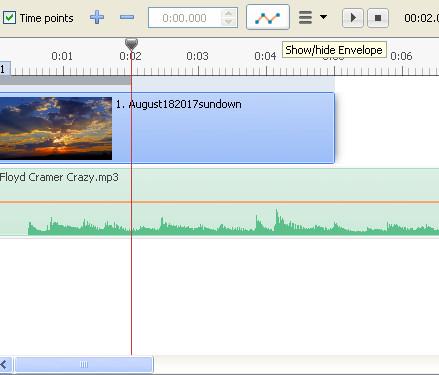
Hi Clare, It's not a bug - the line can be turned on or off. Go to the timeline and look to the right of where it says "time points" then a plus sign and a minus sign then the time block and to the right of this an icon with an orange line and blue dots. Click this. This icon turns on and off the line you are looking for. Best regards, Lin
-
Hi Canico, Listen carefully - you can have as many text objects as you wish and EACH text object can be sized independently. Something is not registering because this has been suggested multiple times. Click on "add text or hyperlink" and the word "Text" appears. That is one text object. Click on "add text or hyperlink" and another word "text" appears. This is text object 2. You will not see the second text object because it perfectly overlays the first on the screen. Just select it in the objects list and use your mouse to move it where you wish. You then type what you want to substitute text object one and size it as you like. Highlight text object 2 and type what you want in a different font or same font or different color or same color and size it as you want. This is text object 2... Even every LETTER of a work can be a separate text object and have different fonts and/or different size, etc. Best regards, Lin
-
Hi Judy, That's Tommy Emmanuel Best regards, Lin
-
Links - Rain Styles - Components - Tutorial
Lin Evans replied to Lin Evans's topic in Styles & Templates
Hi Tom, That's a novel way to approach it! It's always fun looking for new ways to create effects. You'll notice that in my little squirrel video I used your "fly away wings" transition on one of my images. The influx of people formerly using Proshow has injected new spirit into creating styles and transitions. I hope theDom comes back and participates in the forum again after the MacIntosh version gets launched. He has some amazing creativity. Best regards, Lin -
Roll style (like a scroll opening) or unfolding
Lin Evans replied to Scraapi's topic in Styles & Templates
Hi Scraapi, Actually, there are a few ways to approach this depending on how "fancy" you want the scroll to be. The easiest way is to simply get an image of a piece of parchment of the color desired and write your text on it in the desired font. The easiest type to read would be one which rolls down from the top although you could design something which rolls from any direction. In PTE one of the transitions is "curling of page" under "standard transitions." You adjust to "unfolding" and set the radius to about 3 and leave the 3d volume at the default. Change the time for the transition to about 5 seconds or so and the slide time to about 10 seconds. I'm including a little zip file with the components and the PTE file. Just extract everything into a folder by itself and load the PTE file and preview it. If you wanted to get fancy, you could make the parchment paper in Photoshop and make the ends as fancy and shaped like you want and just save as a PNG with transparency. There are other possibilities but play with this and maybe it will give you some ideas. Below the zipped file is a quick little style which creates an opening scroll. Apply to any 16:9 aspect image. To change the text, when you select the style and before applying it, change the text in the "text comment" then after applying it, adjust the size of the text at the first keyframe and use the identical value at the last keyframe. To get more text in or change font use the Objects and Animations screen features. Best regards, Lin scroll_Mar8-2020_18-06-43.zip Parchment Scroll.ptestyle -
Hi Kieron, Tom, Thanks - just a fun way to remember some of the little furry critters who live out their lives in some pretty harsh conditions. They modified the plastic a bit on the feeder to make it a bit wider and deeper so they could get their head and neck in with less effort. It's amazing how quickly they learned to just lift up the lid and stand on the platform and nosh away. They spill just enough to keep the doves and other feathered critters happy. My neighbor has a bird feeder so the neighborhood is pretty popular with both birds and squirrels and the occasional bunny. The little bunnies can slip under the slight passages along the fence. They are small enough for bunny doors but too tight for the neighborhood foxes so they feel safe dining every night in the yard on the little bit of vegetation which survived the winter. Best regards, Lin & Ruby pup