davegee
-
Posts
9,323 -
Joined
-
Days Won
59
Everything posted by davegee
-
Three Simple Styles for the 4x3 (1440), 3x2 (1620) and 16x9 (1920) Aspect Ratios - a wood effect Frame is added to the Slide and a "cream" background is used with shadows behind the image. The Image is in Cover Slide Mode within a mask and can be Zoomed and/or panned as required. Note that the AR of the Image is slightly different to the Project AR so some "cutoff" may occur. 4:3 Framed 1440.ptestyle 3:2 Framed 1620.ptestyle 16:9 Framed 1920.ptestyle N.B. There appears to be an ongoing issue with Exported Styles containing objects, which prevents the use of Multi Aspect Ratio Styles. So (for now) I have had to upload the individual Styles. If anyone else is experiencing the same problem, I would like to hear from you. Multi AR Styles work on the PC used to construct them but when Exported and transfered to another computer things start to go wrong.
-
Let me know when you do? It might be a useful feature on my wife's iPad.
-
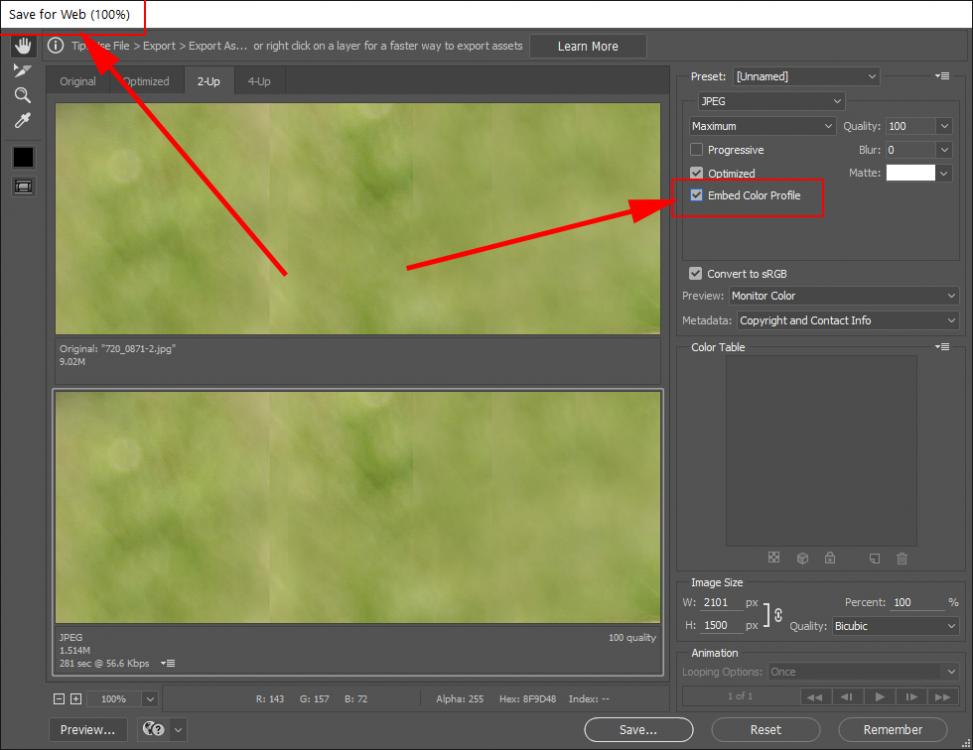
Agreed, but if you turn off "Convert to sRGB" then it is tagged with the ProPhotoRGB or whatever. My attachment incorrectly showed the "Convert to sRGB" ticked. Sorry. DG P.S. Bruno replied while I was writing.
-
Bruno - Export / Save for the web (Legacy):
-
Robert, Check this: https://discussions.apple.com/thread/5724261?tstart=0 DG
-

Voice files - inserting into slides
davegee replied to aplman's topic in Suggestions for Next Versions
Will it be one mp3 per slide - or more than one? You can drag an mp3 into available space in a Track in Timeline view and position it. Right click on the mp3 (in the track) and use Customize Audio Clip to link to the desired slide. You are also offered the facility to Link to the Slide under the cursor. You appear to be only able to Link one Audio Clip per Slide (per track). If you want to Link two clips to the same Slide then it needs to be done in a second track etc. If the clip duration does not exceed the Slide Duration in each case, you only need one track for that and if the Slide position is changed the Link is maintained. Does that help? http://docs.picturestoexe.com/en/project-options/audio-tab http://docs.picturestoexe.com/en/main-window/the_timeline -
In some cases, when adding a project which has been made in an earlier version of PicturesToExe than your current version, the user can open Video Builder without being asked to Save the project. This can cause problems with the publish process. An advisory has been added to the Online Help to Save the project under these circumstances before opening Video Builder. http://docs.picturestoexe.com/en/videobuilder/dvdvideodisc
-
-
There is also this:
-
Check this out: http://docs.picturestoexe.com/en/video/properties?s[]=master#single_videomaster_video Use Master Video to split the video into any number of individual slides and add your Text as required to the slides as you did before. DG
-
Do you mean this one, Ray: DG
-
The test went as you described Igor. No problems - W10. DG
-
Fonts used to be packed in back-up zip
davegee replied to Roel's topic in Suggestions for Next Versions
How does your system differentiate between free and licensed fonts on someone else's computer? It relies on the knowledge (or ignorance) of the user. I assume that PTE avoids this problem by not including the facility. I also wonder if the fonts resident on your pc are deemed to be licensed to you alone by virtue of the fact that you purchased (licensed) the software with which they were supplied. In that sense you purchased all of the fonts on your pc other than any free fonts that you downloaded. -
Fonts used to be packed in back-up zip
davegee replied to Roel's topic in Suggestions for Next Versions
Great idea. But is it legal? http://www.typography.com/faq/category.php?topicID=10 DG -
How do you NOT embed the jpeg? That is a different thing to shooting RAW + JPEG. The video shows the difference between the Adobe generated Histogram and the RAW Histogram.
-
It is not a RAW Converter - it is a RAW Viewer. As I said, it allows you to see the RAW Histogram rather than a Histogram based on the embedded JPEG - a vastly different thing. Their site explains it and some YouTube videos show what it is capable of. I'm not trying to "sell" it - I asked if anyone else was using it. http://www.fastrawviewer.com/
-
Anyone here using Fastrawviewer? It takes some of the guess work out of RAW conversion if you are "struggling" with RAW. It gives you a precise starting point in your RAW converter of choice regarding exposure before you start fiddling with the other sliders. It does this by displaying the RAW histogram rather than a histogram based on the embedded jpeg. It also helps with "culling" of images due to exposure and/or sharpness problems. I have been trying it for a few days and I can recommend it. Take a look at their site and some reviews on the web.
-
The image that you are masking should sit between the "mask container" and the "mask". Click on "mask container" so that it is highlighted and then right click to "add" your image. http://docs.picturestoexe.com/en/techniques/addmask
-
Thanks Igor. DG
-
J-C, This was also reported on your French forum recently (early February?). The problem is (apparently) caused by using the Category Name - Slide Styles when saving or renaming. Only the first "S" should be capitalized. Igor knows about it. DG
-
Does anyone else here get a "problem" when importing Styles made on another PC that the imported Style appears in a second User Styles folder? Getting it into the original User Styles is fairly easy but I am trying to find out if it is just my PCs (W7 and W10) or a wider problem.
-
Combining a couple of these which only takes about two minutes each using the Photoshop actions and PTE Style(s). Could be used for Titles?
-
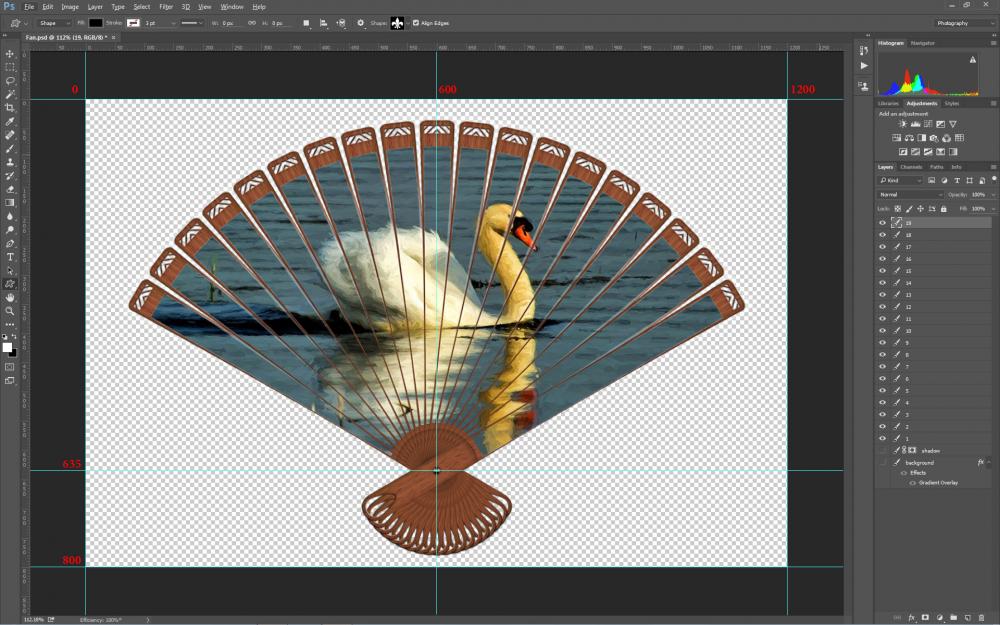
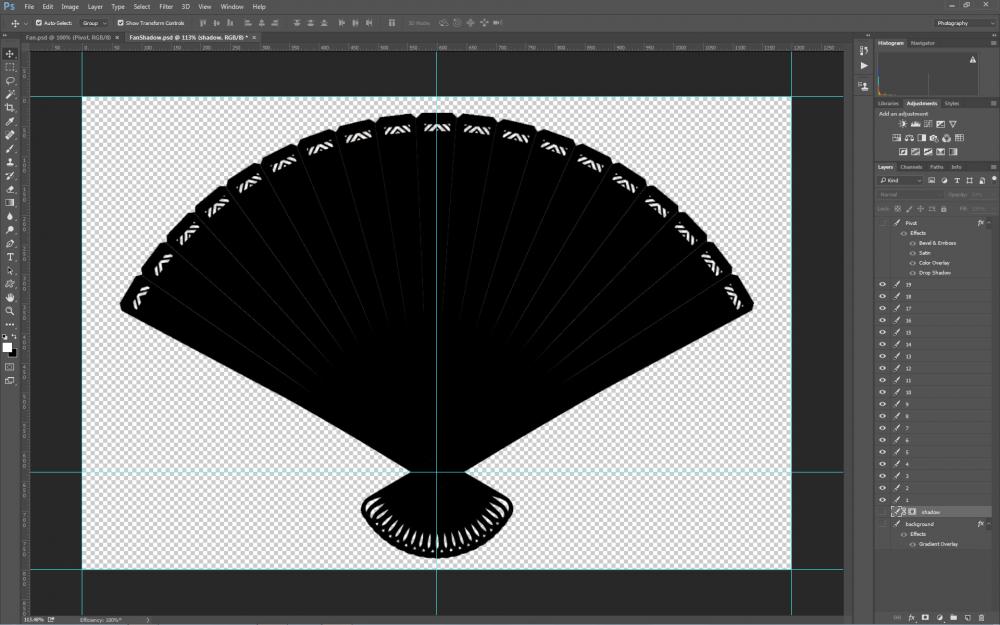
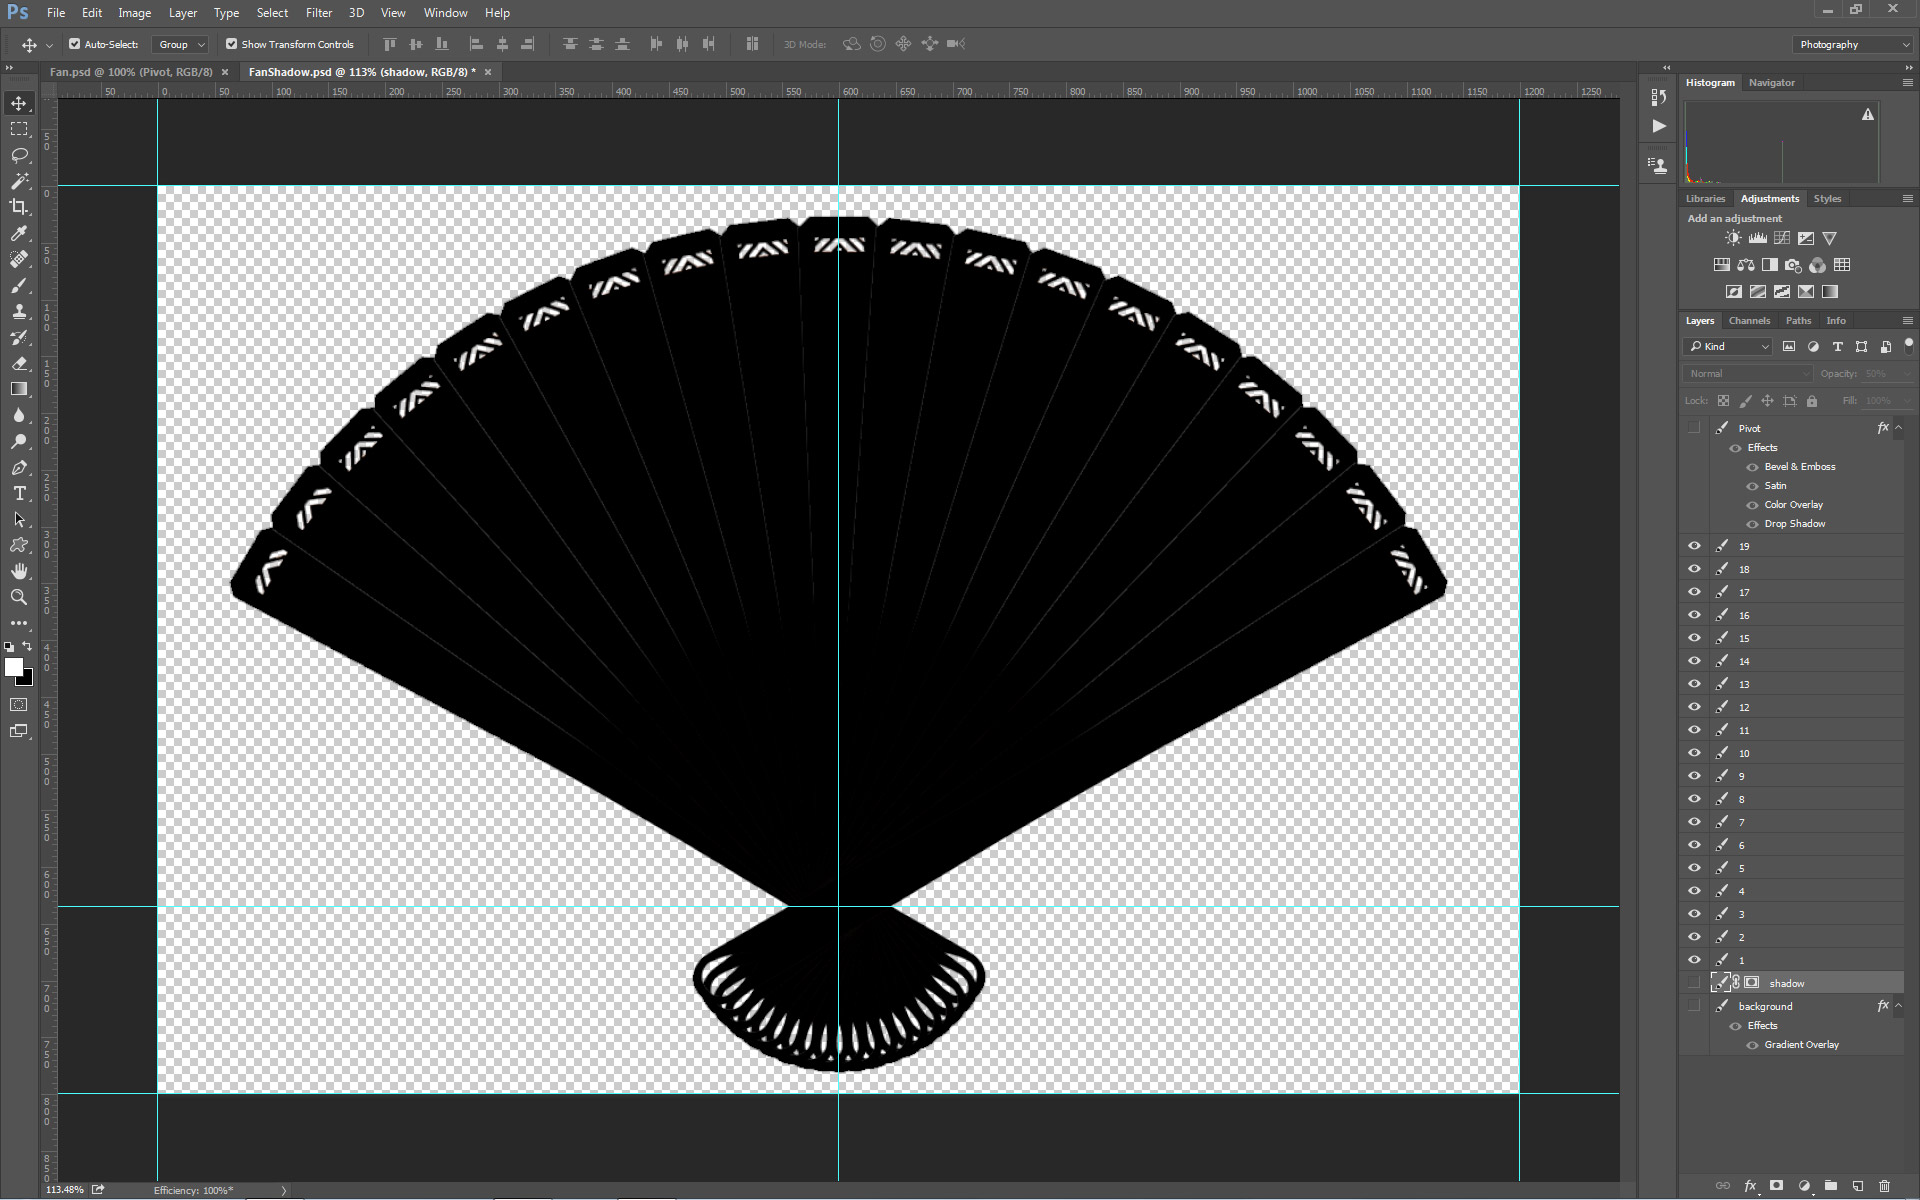
It is fairly quiet at the moment so a REVISION of this project seems to be a good idea. I have created a Photoshop Action (Daves Set.ZIP) which prepares the PanosFX Fan Ceation for Export to a folder for PicturesTo Exe. 1. It Merges Down the Pivot Layer to the Layer 19. 2. It turns the Background Layer and the Shadow Layer OFF. 3. It resizes the project from 4140x2341 to 1200x800 and puts the Pivot Point on the correct point for my PicturesToExe Style. After running the "PanosFX Setup Action" the Layers can be Exported using the File / Export / Layers to Files command. Dave Set.zip Some issues arose out of the EXPORT of the various components from Photoshop in an order which was the reverse of the Layer order in Photoshop. So I completely re-ordered the Main Image Settings in the Fan and Shadow Styles. I also created a Composite Fan and Shadow Style: Fan Style 2.ptestyle Add the Fan Blades in the order that they were Exported from Photoshop and Apply this new Style. Fan Shadow 2.ptestyle Add the Fan Blade Shadows in the order that they were Exported from Photoshop and Apply this new Style.The Shadow Blades can be re-used and only have to be made once. Fan and Shadow Style.ptestyle Add the Fan Blade and Shadow PNG files in the order that they were exported from Photoshop (19 Fan Blades followed by 19 Shadow Blades - 38 PNGs in total) by dragging them into the Slide List in PicturesToExe. Highlight all 38 Slides and Apply the "Fan and Shadow Style". Add your choice of Background in Slide Options. The Shadow Blades can be re-used and only have to be made once.
-
I have had to modify the Tutorial Text. The File / Output / Layers as Files will always save in the wrong order. Using that procedure is by far the quickest way but requires a re-numbering procedure after saving. Or, you can use "Settings / File Sort Order / Reverse Order"
-
Please note a couple of things: A fast PC with a good Graphics card is required to deal with this kind of Style. Full frame PNG files are treated by PTE in the same way as full frame JPEGs with respect to file size and 40+ full frame pics in a slide is quite strenuous on the PC. There are other ways of dealing with the required PNG files but they will probably appear elsewhere. I have used full frame PNG files - one for each blade of the fan - 19 in total. The "Pivot Pin" has been "grouped" with the 19th blade. After applying the action the Fan Object must be resized to 1200x800. The Procedure. Apply the PanosFX Fan Action in your Image Editor. Since this lies outside of the remit of PictureToExe I will not go into detail about it. Resize the resulting file as shown in the attached screen shot. It is essential that the guides intersect over the Pivot Point and that the guides are placed with "Pixel Perfection". This part of the Style deals with the Fan itself and the Background and Shadow can be ignored. Now Save each layer as a PNG-24 file where Layer 1 equals Blade 01 (through to Layer 19 equals Blade19). Browse to your Project Folder and create a new folder for the images created. In PTE: Browse to the Project Folder and the Folder containing the Blade PNG files. Select all 19 Blades and add to the Slide List. Check that they are in the correct ascending order. Import the Style attached below. Highlight all of the Blade PNGs in the Slide List and Apply the Style. The result is a 5 slide sequence. Fan Style.ptestyle The Shadow In your Image Editor, create a solid black version of each blade in turn. Select Transparency / Invert / Fill with Black. Make sure that the holes in each fan blade are selected. When finished it should look like this: Now Save each layer as a PNG-24 file where Layer 1 equals Shadow 01 (through to Layer 19 equals Shadow 19). Browse to your Project Folder and create a new folder for the images created. Add all 19 shadow images to the Slide List after the original 5 slides and with all 19 shadow blades highlighted apply the following Fan Shadow Style. Fan Shadow Style.ptestyle This creates 5 slides with the shadows. In O&A, copy and paste the blade frames from slide 1 to slide 6 (slide 2 to slide 7 etc). When complete you can delete Slides 1 to 5. The result is a combination of two applied styles and to complete the project just add a Background Image to all five slides.