

davegee
-
Posts
9,334 -
Joined
-
Days Won
59
Everything posted by davegee
-
Look at the settings offered when you make your MP4 - make sure that it is as follows: Creating HD Video for PC: 1920x1080 - High Quality - Pan and Scan enabled. DG
-
Post a screen shot?
-
Please read this: As I said, I have never used it and find the MP4 Output method much more reliable. DG
-
Hi Barry, There is a solution to this but it might take me a little while to find it. I have never done it that way - I always make an MP4 and upload that to YouTube - never fails and you can see the quality on your PC before uploading. DG
-
The two examples at www.Wnsoft.com are Youtube videos. There are many more on the Forum pages. DG
-
Go to the Wnsoft.com site to compare editions (bottom of page). On the basis of what you have said the Essentials version would suffice. If you wanted to be more creative with the audio files then the Deluxe version would be better. Envelope control of audio files etc are in the Deluxe version.
-

Voice files - inserting into slides
davegee replied to aplman's topic in Suggestions for Next Versions
Lots of ways to skin possum in PTE. Ken asked for alternatives to the "Add Audio" button. Doing it in the way I suggested saves "browsing" - you have the files already showing in the files list and just drag them into place wherever you want them. Show File Tree makes changing folders easy - if necessary. One of Ken's requirements was to be able to Play the file to make sure it is the right one - that can also be done. Ken's idea of dragging onto a slide in the slide list is a good one but correct placement of the file in the present V8 is not achieved - it is a good idea - perhaps he should post it in Suggestions? -
Three Simple Styles for the 4x3 (1440), 3x2 (1620) and 16x9 (1920) Aspect Ratios - a wood effect Frame is added to the Slide and a "cream" background is used with shadows behind the image. The Image is in Cover Slide Mode within a mask and can be Zoomed and/or panned as required. Note that the AR of the Image is slightly different to the Project AR so some "cutoff" may occur. 4:3 Framed 1440.ptestyle 3:2 Framed 1620.ptestyle 16:9 Framed 1920.ptestyle N.B. There appears to be an ongoing issue with Exported Styles containing objects, which prevents the use of Multi Aspect Ratio Styles. So (for now) I have had to upload the individual Styles. If anyone else is experiencing the same problem, I would like to hear from you. Multi AR Styles work on the PC used to construct them but when Exported and transfered to another computer things start to go wrong.
-
Let me know when you do? It might be a useful feature on my wife's iPad.
-
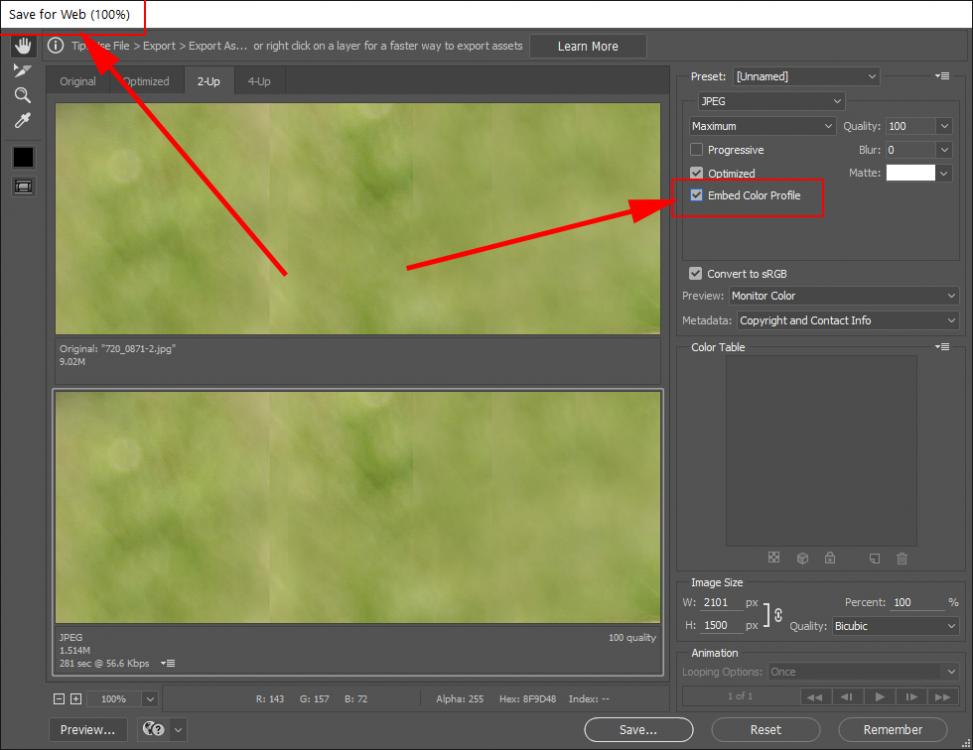
Agreed, but if you turn off "Convert to sRGB" then it is tagged with the ProPhotoRGB or whatever. My attachment incorrectly showed the "Convert to sRGB" ticked. Sorry. DG P.S. Bruno replied while I was writing.
-
Bruno - Export / Save for the web (Legacy):
-
Robert, Check this: https://discussions.apple.com/thread/5724261?tstart=0 DG
-
Voice files - inserting into slides
davegee replied to aplman's topic in Suggestions for Next Versions
Will it be one mp3 per slide - or more than one? You can drag an mp3 into available space in a Track in Timeline view and position it. Right click on the mp3 (in the track) and use Customize Audio Clip to link to the desired slide. You are also offered the facility to Link to the Slide under the cursor. You appear to be only able to Link one Audio Clip per Slide (per track). If you want to Link two clips to the same Slide then it needs to be done in a second track etc. If the clip duration does not exceed the Slide Duration in each case, you only need one track for that and if the Slide position is changed the Link is maintained. Does that help? http://docs.picturestoexe.com/en/project-options/audio-tab http://docs.picturestoexe.com/en/main-window/the_timeline -
In some cases, when adding a project which has been made in an earlier version of PicturesToExe than your current version, the user can open Video Builder without being asked to Save the project. This can cause problems with the publish process. An advisory has been added to the Online Help to Save the project under these circumstances before opening Video Builder. http://docs.picturestoexe.com/en/videobuilder/dvdvideodisc
-
-
There is also this:
-
Check this out: http://docs.picturestoexe.com/en/video/properties?s[]=master#single_videomaster_video Use Master Video to split the video into any number of individual slides and add your Text as required to the slides as you did before. DG
-
Do you mean this one, Ray: DG
-
The test went as you described Igor. No problems - W10. DG
-
Fonts used to be packed in back-up zip
davegee replied to Roel's topic in Suggestions for Next Versions
How does your system differentiate between free and licensed fonts on someone else's computer? It relies on the knowledge (or ignorance) of the user. I assume that PTE avoids this problem by not including the facility. I also wonder if the fonts resident on your pc are deemed to be licensed to you alone by virtue of the fact that you purchased (licensed) the software with which they were supplied. In that sense you purchased all of the fonts on your pc other than any free fonts that you downloaded. -
Fonts used to be packed in back-up zip
davegee replied to Roel's topic in Suggestions for Next Versions
Great idea. But is it legal? http://www.typography.com/faq/category.php?topicID=10 DG -
How do you NOT embed the jpeg? That is a different thing to shooting RAW + JPEG. The video shows the difference between the Adobe generated Histogram and the RAW Histogram.
-
It is not a RAW Converter - it is a RAW Viewer. As I said, it allows you to see the RAW Histogram rather than a Histogram based on the embedded JPEG - a vastly different thing. Their site explains it and some YouTube videos show what it is capable of. I'm not trying to "sell" it - I asked if anyone else was using it. http://www.fastrawviewer.com/
-
Anyone here using Fastrawviewer? It takes some of the guess work out of RAW conversion if you are "struggling" with RAW. It gives you a precise starting point in your RAW converter of choice regarding exposure before you start fiddling with the other sliders. It does this by displaying the RAW histogram rather than a histogram based on the embedded jpeg. It also helps with "culling" of images due to exposure and/or sharpness problems. I have been trying it for a few days and I can recommend it. Take a look at their site and some reviews on the web.
-
The image that you are masking should sit between the "mask container" and the "mask". Click on "mask container" so that it is highlighted and then right click to "add" your image. http://docs.picturestoexe.com/en/techniques/addmask
