davegee
-
Posts
9,334 -
Joined
-
Days Won
59
Everything posted by davegee
-
Igor, I would like to add my thanks to Jeff Evans, whose help in getting to where we are now is gratefully acknowledged. I must also thank Lin Evans for the Proofreading and "Americanization" of the project and for the article on Chroma Key. I cannot think of anyone else in this forum who could have done that. The task is now to complete the project. I am inviting anyone who wants to participate to look at where we are now and submit articles and "How To's" which fill the gaps. There are a couple of things that need to be mentioned. 1. If your submission is a "one liner" please submit it here. We don't need suggestions for articles - we need articles. 2. If you are submitting an article (or "How To") it needs to be in Word or .rtf format (PDF perhaps) but the images need to be SEPARATE - not inserted into the document. 2a. Images should be a maximum of 1280 Pixels wide - there's a little trick - if you need help please ask me? 3. If possible images need to be screen grabs in W7 format/"livery" - for consistency. 4. Articles should be SPELL CHECKED before submission. 5. Opinions in articles will be edited out. Submissions should be made in a PM to me. It might be wise to let me know if you plan to make a submission just in case someone else is planning the same topic? The work is ongoing and it might be wise to Press F5 (or even Ctrl+F5) often to make sure that you are not viewing an old version of what is current. DG
-
Sorry Tony, I misunderstood. Yes, you add the Blank Black Slide (1920x1080) to every slide (copy and Paste) and then add your images and Objects (Text etc) to the Blank Black slide. The Blank Black Slide is the MAIN IMAGE which is then reduced to 90-97% according to TV. All other Child Objects are reduced to suit. DG
-
Hi Tony, If your AR is 16:9 and you are using 16:9 (1920x1080) images they will fill the screen until you apply "xx% of Slide to show main images". "The Screen" is your Background which can be any colour you wish. Not a separate image. BTW on my new TV and BR Player the % turns out to be more like 98%. DG
-
Tony, I don't think that is what Lin said? It is OK to use 1920x1080 images but be aware that when making a DVD they are re-sized to fit 768x576 and then upscaled by the DVD Player to fit your TV screen. DG
-
Hi Jose, I think that in most cases it is almost immediate. In my case it was. The fact that you have contacted Wnsoft about it means that they are aware that in your case it did not happen. Did you check "Junk Email" (just in case)? Glad that you now have it OK!! DG
-
Jose, Have you now recieved your license??? DG
-
Hi Igor, Everything completed successfully with a DVD burn. Did not get the previous error that I reported. DG P.S. I used DEFAULT settings
-
Jose, It is explained in the first PDF here You can read it online or download and read/print. Also see the Online Help: HERE DG
-

A Strategy For Tutorials with SlideshowClub
davegee replied to Lin Evans's topic in Tutorials & Video Lessons
It is the same in principle. The PTE Wiki will allow Links to both internal and external Tutorials. My concern would be the longevity of external links and the constant need to monitor them. DG -
Jerry, You are resizing to 3:2 (dpi/ppi is irrelevant in this case). If 3:2 is the Aspect Ratio (AR) of your project - great. If your Project AR is anything other than 3:2 you might find that you will want to change all images from "Fit to Screen" to "Cover Screen" for those images on which there is no animation e.g. Zoom. There is a STYLE which converts all images to "Cover Screen" from the default "Fit to Screen". DG
-
My bad! DG
-
Jerry, Slide Styles Button is normally of the Bottom Left Toolbar. Go to Settings / Preferences / Toolbars and make sure EVERYTHING is ticked until you decide what you don't want? DG
-
New (Europe) Version 2.4.6 at: https://nikoneurope-...tail/a_id/59403 As well as support for new cameras there are some nice changes to the way in-camera Picture Controls can be tweeked in software. There are also some changes in the WB section. DG
-
Try the other option that I suggested? Get the V7.5 manual from wnsoft.com and it will help with this. DG
-
Do you mean Project Options / Advanced / Synchronise Soundtrack and Slides? Or, in Timeline View, click on the little Icon on the middle horizontal bar with three horizontal lines and choose "Fit all slides to Soundtrack"?? If neither, please supply a longer explanation? DG
-
Thanks Igor, Great info!! DG
-
Since you have to be there to change the discs it would, perhaps, defeat the purpose. Probably the best option is to create the ISO (see last page in VideoBuilder) instead of a DVD and burn the ISO in your burning software multiple times - not necessarily in the same session. Most software will ask if you want to burn another from the same project. Roxio and Cyber Link do this. DG Wiki: "An ISO image is an archive file of an optical disc, a type of disk image composed of the data contents of every written sector of an optical disc, including the optical disc file system.[1] ISO image files usually have a file extension of .iso. The name ISO is taken from the ISO 9660 file system used with CD-ROM media, but what is known as an ISO image might also contain a UDF (ISO/IEC 13346) file system (commonly used by DVDs and Blu-ray Discs). ISO images can be created from optical discs by disk imaging software, or from a collection of files by optical disc authoring software, or from a different disk image file by means of conversion. Software distributed on bootable discs is often available for download in ISO image format and, like any other ISO image, may be written on, or "burned" to, a CD or DVD with any capable software".
-
Perhaps we should compare the "colour managed" image with the same image in an exe? DG
-
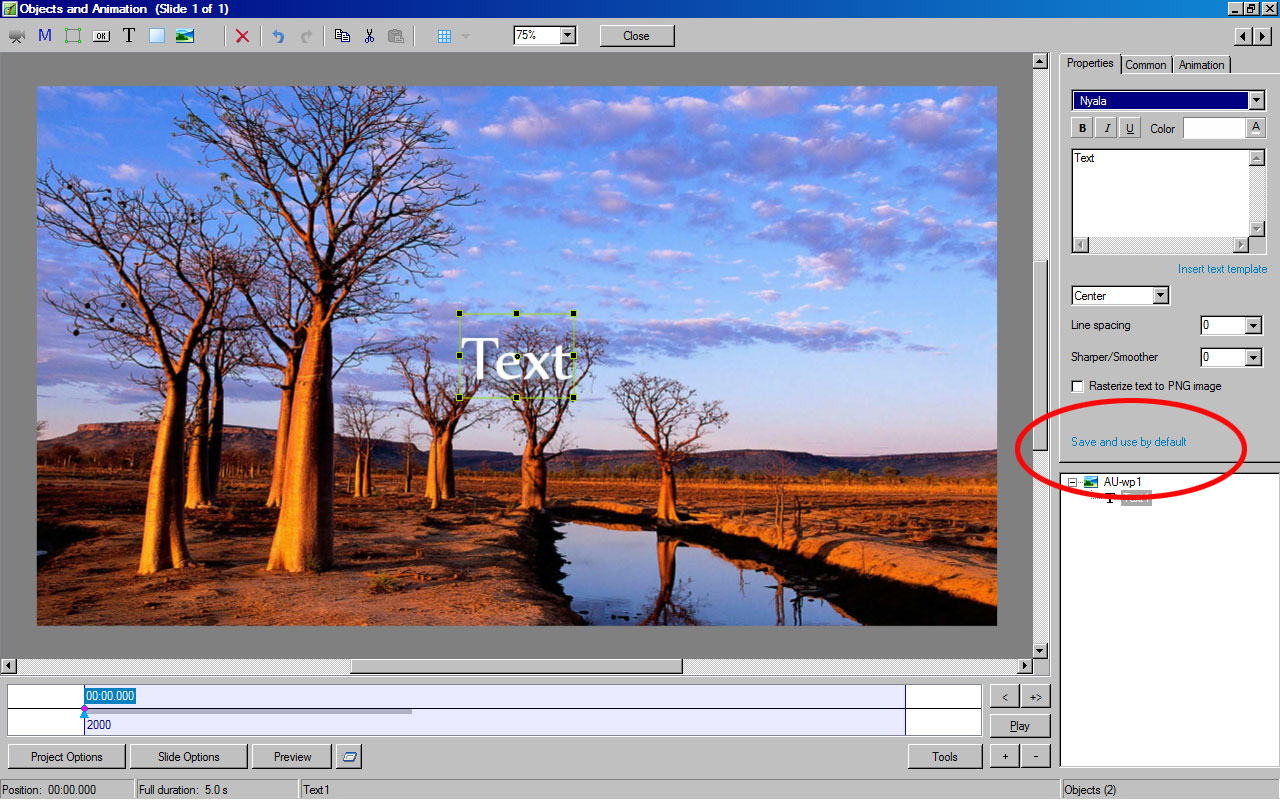
The one in Project Options only applies to the Text Comments (??) - Picture Name etc - and not to the Text which is added in O&A. I used "Save and use by default" and then opened the oldest PTE I have. Sure enough, the Default that I just saved was in use when I clicked on the Text Tool. DG
-
Hi Jeff, It is still awaiting approval. It's http://www.slideshowclub.com/files/category/1-slideshows/ DG
-
Hi Mick, DG
-
Mick, "Save and use by default" also works for me. DG
-
As above. DG
-
Animated GIF as constant dim overlay during show
davegee replied to newsposter's topic in General Discussion
The method used here is using the same method as I described above - at default settings. Opening the Animation Tab in "Adjust Image and Border" will show that the Repeat = 0. This means continuous repeat. Altering the Interval setting will change the speed of the "baling". DG -
Animated GIF as constant dim overlay during show
davegee replied to newsposter's topic in General Discussion
It is possible to use the animation tab in the "Adjust Image and Border" to do what you want with an animated gif which would repeat during a slide's duration. Take a look at this feature. There is no demo or "how to". Add your gif at the desired opacity and then adjust its speed in the animation tab of "Adjust Image and Border".You could then copy this to every slide. I think that Lin Evans has some experience in this area. DG