davegee
-
Posts
9,334 -
Joined
-
Days Won
59
Everything posted by davegee
-
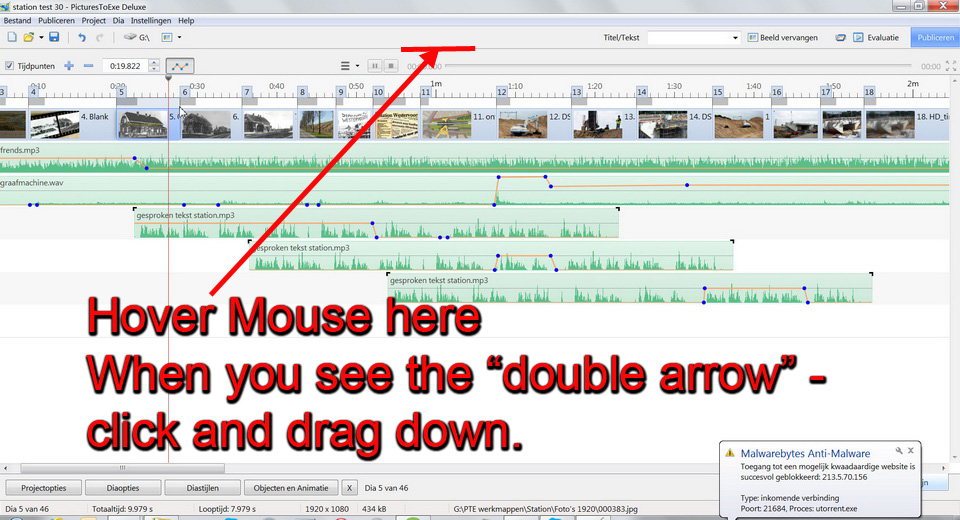
You can set Key Frames at 1ms resolution. If you have for instance a KF at 2000ms with an Opacity of 100 and another KF at 2001ms with the opacity at zero the mask will turn OFF at 2001ms. Set the opposite for the next mask and it will turn ON at 2001ms. DG
-
What's the Project Size?? The 140% is relative to the Full Screen / Project Size (perhaps?). DG
-
Adjust Image and Border added to post#1. DG
-
Bert, I think that it is "Follow This Category"? DG
-
Further amendments to Inserting Video Clips. DG
-
Celou, It is the same thing - Windows or PTE. Try removing the accents - rename. DG
-
Inserting Video Clips has been amended to include adding Video Clips from within Objects and Animation. DG
-
Charles, Others are far more capable of answering this correctly, but in the case of the second question I don't think that you are right? The EXE is a set of instructions which have to be carried out on the various elements (objects) in a slide every time it is executed. If you take it a step further and make an MP4 from the project then the end result is "flattened" as you said. The MP4 can be thought of as a sequence of "flattened" frames which play at around 30 FPS. That's my understanding. DG
-
Hi Dave, Do you have Adobe PDF Reader? PC or MAC? If you are being asked which software you want them opened in chances are that you do not have the reader. Can you normally open PDF? I can read them from their current location using Adobe PDF Reader or DL them and open them locally. DG
-
You can split your show into sections devoted to the cities and then add the individual shows to the DVD menu. You can configure them to run consecutively or return to the menu but also choose a city from the menu to start from. But I think that they have to be individual shows for each city. DG
-
I think that I did set Fixed Aspect Ratio of 16:9? DG
-
Hi Igor, I just want to emphasise that the Style in Post #6 is meant for a 1920x1080 image in a 1920x1080 Project. When used on different sized images in different sized projects the effect is not the same. DG
-
Update. You can also "stream" video, images, PDFs and Audio wirelessly from the Mobilelite to the Tablet/ iPad without having to fill up the "Tablet's" memory. A USB or SD card is plugged into the Kingston Mobilelite and read wirelessly from your Tablet / iPAD. It does not work through your home Broadband - it uses its own wireless network so it will work anywhere. DG
-
The PDF Files in this Post in this Thread have now been replaced by the Online Help Manual. http://docs.picturestoexe.com/en/main DG
-
Hi Igor, Second try: Once again the mask is made to suit the user's image. This technique once again proves that being able to create (paint) the mask in PTE would be a HUGE advantage. Are we likely to have this soon? DAVEGEE 14_01_26.ptestyle DG
-
Igor, Something like this?? 1920x1080 image in 1920x1080 project. Set White Background. IGOR 25_1_14.ptestyle You can vary the opacity of the faded image outside of the frame in O&A.
-
ok, DG
-
Igor, Isn't the mask and the effect going to vary according to different images?? DG
-

Colour reproduction of PC Monitor and Projected image.
davegee replied to JEB's topic in Equipment & Software
In the full Adobe product, when using "Save for the Web" the sRGB option is a Tick Box - I'm not sure what the default is, but when I have used it in the past it has always been set to "ticked". I would recommend using "Save for the Web" because it allows you to adjust the quality setting to optimise the JPEG while viewing at 100%. I couldn't see the sRGB tick box in the "Save for the Web" utility in my version 10 of elements - it is probably elsewhere? DG -
Colour reproduction of PC Monitor and Projected image.
davegee replied to JEB's topic in Equipment & Software
John, What method do you use to present your images? We use PTE. and give a judge the PTE EXE. there is no point in giving the judge individual images. If the images in the show are1920 x 1080 max and the judge is viewing on a 1920x1080 monitor the judge is seeing the images at 100%. All members have been advised to use sRGB and this works. Maybe it is not "correct" but it works. I have often wondered if clubs need a "standard" jpg image which all members can download and compare on their own systems. An sRGB image in a PTE show works for me on both my own system and on the club's HD projector (whEn viewed in a PTE EXE). DG -
I am glad that it worked but it is a "heavy handed" approach to what seems to be a simple problem. Perhaps Igor should look at it. DG
-
Hubert, Did you UNINSTALL V8 before Installing again?? DG
-
Try this: DG
-
Please read this post: http://www.picturest...es/#entry114591 DG
-
Project Options / Defaults / Insert Template. Choose from list. Apply to all slides. DG