davegee
-
Posts
9,323 -
Joined
-
Days Won
59
Everything posted by davegee
-
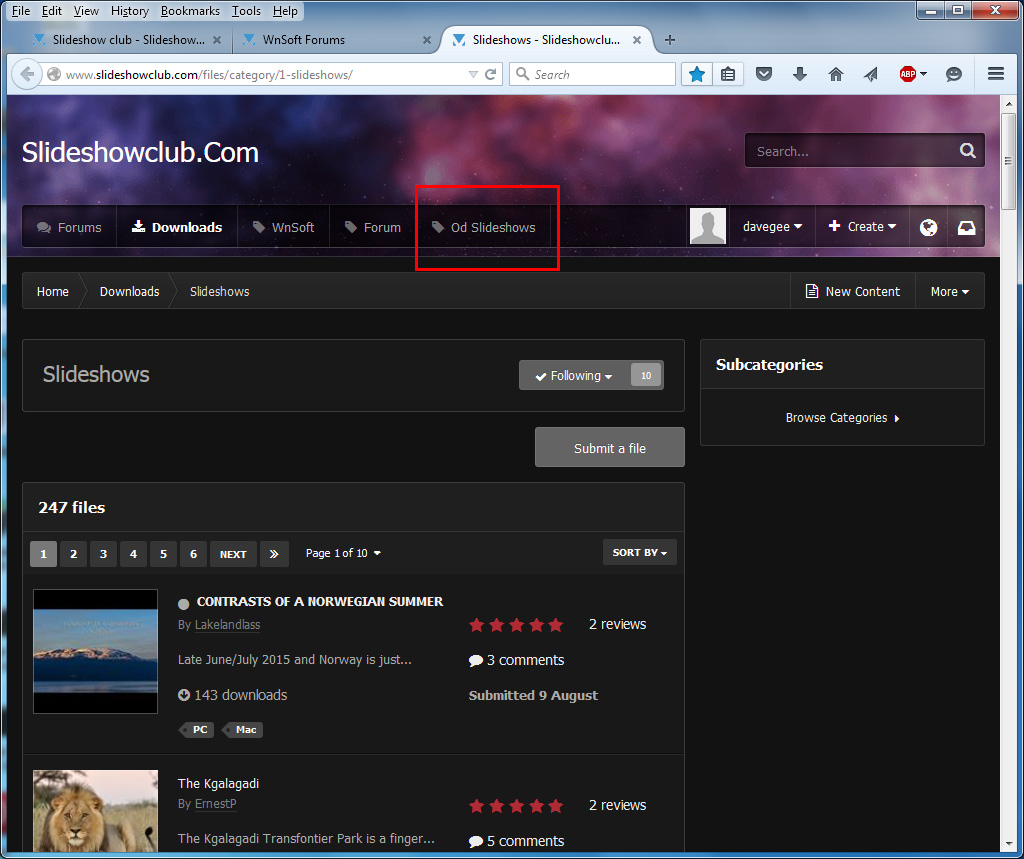
Hi Michael, You don't need to be logged in to Download a file. If you take the top show there at present, click on its title on the HOME Page (Put on a Happy Face). When the next Page has loaded there is a Download Link on the Right Hand Side. Click on this and the Download will appear. Click on Save and choose a destination - bingo. DG P.S. I am on a Vista Laptop at present - if you are not seeing what I am seeing please describe the difference?
-
So, I have two iterations of PTE open. I add an Image to both. I add an Audio Clip to both. In each case I Link the Audio to the Image in Project Options / Audio / Link To Slide. I copy the Slide(s) in Iteration 2 and Paste into the Slide List of Iteration 1 and the Linked Audio is pasted along with the Image. If there are any "overlaps" in the Audio the audio of the Pasted Slide can be moved to a seperate track with no losses. Project Options displays the Audio Tracks in the same way as if the Add Audio or Voice were used - it's the same thing? DG
-
Where did he say that? P.S. I forgot to mention the "Link To Slide#" feature in Project Options / Audio. DG
-
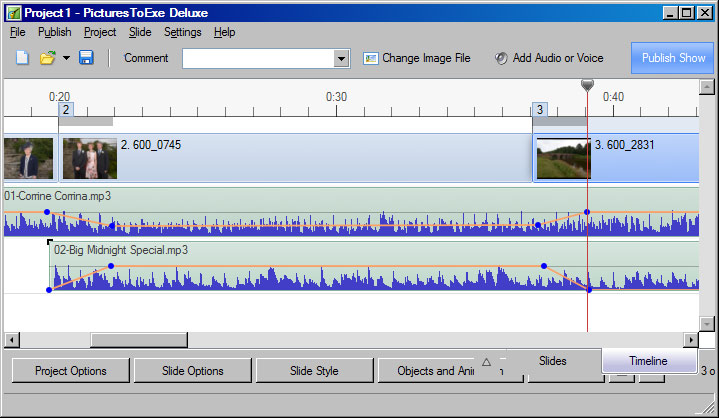
Andrew, Try adding both Audio clips to the Timeline instead of One tied to a slide and the other in the Timeline. You will then have the two clips in separate Tracks and it will look more like Audixatron ( ) and be more familiar to you.
-
http://www.wnsoft.com/picturestoexe/buy/ DG
-
Thanks JT, You may have noticed the link in Post#4 which explains that. For the purposes of this thread either method (or both) will produce the desired result. If there are any hyperlinks in the slide in question then unticking "Transparent to selection", after editing, is advisable, as you say. DG
-
http://docs.picturestoexe.com/en/techniques/selection?s[]=transparent DG
-
Mick, Two ways: The IMAGE/OBJECT that you are trying to move needs to be on top of the stack. OR... If it has other IMAGES/OBJECTS above it (in the stack) they need to be marked as "Transparent to selection". Is that your problem? DG
-
Ken, When preparing a Vista screenshot, I noticed that the links disappear when you view Slideshowclub in a Window - at around 1024 wide they disappear. DG
-
W7:
-
Colin, I think that you will find that 32" TVs can be EITHER 720p or 1080p. My 32" is 1080p Full HD. DG
-

Inserted blank slide does not include default text comment
davegee replied to PGA's topic in Troubleshooting
FWIW, and in reply to Igor, I think that applying a "Text Comment" to a blank slide is somewhat illogical. 90% of the Preset Text Comments would (normally) be derived from the exif of the non-existent Main Image. On the other hand in the Special Case of the Slide Number or Slides Count there is a possible anomaly. If the Slide Numbering could be added independently of the Text Comment that might be an option? If a true "Text Comment" could be added independently of Exif based Text Commemts that also might be an option. Again FWIW, adding a previously made "Blank Image" rather than a Blank Slide makes more sense (to me). DG -
Inserted blank slide does not include default text comment
davegee replied to PGA's topic in Troubleshooting
Barry, Just a thought - in the case of a BLANK slide the "Change Image File" is really "Add Image". If you "Add Image" in O&A that has the same effect on a Blank Slide - it does not change the Slide Name - that has to be done in Slide Options. DG -
Have you tried uninstalling using the PTE uninstaller and re-installing a fresh download of the latest version? You might need your serial number ready. DG
-
"sRGB is a great baseline If you only take away one piece of advice from this article it should be that converting to sRGB is the best single safety net in image preparation. Unless you are certain your image will be color-managed correctly when it leaves your hands, you should convert it to sRGB. An image in any other colorspace will look bad – typically unsaturated, for example – on a system that isn’t properly calibrated and managed." DG
-
http://blog.datacolor.com/david-cardinal-taming-color-in-your-slideshows/
-
Thanks, I have replied. DG
-
Tom, What is it that you feel that you cannot do in the timeline? DG
-
Hi Igor, Difficult for me because I will have to travel to someone with W8.1 to reproduce it. Perhaps Lakelandlass could provide a screen shot and test with a short EXE? DG
-
I was asked to Log In this morning. DG
-
Anyone out there with this combination? I took a PTE 8.0.16 EXE which I made this morning to test out on a friends new computer and Norton flagged it up as suspicious straight away. It didn't prevent it from running but said that it might be dangerous and offered three alternatives the last of which was to "Run anyway". Is this common or maybe something that Igor ought to follow up on?? DG
-
Peter, I have always thought of it this way. If you drag a video into the Slide List you (presumably) do not want to edit it (trim;cut etc) so the conversion is done in the background and therefore behind the main screen allowing you to continue working while the conversion is being carried out. If you want to apply some editing to the Video as well as convert it then you call it up on a right click from the list of Images/Files. You can also do a "Batch" conversion this way. JMTP, DG
-
IG, I am guessing that, because you have found how to add a Border, you have found the "Adjust Image and Border" Tool in Objects and Animation / Properties Tab? If you look a little closer at this tool and its CROP tab, you will find that you can make the adjustment you require by using the "Offset X" and "Offset Y" Parameters. (See Denisb's Post #15 above). The "Scale" control will allow you to zoom into your images. DG
-
P.S. It mentions Convert RAW to JPEG. No TIFF Converssion? DG
-
I could not see any mention of Layers? DG