Leaderboard
Popular Content
Showing content with the highest reputation since 04/08/2024 in Posts
-
Hi everybody, Here's a Slideshow project I think could be used to create kind of funny, "Vintage" look. I like to use it for modern pictures. You can use the Styles in any combination and length. Just don't forget to adjust the Position and Scale of your photos. Best Alex554 points
-
Two Simple Panorama Styles which work with any Aspect Ratio Project (16:9; 16:10; 3:2; 4:3) and any size of Panorama without adjustment. Styles for beginners: https://docs.pteavstudio.com/en-us/11.0/how_to_v11/styles1 Simple full screen panorama: Pano.ptestyle Simple panorama in a frame with background: Simple Pano with Frame.ptestyle DG3 points
-
Round 7 of the 2023 V8 Superboat at Round Mountain Raceway at Cabarita just up the road (about an hour away). Big day with races taking under 1 minite most times. Over 50 individual races plus warm up and once they start there is not much time between races. This is the final race of the day and I managed to capture this mishap in front of me. Made a selection of images into an AV. Touch and go for a while for the crew so I stopped photography and resumed once it was clear. Cheers Mark3 points
-
The unique, enchanted beauty of nature of the central Russian zone. The project used works by three contemporary Russian artists. Arkady Mikhailov is a freelance artist. Born in 1956 in Donetsk and lives there. Mikhail Satarov. Born (1963) and lives in Moscow. Satarov’s paintings occupy a worthy place in the collections of the Presidents of Russia, Georgia, Kazakhstan, and Prince Albert of Monaco. Enjoy watching.3 points
-
Sometimes we want to show two (full-screen) images at the same time by blending them together. With analogue slides we had the additive blending on the screen. In PTE we can put image 1 on top of image 2, and we can set the opacity of image 1 to 50% (alpha-blending). This is indeed an addition, but only with half the colour values. This is the reason why the results of this kind of blending often show a lack of contrast. Since version 11 PTE we can use the feature of "Nested Color Filters", the value of which I noticed only recently. In the situation above, it allows us to overcome the restictions of alpha-blending, and we can create additive blends in which the images have higher proportions than just 50%. An application is shown in the attached project: KerzePlusLaterne.zip A bit more sophisticated methods have been applied to create the following video (texts in German):2 points
-
Hi, I agree that a possibility to rename a project template in PTE AV Studio would be a good function for the next version.2 points
-
Name me an App that anyone can jump into and start creating on day one and I’ll show you an App not worth having.2 points
-
A rather simple style for arbitrary images and aspect ratios. Unrolling_image_with_blur.ptestyle2 points
-
Greetings, I had a bit of concern how would the video clips from my new Insta360 X3 camera would work with PTE. I just gave it a test run with a couple clips from a recent trip. The re-framing (panning) was done in the Insta360 desktop app. The 2 exported MP4s were put in PTE where the text and music was added. Came out pretty good, I think. Gary1 point
-
Go to Barry Beckham's free styles and themes for PT-AV-Studio page. Styles & Themes – Beckham Digital There are a number of "triptych" styles (and many others) that you can download. Bring the styles into the program and examine them a bit. This is a very easy way to get started in learning how to do more complicated things in PT-AV-Studio. Once you understand how they work, you can modify them to suit your own purposes rather than trying to start from scratch and figuring it all out on your own. There are many other styles and templates posted on this forum, mostly under the Section "Styles and Templates". There are often demos of the styles so you can determine whether they might be useful to you.1 point
-
1 point
-
There are not as many dedicated AV Groups in the UK as there used to be. A lot of Camera Clubs have a few AV workers, but they tend to work in isolation. I help run the Wilmslow AV Group & we are now running totally online as our members are from all over the UK & abroad. We meet on a Friday evening & have an active membership. We used to meet physically near Manchester, but all our members were travelling long distances & numbers were dropping. Covid lockdowns forced us online & we haven't looked back. See www.wilmslow.av-group.org.uk We only have a few more meeting then stop until September. Jill1 point
-
I must admit I have never had any success with the Search function. There is a list of contents in the Online Help https://docs.pteavstudio.com/ I know it is difficult to ask the right questions as at this stage you don't know, what you don't know! As to aspect ratio it depends what you are trying to achieve with your shows. Do you simply want to show your individual images to some music, or are you trying to tell a story. If it is simply to showcase your images, then don't worry too much about aspect ratio, composition etc. If you are trying to make a pleasing show that has a narrative and one image blends into the next, then it is best to have all of your images the same size. Otherwise the viewer will be looking at the edges rather than the content. You can easily adjust sizes in O&A (Objects & Animation) simply drag the image using the grab handles to the size & position you want. It is the opposite of Photoshop in that it will keep the aspect ratio. To change & just adjust in one dimension then Hold Down Shift as you drag. PTE does an excellent job of upsizing if the original aspect ratio is not what you want. You are looking to line up horizons, angles, shapes so that they flow from one to another. To rotate an image put the cursor just outside a corner grab handle so you get a bent arrow & drag. To flip it is easier to use the Rotate X or Rotate Y modifier & set it to 180. Most of PTE is very intuitive (unlike Photoshop) and you are not affecting the actual image by making any changes. Everything is virtual. So just play in O&A changing different things until you get used to what each thing does. There is always the Undo button & unlike Photoshop it is not limited to a set number. Or just close the Project & don't Save. Don't worry about Terminology or Technique at this stage, just practice. Most of all have fun & enjoy experimenting. And come back & ask if you need help. No question is a silly one. Jill1 point
-
1 point
-
1 point
-
Sympathique ! merci pour l'idée à développer1 point
-
1 point
-
1 point
-
If you have an Adobe Subscription the latest update of Photoshop allows access to 25,000 Adobe Fonts which can be selected to download and Sync with others Applications such as Microsoft and PTE AV via the Adobe Creative Cloud. This refers to the Beta Version but it is now available in the Latest normal version 25.7. HERE DG1 point
-
It is the same procedure for most, if not all, Nikon Cameras. https://downloadcenter.nikonimglib.com/en/download/fw/524.html Download the .bin file from the link above to a "firmware" folder and transfer it to the ROOT of the camera's card as described in the instructions. Replace the card if you are using a card reader and go to the Firmware section of Settings and follow the instructions. If you have transferred the .bin file correctly the camera will recognise it and will give you the correct instructions. Make sure that you have a fully charged battery and be prepared for a wait while it loads. There will be a (slow) progress bar. DG You will need to open the "updating the camera firmware" link.1 point
-
Thank you Igor for all your hard work and trying to keep all your PTE users happy. The route I took to change the title was cumbersome but achieved the desired result. I look forward to all the changes in the next version. Rosemary1 point
-
The Blur mode "Gauss Extended" works well, but there may be situations in which you may want to blur an image while the edges remain sharp. The attached project shows a kind of solution, even if it looks a bit cumbersome. In order to use this method you may start the project, open slide 2, and replace one instance of the included Main object 1 by one of your own images (any aspect ratio); finally you may copy the whole thing to your own projects. You may create a style from slide 2, which has the disadvantage to loose the objects' names. Blur_with_sharp_edges.zip1 point
-
1 point
-
1 point
-
Thank you very much Jill, Davegee Ok from now on I will use Google Translate to ask questions...1 point
-
Ctrl and Scroll Wheel will also expand horizontally. Ctrl et la molette de défilement se développeront également horizontalement. DG1 point
-
Unfortunately I only speak French... Merci Igor pour ce merveilleux logiciel... I would like to know if it is possible to enlarge the soundtrack (magnifying glass effect for example) to better see the sound waves... Please use Google Translate or similar to post in English Use the + and - at the bottom right of Timeline to expand Horizontally CTRL+Shift+Mouse Wheel to expand Vertically Jill1 point
-
Welcome RCRA. I understand completely and have to agree that PTEAV is not the easiest app to jump into and start creating on day one. I had been using a more intuitive piece of slideshow software for a number of years but that went out of business which is why I transitioned to PTE. PTEAV is extremely powerful and you really need to get into the weeds and play around with all of the features and effects. Watching Barry's videos was a great help as well as posting questions on this forum. My shows are limited to vacation travelogues so obviously I am not using PTEAV on a regular basis so sort of have to relearn things every time I use it.1 point
-
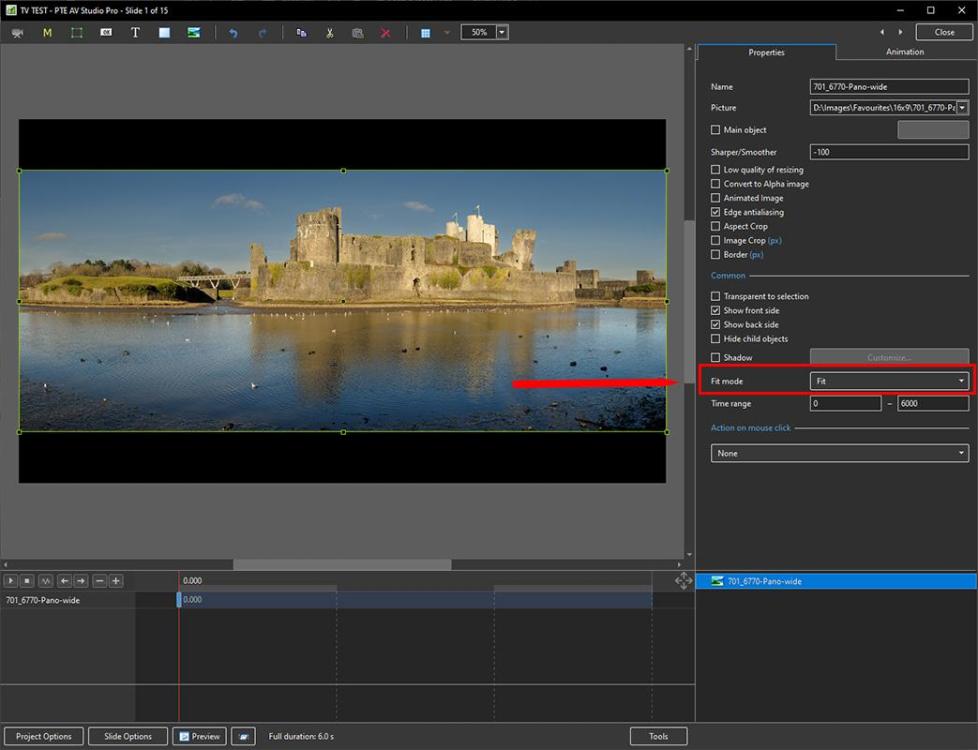
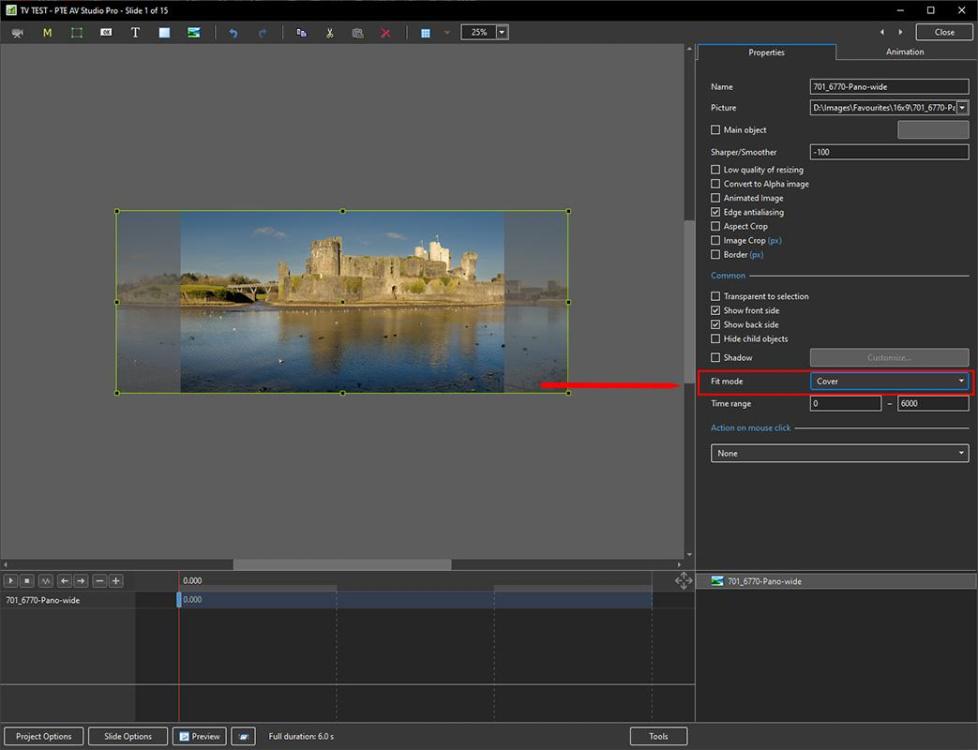
With regard to non 16x9 images in a 16x9 project you can use "Cover Screen" instead of the default "Fit to Screen". Some adjustment up or down might be needed to get the composition that you want. In some cases it might be possible to "squash" your images from 3x2 into the 16x9 format without causing any visual problem. https://docs.pteavstudio.com/en-us/11.0/objectsandanimation_1/properties_tab?s[]=fit&s[]=screen#common1 point
-
Also see the Online Help files https://docs.pteavstudio.com/ You can easily resize images by going into Objects & Animation (O&A) and when an Object is selected you will see the Grab Handles around it. Simply drag these with your mouse to resize as needed. If you have several images all the same size then you can use the Quick Slide Style. Do the first Manually, then 'Create Quick Style', Select all the other images & 'Apply Quick Style' and they will be resized accordingly. PTE is a great program, very easy to get started but extremely powerful allowing you to do anything you can imagine. Jill1 point
-
Hi RCRA. Welcome to the forum. If it is any consolation I was in the same boat as you. Don't despair and post lots of questions. May I suggest Barry Beckhams video "Lets make a Slideshow" It walks you through the basics. I find it helpful to have the tutorial on another devise so I can stop the tutorial whilst I carry out the instruction. Good luck. Rosemary https---www.google.com-search-q=barry+beckham+let%27s+make+a+slideshow+with+music&rlz=1C1CHBD_enCA850CA850&oq=Barry+Beckhan+L.url1 point
-
Hi, displacement map used in 13 custom transition. Denis DB_Deplacement_Map.pteeff1 point
-
Hi everybody, Here's a little Slideshow I think good for kid's presentation. Just replace .Pict Placeholders with pictures of your choice. It's basically 2 Styles for Horizontal and Vertical Photos, so use them accordingly. You can repeat them in any combination depend on your needs. Thanks for watching Alex551 point
-
I used it in this slideshow https://www.diapositif.org/forum/viewtopic.php?t=449691 point
-
1 point
-
Examples of using black and white masks for animation and video editing. Download masks: https://yadi.sk/d/IZURHTzdCs3uhw1 point
-
Hello. The summer slideshow is assembled from a winter slide. https://disk.yandex.ru/d/TrpolfZz8PSvAQ 3D style. Installing photos. AleAle5025.1 point
-
I have modified my style, and using Igor's remarks on data exchange, I could also transform it into a transition. Unrolling_image_with_blur_2.ptestyle Unrolling.pteeff1 point
-
Hello. I've been wanting to make changes to the style of the book for a long time. Now visually the book covers look right in relation to the surface. You can delete the old style by downloading the style, the book of 2022. Updated book style, new title "Book 2022" download: https://disk.yandex.ru/d/uPLn2tozWIZ41w The photobook can be signed in the program or in Photoshop Success.1 point
-
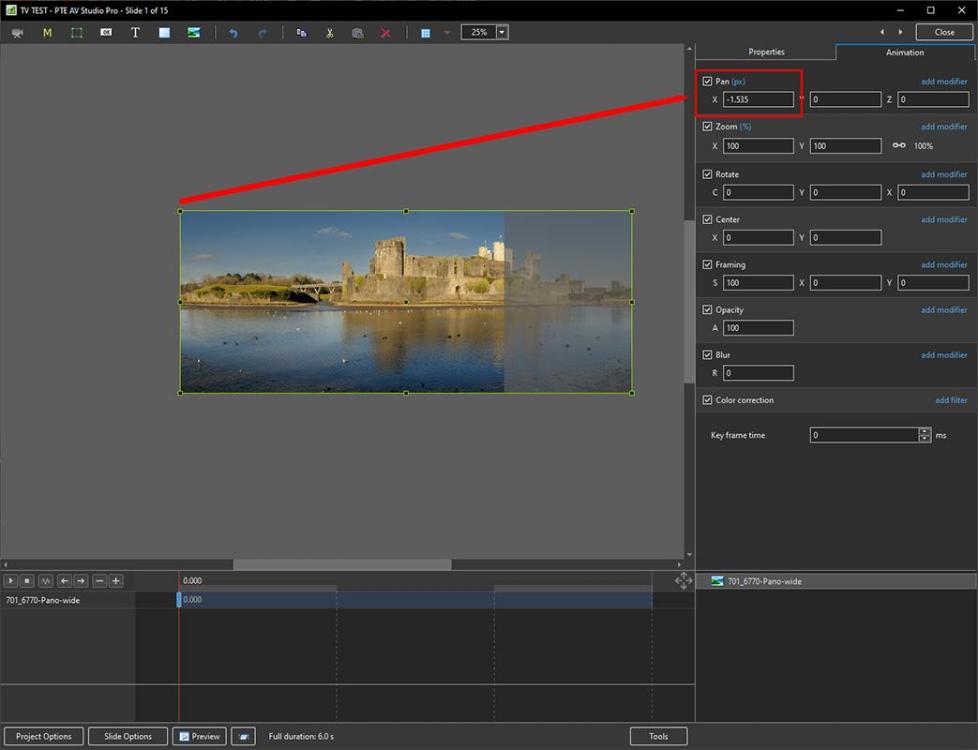
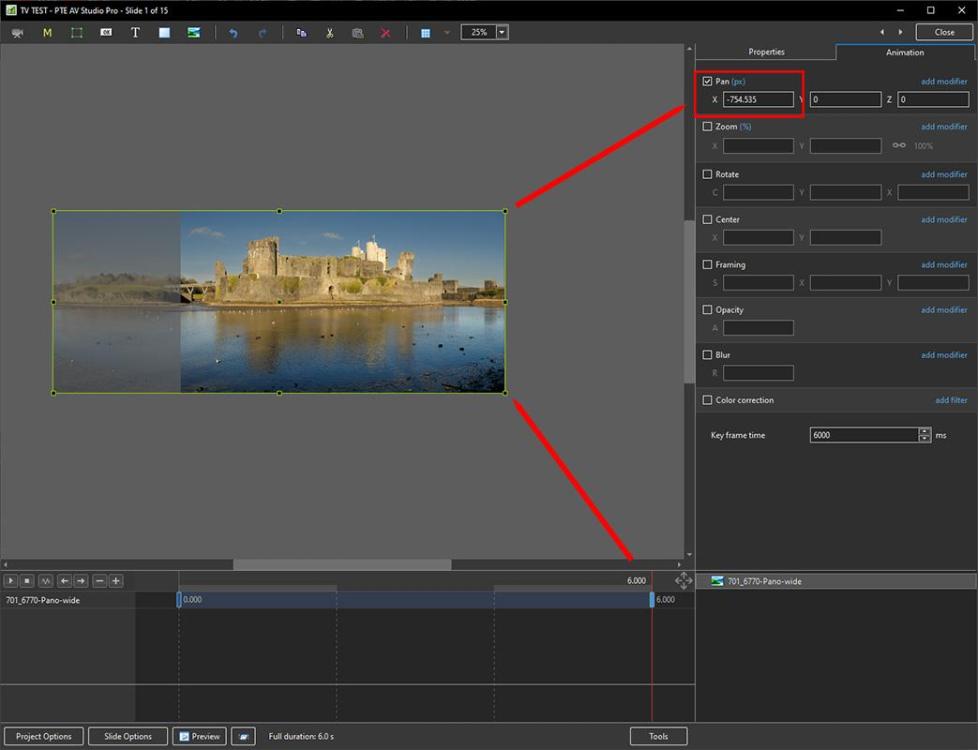
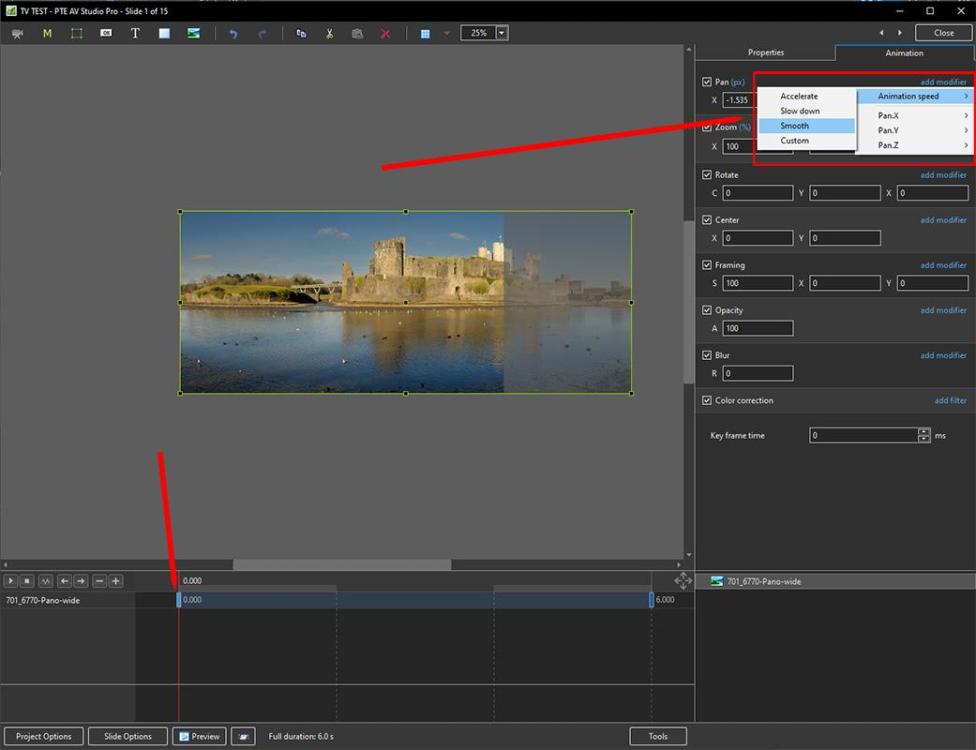
Add your image to the Slide List and click on Objects and Animation In the Properties Tab set the Fit Mode to COVER. In the first KEY FRAME (KF) adjust the PAN X control in the ANIMATION TAB until the image sits correctly on the left of the screen Right click on the First KF and ADD a new KF - it will appear at the end of the Timeline. Click on it Adjust the PAN X control until the Image sits correctly on the right of the screen. Click on the first KF again. Click on "ADD MODIFIER" in the Pan section and then on ANIMATION SPEED - set SMOOTH. PLAY. DG1 point
-
1 point
