Leaderboard


Popular Content
Showing content with the highest reputation since 07/31/2025 in all areas
-
Taking advantage of the new transition editor in Pte AV Studio 12, which saved a lot of time when creating them, I made 20 transitions, each approximately 10 seconds long. In this case, the slide has a duration of 9.90 seconds, the same as the transition. I'm including a link in case anyone wants to try them. https://javier-pteavstudio.blogspot.com/2026/06/particles-transitions.html12 points
-
Hi everyone, Playing with masks, this is what happened. Cheers. Download: 148 MB https://www.mediafire.com/file/ed6s7mxc893tk6v/Out_of_Bounds_Feb28-2026.zip/file11 points
-
Hi everybody, Love this song. Had some Styles composition in mind and here's how it looks. There's link to the Styles. Like always replace Files "replace Me" with your images or videos. Best11 points
-
Merry Christmas and happy New Year to everyone! We wish peace, joy, and good health to all of you and your loved once! Alex55 The Link to the Project files provided11 points
-
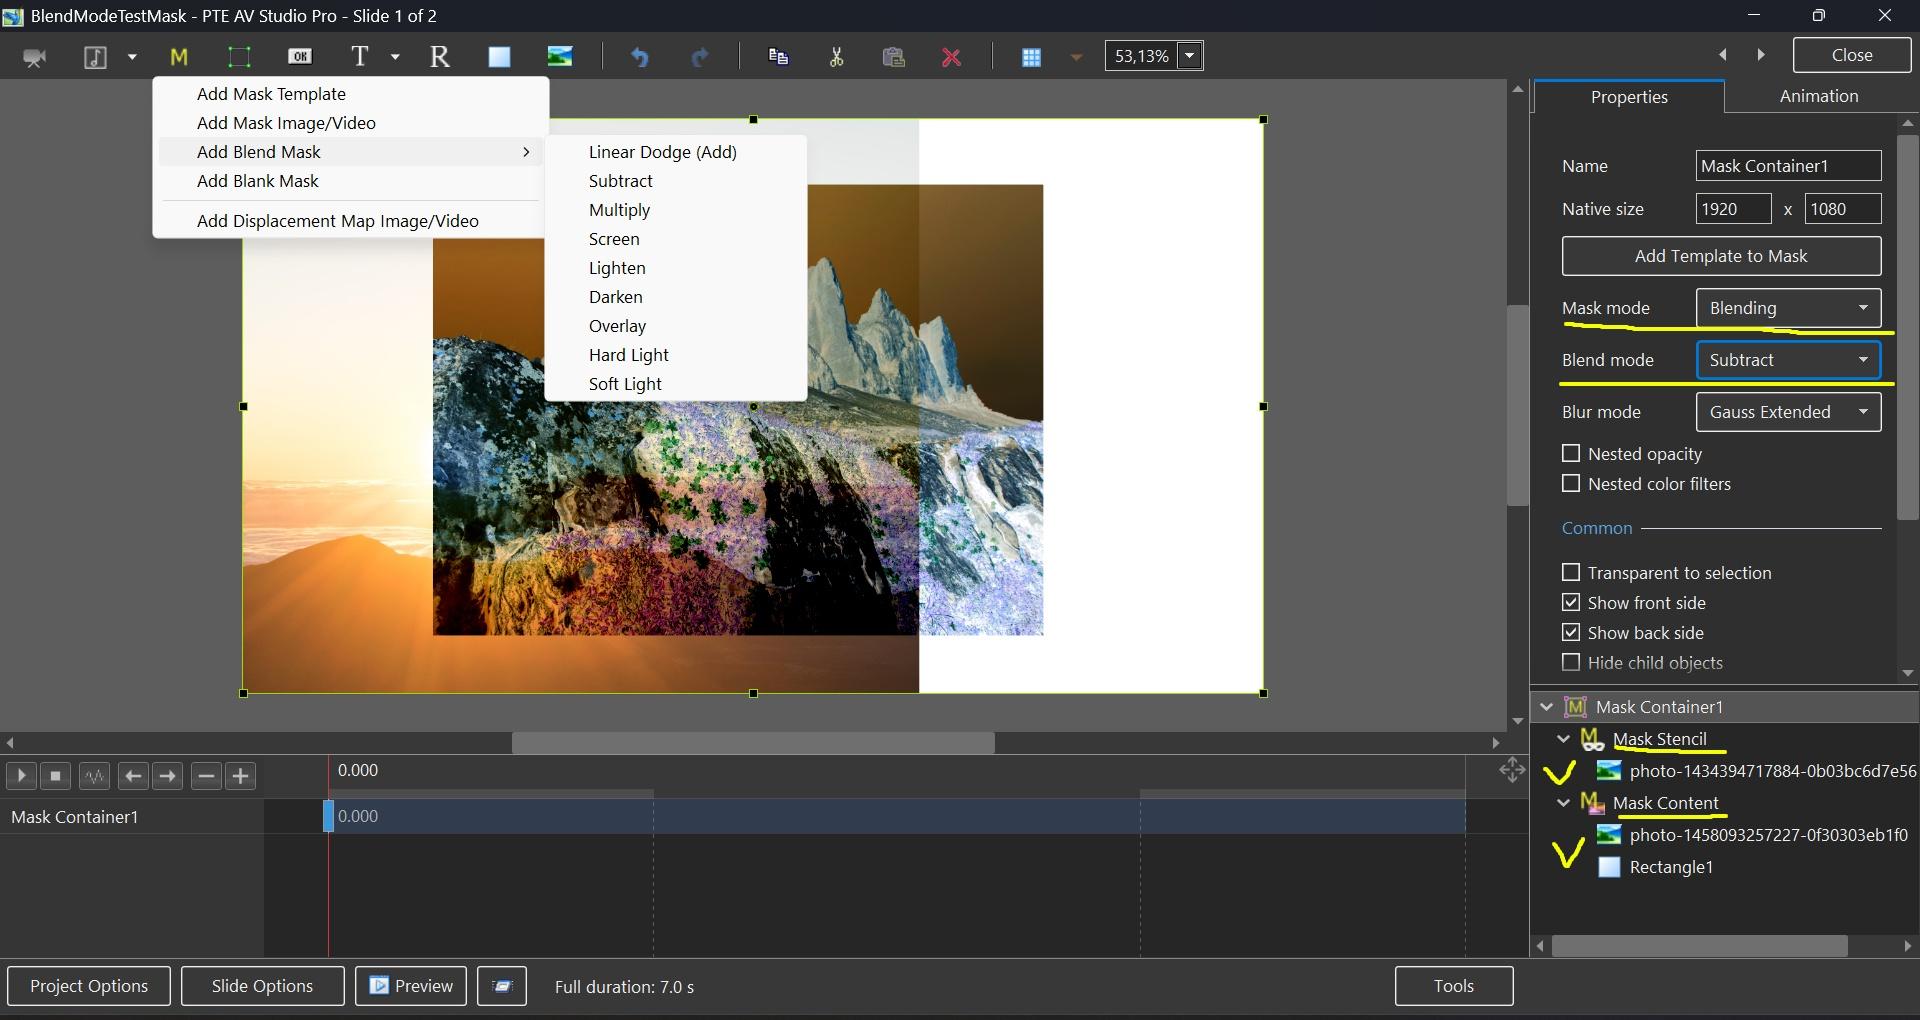
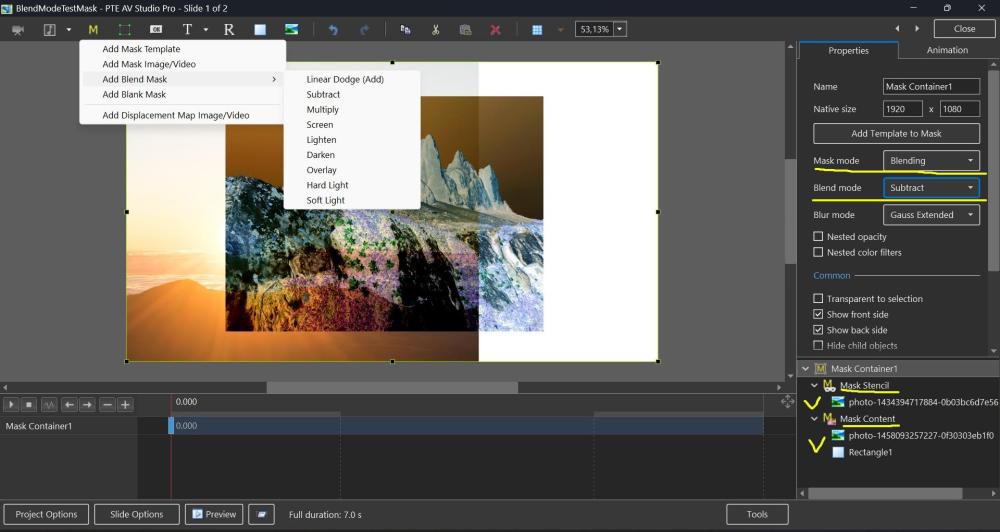
Hi everybody, The idea of the Slideshow was the illustration one of the new PTE V.12 feature-Blending Modes. This is basically variations of the one Style--Screen Blending Mode. The set of pictures placed in the Stencil Container and the Background Composition-in the Mask Content. There's some whistles and bells here and there also to make it looks more cinematic. To my mind, of course. If you like it--there's The Link. Just replace the files marked "Replace Me" with yours Media. Best Alex558 points
-
Hi, In PTE AV Studio 12 we've added a new "Blending" mode to the Mask container with support for 9 blend operations: Linear Dodge (Add), Subtract, Multiply, Screen, Lighten, Darken, Overlay, Hard Light, and Soft Light. To use: place the first image into the Stencil, and the second image into the Content of the Mask container. You can add video, text object, rectangle object, or multiple objects (several images, for example). Watch a video example. Click the play button: BlendMode.mp4 BlendMode.zip
 8 points
 -
Hi everybody, Here's a Slideshow I think is good to memorize a family vacation. Just replace the files marked "Replace me" with Photo or Video of your choice. You can find them in Folders marked ".EDIT" Note you have to adjust Location and Size of the replacement. The Link provided. Best Alex 558 points
-
I hope you like the transitions for PTE. https://javier-pteavstudio.blogspot.com/8 points
-
Hi, I wish you a happy New Year and good health! New creative ideas, new projects in PTE AV Studio, and new travels. Our planet is a small fragile house in the endless ocean of Space. One planet for all people. I dream about peace and cooperation among all people from all countries. Thanks for your support
 8 points
 -
Hi, We wish you a Merry Christmas and Peaceful New Year! Warm regards, Igor,8 points
-
Hello to all forum members. I bring to your attention a festive Christmas video. Description and download link for the YouTube video. Congratulations on the wonderful upcoming holidays. I wish you creative success and good health.8 points
-
Hi, PTE AV Studio 12 Pro (Beta) is available all members of this forum: Download For Windows: https://files.wnsoft.com/test/pte12abc/pteavstudio-setup.exe For Mac: https://files.wnsoft.com/test/pte12abc/PTE-AV-Studio.dmg PTE AV Player for Mac: https://files.wnsoft.com/test/pte12abc/PTE-AV-Player.dmg System Requirements Windows 10 or Windows 11. macOS 11 Big Sur - macOS 26 Tahoe (Apple Silicon or Intel chip). Important notes You can keep your existing version of PTE AV Studio 11.0 and use both versions together. We recommend to untick an option “Associate .pte projects...” when you install a Beta version. For new customers. If you purchase version 11.0 today or later, you'll get a free upgrade to a final version 12.0 when it's ready (in May-June, 2026). We continue to work on version 12.0 and plan to add new features and new slide styles before the final version. _________________________________________________ What's New in PTE AV Studio 12 Pro: Slow-Motion and Video Speed Control Take complete control over video playback. Adjust video speed using key points to speed up, slow down, or freeze the action exactly where you need it. Insert pauses inside your video clips to emphasize key moments. Learn more The new frame interpolation creates smooth slow-motion effects by blending frames together, eliminating jerky playback when slowing down your footage. (Pro version only) Learn more Modern Video Formats and AV1 Encoder Create content for social media and the web. PTE AV Studio 12 adds full support for vertical video (9:16 for YouTube Shorts, TikTok, and Instagram Reels) and square format (1:1 for Instagram posts). New resolutions including 2560x1440, 1080x1920, 720x1280, and 1080x1080 cover all modern platforms. The "Auto" resolution preset automatically matches your project settings for quick exports. The revolutionary AV1 encoder produces videos up to 50% smaller than H.264 while maintaining the same visual quality, making it perfect for web publishing. The improved Video Export interface with "Show/Hide Advanced Options" keeps things simple yet powerful. The "Fast decode (web)" option creates optimized videos for quick loading and playback on your website. You can even pause video encoding and resume later. Improved Video Playback Smoother playback and better audio/video synchronization for variable frame rate (VFR) videos, commonly used by most modern smartphones in H.264 and HEVC formats. HDR video support (HLG and Dolby Vision, Rec.2020 color space). AV1 video playback is now hardware accelerated, significantly reducing CPU load when previewing projects with AV1 footage. On Windows this requires graphics cards from 2020 or newer (NVIDIA RTX 3050+, AMD RX 6000+, Intel Arc or 11th Gen+ integrated graphics); on macOS, an Apple M3+ chip. Improved Chroma Key for Video Clips The chroma key function for video clips has been completely rewritten. It now works reliably with all popular background colors: green, blue, red, and more. Background removal quality is significantly improved. Edge handling is especially enhanced: color spill is eliminated and object outlines are clean and sharp. Learn more HEIC and AVIF Image Support HEIC, the format used by iPhone for storing photos by default, is now supported on Windows. Windows users can now import iPhone photos directly into their slideshows, without converting them first. HEIC was already supported on macOS in previous versions. AVIF support is now available on both Windows and macOS, covering the modern web image format used by many websites and image services. New Creative Effects The Dynamic Gradient map creates color transformations and artistic looks. Learn more Blending modes for the Mask container: Linear Dodge (Add), Subtract, Multiply, Screen, Lighten, Darken, Overlay, Hard Light, Soft Light. (Pro version only). Learn more The Chromatic Displacement map adds glitch effects and distortions for modern, eye-catching visuals. (Pro version only) The Instant speed modifier disables interpolation between keyframes for snappy, precise animations. Learn more Quick Search. New Slide Styles and Transitions Find the perfect slide style or transition instantly. Type a keyword and PTE AV Studio will show you matching results immediately. No more scrolling through hundreds of options. Just type "zoom", "push", or "fade" and get what you need. You can also filter slide styles by the number of images they require, making it easy to find styles that match your current selection. New transitions: Spots, Push Smooth, Rotating Linear Wipe. New slide styles: Zoom Out with Fade, Brush Strokes - Frosted Glass. Learn more Sound Object & Built-in Library Create engaging slideshows with impactful sound effects. The new Sound object lets you play short audio files to enhance your slideshows and AV shows. Choose from our built-in Sound Library with camera shutters, clicks, page turns, and whooshes, or import your own custom audio files. Add whoosh sounds for fast transitions, subtle clicks when images appear, or any other short audio effects that bring your slideshow to life. Adjust sound volume for individual video clips and sound objects with precision. Learn more Voice Recording on Mac Mac users can now record voice-overs directly in PTE AV Studio without external tools. Faster Project Backups & 2 GB+ ZIP Support Back up your projects 3-4 times faster, saving precious time when archiving large projects with hundreds of high-resolution images and video clips. The Create Backup in ZIP command now correctly handles projects with multiple files that share the same name in different folders. Added support for creating ZIP archives of projects larger than 2 GB. Other Improvements Blur and Unsharp mask can now be adjusted separately for parent and child objects. Export Slides to Images can now include transition effects. Hold Shift while dragging a sound volume keypoint in the Timeline to adjust it with finer, slower precision. Learn more Transition group expand/collapse state is now remembered. Custom transitions: added "Duration (in the editor)" parameter, allowing transitions to be created and previewed at any length, not just 2 seconds. Improved interpolation between keyframes for long panoramas when using the Smooth modifier or other speed modifiers. Improved installer on Windows: fonts now render larger and are easier to read at 125%+ display scaling (HiDPI support), and the installer now respects the system Dark Mode theme. Added a Japanese translation. P.S. Click the "Follow" button at the top of this page to receive notifications about new Beta releases.7 points
-
Hi everybody, Love this song. Tried to find suitable Styles to fit. Here's the result. Note, this is 16x9 Aspect ratio, so choose pictures accordingly or crop the aspect to 16x9. Best Alex557 points
-
Hi Peter. I made a style similar to yours, but not exactly like the original. This is the simplest version with straight corners of the vignette. There is a style file and a project file in the project folder. I have included the project file in case you want to modify the design according to your preferences. The style name is random, but its animation resembles a similar preset with alternating images in After Effects. Photos in the style are cropped with a 16x9 aspect ratio. Keep this in mind when using photos with other sizes, or disable the "Crop" feature in the project and save the style with a different name. Download link:https://drive.google.com/file/d/12wYNLz4ig5TCFzy7ncy9DyGGdoom0N39/view?usp=sharing7 points
-
This is a simple example of working with text. The program's features allow you to make similar animations. It was possible to complicate the appearance of text layers with masks, but it would be difficult for an inexperienced user to understand. Of the three options I tested, the last one turned out to be the easiest, where a pair of frames rotated 90 degrees relative to each other along the Y axis and placed in the third frame, allowing you to move the entire composition vertically. I will consider any comments as an aid in studying the program.7 points
-
Transitions Broken Glass with Sound V.12 Camera Transitions_V12 Hi everyone, these are transitions I've modified for the new version of PTE 12 with sound; I'm leaving a link in case you want to try them. https://javier-pteavstudio.blogspot.com/7 points
-
15 transitions with camera sound, for this new version of PTE V 12, I hope you like it. Download: https://javier-pteavstudio.blogspot.com/6 points
-
The Online Help for Version 12 has been updated in line with the "What's New in Version 12" posted by Igor: https://docs.pteavstudio.com/en-us/12.0/v12_wn/main Links have been added to each paragraph as appropriate. There is obviously more work to do but the OH is an ongoing and evolving document and if anyone wishes to contribute it will be hugely appreciated by the PTE community. "How to" articles are largely driven by Forum Posts for which there is no obvious answer in the OH and these will continue to be added when they arise. DG6 points
-
Hi, Release Candidate 1 for PTE AV Studio 12 is available today, and the final version is scheduled for release within a week. P.S. Today marks exactly 27 years since the release of version 1.0 on July 2nd, 1999.6 points
-
Hello everyone. A retro-style design project for you. Download link and description on YouTube.6 points
-
20 years ago, on May 1st, we published the first Beta version of the legendary PicturesToExe 5 with keyframe animations. V5 was released on June 18th, 2007.6 points
-
I put together a transition. Rotating strips. Version 12 has this new transition. If you stick with version 11 for whatever reason, you'll have the new transition, just like in version 12. Download the transition to YouTube.6 points
-
Happy New Year to everyone. I hope 2026 brings us world peace and lots of photos to use in PTE 12. Rosemary6 points
-
Happy New Year! May there be peace, prosperity, and good health for 2026!6 points
-
6 points
-
A collection of videos to wish you a Merry Christmas and Happy New Year 2026. All videos are themed around winter, Christmas, New Year, and Christmas miracles. Merry Christmas and Happy New Year to everyone! I wish you all good health, joy and happiness, love, kindness, success in all your endeavors and more frequent meetings with friends! Enjoy watching.6 points
-
Hello everyone Best wishes for a safe and happy Christmas and a wonderful New Year. I have started creating an AV of my travels this year. I was aiming for one photo per week but did not quite achieve my goal. Most weeks I take hundreds if not thousands of photos depending on location and subject. I spent 6 weeks in Europe in April - June, so there are a few more from this trip to the other side of the world. The images are captured on a mirrorless camera, drone, mobile camera/phone and 360 camera. This may not be the final AV but it will be very close. Cheers Mark6 points
-
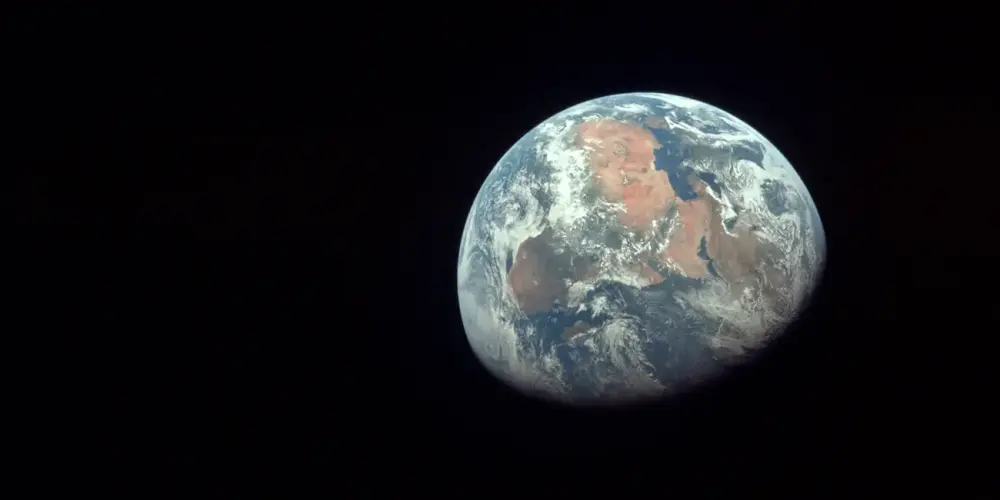
Igor has asked me to post a link to my new AV sequence. The background is that my AV Group had a challenge to produce a new sequence using some form of AI, either images, video or audio. I decided to make one about Yuri Gagarin's pioneering space flight in 1961. Very few images exist of this, so the use of AI was a good option to re-imagine the story. See what you think:5 points
-
Testing...5 points
-
Version 12 of PTE AV Studio introduces a new effect mode: Gradient Map, applied to a Mask Stencil. This mode makes it possible to create dynamic visual effects using a grayscale image as a control mask. A preset called Spots is included, with fully customizable parameters. I am offering a tool that generates grayscale images specifically designed to be used as control masks for the Gradient Map effect. This generator creates images made of gradient‑based bands and provides control over the following parameters: - band structure (number and orientation) - grayscale gradient ranges (start/end values + modes) - wave distortions (sine or triangle) - natural perturbations (Perlin noise) - reproducibility (seed) - high‑definition image export This tool therefore helps expand the library of available masks for PTE AV Studio 12. The interface is originally in French, but a language selector on the web page allows you to translate it into another language. The translation may not always be perfect, but it should help you understand the meaning of the parameters. Here is the link to the tool, the parameter description page, and a demonstration showcasing several example masks generated with it: - parameter description link : https://diaporashop.com/generateur-de-bandes-en-degrade-gris/ - direct link to the generator tool : https://diaporashop.com/bandes-en-degrade-gris/ I hope you find this tool useful. A video demonstration of the results achieved: Pascal.5 points
-
Very fine work. The text characters in both white and black, which allows for subtraction, work very well. More testing with masks.5 points
-
Thanks to Alex55 for the Viewfinder Template. I used it to put together a few pix from a show photo shoot. A higher resolution version is on my photo site. Majestic Tango, Barclay Theater, University of California Irvine Majestic Tango Behind the Camera-template anestudio55-720_2.mp45 points
-
AI is wrong (how surprizing !). The very first (very basic) version of PTE has been released on July 2nd, 1999. Version 1.60 was published on February 24, 2000; version 2.0 was releleased on March 21, 2000. And so on, and so on. There's a very well informed story (based on Igor's own statements) written in 2008 by Marcel Boi, French AV author, which I attach in PDF; of course, it's in French, which is good for you. "PTE - what a story" is the translated title, it counts 14 A4 pages with many screenshots of the new features of the different versions of PTE. pte_quelle-histoire.pdf5 points
-
Hi, We've already implemented 2 improvements in V12 Beta: 1. You can create a backup of a project in ZIP archive (or project template) that links files (images/audio/video) with the same file name (duplicate names) but in different folders. 2. Smart ZIP compression. Archive creation is now 3-5 times faster. We'll soon add support for creating project ZIP archives larger than 2 GB.5 points
-
Moscow's stunningly beautiful streets, squares, parks, and plazas, decorated for New Year and Christmas. Enjoy watching.5 points
-
Happy New Year to all. Peace and health!5 points
-
Happy New Year! I wish everyone health, happiness, and peace!
 5 points
 -
Hello everyone Thanks for commenting and feedback on the previous version of this. I made some changes to the previous version, so if you have 5 minutes to spare, have a look at this version.5 points
-
Hi everybody, Here's the Slideshow with the couple of Styles. Someone may find them useful. The link to the You Tube video and downloading files provided. Just replace Placeholders with Photo or Video of your choice. Best Alex555 points
-
Hi, We're glad to introduce a new PTE AV Studio 12 - a powerful software for photo slideshows and AV shows. What's New in version 12 The new version includes many improvements, new effects and creative possibilities: - Blending Modes (Multiply, Screen, Overlay, and more) - Video Speed Control and Slow-Motion with frame interpolation - Sound Object and built-in Sound Library - Export Vertical and Square Video for YouTube Shorts and other social media - New AV1 Video Encoder - HEIC Image Support for iPhone photos on Windows - Improved Chroma Key for Video Clips - New Dynamic Gradient Map effect in the Mask container - Quick Search in styles and transitions. New built-in slide styles and transitions And more. Read a full list of new features: https://wnsoft.com/pte-av-studio/whats-new-12/ Download for Windows and Mac: https://www.wnsoft.com/pte-av-studio/download/ Prices and Editions There are two versions: - PTE AV Studio 12 Pro - 145 EUR (VAT is included) - PTE AV Studio 12 - 74 EUR (VAT is included) Buy full version: https://www.wnsoft.com/pte-av-studio/buy/ Upgrades Upgrade from PTE AV Studio 10 or 11 Pro to PTE AV Studio 12 Pro - 48 EUR (incl. VAT) Upgrade from PTE AV Studio 10 or 11 to PTE AV Studio 12 - 35 EUR (incl. VAT) I hope that you will enjoy using the new PTE AV Studio 12! Thank you very much for your support and help with Beta testing! P.S. You can still find the Beta discussion here4 points
-
voici mon premier diaporama avec le logiciel PTE 11 "Here is my first slideshow using PTE 11 software." (Google Translate)4 points
-
Hi, In PTE AV Studio 12 hold the Shift key while dragging a sound volume keypoint in the Timeline to adjust it with finer precision - the keypoint moves 3x slower than your mouse cursor, giving you 3x better accuracy when fine-tuning the value. Watch a video demonstration. Click the play button: audio-keypoints-with-shift-key.mp44 points
-
Don't worry, be happy. 😉 Description and download link for the YouTube video. https://www.youtube.com/watch?v=SCZmOUHG-eU4 points
-
You can easily do all of this in PTE. Simply start a New Project, edit your clips so that each portion is on a separate Slide. You can then add whatever Transition you need between each one. Publish as an MP4 & then insert that into your final Project. I always use PTE to edit my video clips & find it quick & easy. Jill4 points
-
I really like the idea of multiple slide/object tracks. We've already written some of the code. One of the most important ideological questions is slide duration and transition duration. You can already see (V11) the difference in the timing concept for slides and audio clips - they are calculated differently. I'd like to discuss this topic after the release of V12.4 points
-
Hi, Please share your impressions of version 12.0 Beta. If you find any problem, please start a new topic for each one. Happy Christmas! Igor,4 points
-
Absolutely love the sample project included with the new beta! Will be wonderful to explore many of the new features by going through those images and transitions. Much easier than aimlessly clicking buttons or printing out Igor's description sheet and looking for the updates. Great job and beautiful images, Barry Beckham! And I love the winking koala at the end! One of the changes that stands out to me so far is the ability to use a parent object to change the colors and opacity of it's associated children. Having to modify those settings for each one of those child images / objects in the past was a bit annoying.4 points
-
Lake Ainsworth is a 12-hectare freshwater, tea-tree lake in Lennox Head, NSW, known for its dark, tannin-stained water from surrounding paperbark trees. It is a popular spot for family-friendly swimming, paddleboarding, kayaking, and canoeing, with amenities like paths, barbecues, and picnic tables. The lake is located at the northern end of Pacific Parade in Lennox Head, NSW. The area has undergone recent improvements and features pathways, picnic tables, barbecues, and toilets. The lake can be affected by blue-green algae, which can be harmful.4 points
-
Sort the images before importing by Date/Reverse order or Name. Apply the style to the images before or after importing. Publish as a video to view. Many newer cameras have a video timelapse option. Camera shutter speed should be 1/2 capture frame rate to add motion blur. If you capture at 5 second intervals the shutter speed should be 2.5 seconds. Thanks, Tom Update: Sep. 5 2025 Added 15 fps and 24 fps styles. Update Sep. 6, 2025 Added frame blending (dissolve transition) style for smoother video. Blending attempts to add synthetic motion blur but can create ghost images for fast moving objects. I also renamed regular version to quick. Update Sep 10,2025 Frame blending moved to another post in this thread. Timelapse Quick 30 fps.ptestyle Timelapse Quick 24 fps.ptestyle Timelapse Quick 15 fps.ptestyle4 points
-
Beautiful views of the Golden Autumn in the European part of Central Russia. Download the project: https://disk.yandex.ru/d/H3Apvu67_c2bVA Enjoy viewing.4 points